Introduction to Qualtrics
The Survey flow section of Qualtrics allows you to view the block or blocks of questions in your survey, and to add in other elements. If you only have one block of questions you won’t need to make use of this section, but for surveys with more than one block it allows the blocks to be easily rearranged, and for the survey flow to be customised – such as through branching logic.
To access the survey flow section of Qualtrics, click on the ‘Survey flow’ icon on the navigation menu at the far left of the screen:

This page details some of the functionality available in this section of Qualtrics.
In brief, it covers how to do the following:
- Edit the survey flow
- Add branch logic to a survey
- Add embedded data to a survey
Editing the survey flow
In the survey flow section of Qualtrics you will see the question blocks that currently appear in the survey, and can add new blocks, move blocks, duplicate and delete blocks as desired. You can also add in other elements by clicking Add Below or + Add a New Element Here, both of which will display a list of options:

Aside from blocks, the most commonly used of these elements are typically Branch and Embedded Data, and these are detailed in the following sections. Alternatively, to find out more about other elements click on the relevant link to view information on the Qualtrics support site:
Branch logic
Branch logic is used to conditionally display blocks of questions (or other survey elements) based on information such as question responses. It allows you to customise the flow of your survey to best suit the respondent. You can do this in the Survey flow section of Qualtrics by selecting Add Below or + Add a New Element Here, selecting Branch, selecting Add a Condition and specifying a condition based on a question, embedded data or other option. You can then add or move other blocks or elements below this branch, so that they will only be reached if the specified condition is met. You will then need to select Apply to save any such changes before leaving the Survey flow section.
Example
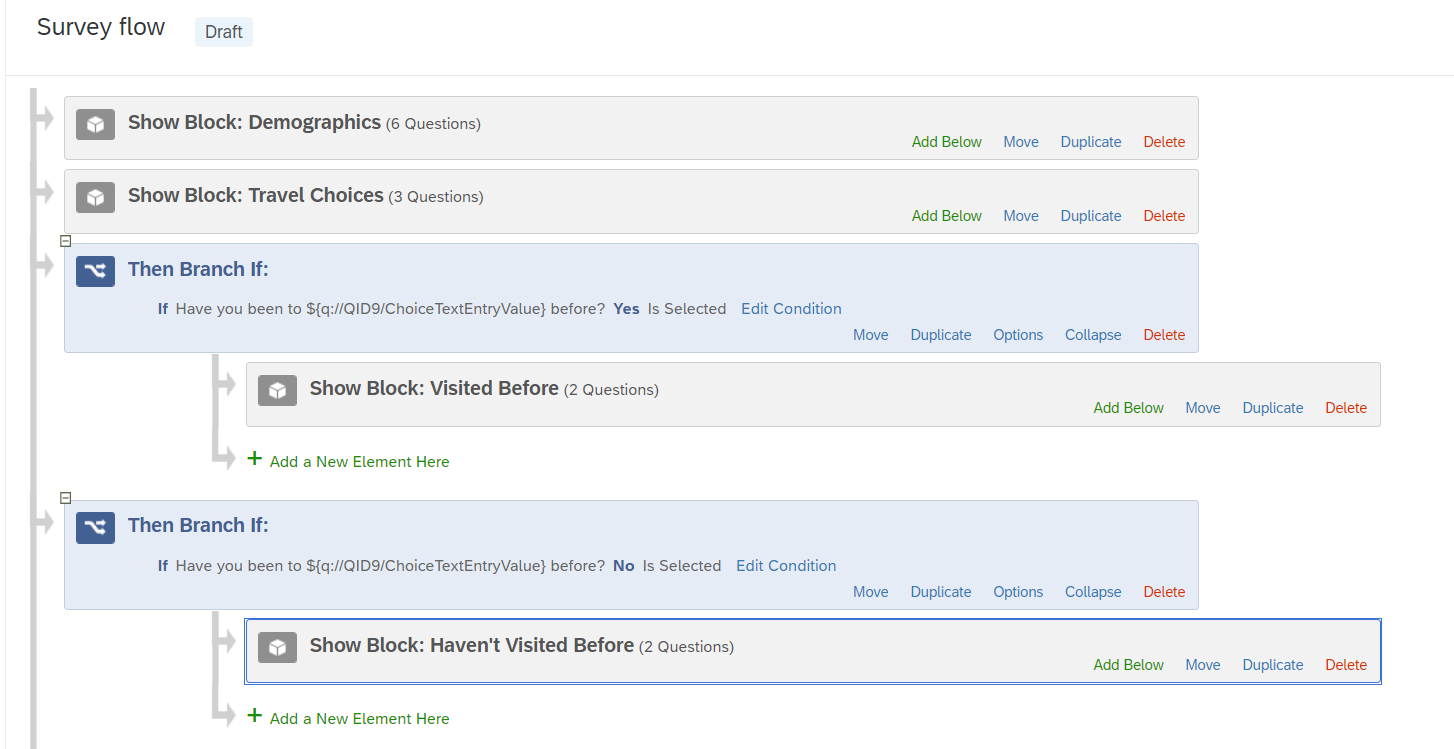
Let’s customise the Test survey by asking the participant whether or not they have ever previously visited their chosen holiday destination, and directing them to different blocks of questions accordingly.
To do this, first return to the survey Builder and add a new multiple choice question to the ‘Travel Choices’ block which asks the participant whether they have visited their chosen holiday destination before (use piped text, as detailed in the Survey builder page, to include the name of the destination in the question). Include Yes or No response options, and force a response to this question by toggling on Add requirements and keeping Force response selected (on the Edit question menu on the left of screen), if you want to ensure the participant follows one of the branching options. Alternatively, if you don’t force a response then the participant will just be taken to the next block after the branching blocks (or to the end of the survey if there are no other blocks) if they don’t answer the question.
Now add a new block below the ‘Travel Choices’ block by selecting Add Block, and rename it Visited Before. Add at least one multiple choice question, with relevant answer options, to this block; for example, asking how many times the participant has been to their selected holiday destination and how long ago they last visited (use piped text to display the name of the destination in the questions again).
Similarly, add another block below this one called Haven’t Visited Before, and add some ‘Multiple Choice’ questions with relevant answer options; for example asking whether they know anyone who has been to their selected holiday destination, and whether they plan to visit there in the next year. If desired, re-number all questions at this point by selecting the Tools drop down menu at the top of the survey, choosing Auto-number questions and selecting the type of numbering you wish to use.
Next go to Survey flow and add a branch below the ‘Travel Choices’ block, by choosing Add Below and selecting Branch. Repeat the process to add another branch directly above the first one. Select Add a Condition on the top branch and then set up the required condition by selecting the relevant question (i.e. the one asking whether they have visited the destination before), selecting Yes and Is Selected. Click OK, then select Move on the ‘Visited Before’ block and drag it to sit below the top branch.
Finally, click Add a Condition on the bottom branch and then set up the required condition by selecting the relevant question (i.e. the one asking whether they have visited the destination before), selecting No and Is Selected. Click OK, then select Move on the ‘Haven’t Visited Before’ block, and drag it to sit below the bottom branch.
Select Apply to save the changes. The survey flow should look as follows:
Go back to the survey builder and preview the survey to check that it works as expected.
Note that further information can also be found on the Branch Logic page of the Qualtrics support site if required.
Embedded data
Embedded data allows you to record extra information in your survey, in addition to the participant’s responses. For example, you could use embedded data to store information that is saved in a contact list or to record a participant’s score (for more information on contact lists, see the Distributing your survey page of this module).
You can add embedded data in the Survey flow section of Qualtrics by selecting Add Below or + Add a New Element Here, then selecting Embedded Data. You then need to assign both a name (referred to as a field) and a value to the embedded data. To assign a name click on Create New Field or Choose From Dropdown…, then either choose the name from the drop down menu or type your chosen name in the box. You will then need to set the value of the embedded data by clicking the blue Set a Value Now text, then either entering a custom value or selecting Insert piped text from the drop down menu and choosing where to pipe the value from.
Once you have added embedded data to your survey you can use it in a few different ways, including as piped text and as part of branch logic or display logic. For an example of creating embedded data to record a participant’s score and then using it as part of display logic, see the Scoring section of the Survey options page of this module.
Note that further information can also be found on the Embedded Data page of the Qualtrics support site if required.