Introduction to NVivo
You can use queries in NVivo to search your project materials in a range of different ways and for a variety of purposes, from searching for specific words or phrases, or for frequently occurring words, in order to inform your coding; to searching material that has been coded to combinations of codes or to codes for particular classification attributes, in order to uncover patterns in the data. This page looks at some examples of different queries.
In brief, it covers the following:
- How to conduct a text search query to search for specific words and phrases in selected materials
- How to conduct a word frequency query to find the most frequently occurring words in selected materials
- How to use coding queries to find content that has been coded to combinations of codes, cases or attribute values
- How to use matrix coding queries to make comparisons and look for patterns in your data
- How to use crosstab queries to compare codes between different values of a classification attribute
Note that in order to follow the examples in this page, you should make use of the Environmental Change Down East sample project (as detailed in the Sample projects page).
Text search queries
A text search query is used to search project items and folders (for example all files, files in a specific folder, material coded to codes, etc.) for specific words and phrases.
To run a simple text search query, for example to search for the word ‘erosion’, do the following:
- Select Query Criteria in the Navigation View (in the ‘Queries’ group), then right click in the white space in the List View and select ‘New Query’ and ‘Text Search’ (alternatively, select the ‘Explore’ tab on the ribbon at the top of the screen, then select the ‘Text Search’ option under it)
- Choose where you would like to search; the default is ‘Files & Externals’, but if you would like to search specific items or folders then click on the appropriate button and make your selections in the dialog box that appears
- Enter the text to search for in the ‘Search for’ box (for example ‘erosion’); you can enter multiple words and/or can use special characters and operators to assist with your search using the ‘Special’ button if required
- You can alter the ‘Spread to’ from the default ‘None’ to a different context if you would prefer to see more, or less, of the context of the word(s) in the resulting query
- Choose how precise you wish to be with words in your search using the ‘Find’ slider on the right (for example choose to search for Exact matches, With stemmed words, With synonyms, etc.)
- Select ‘Run Query’
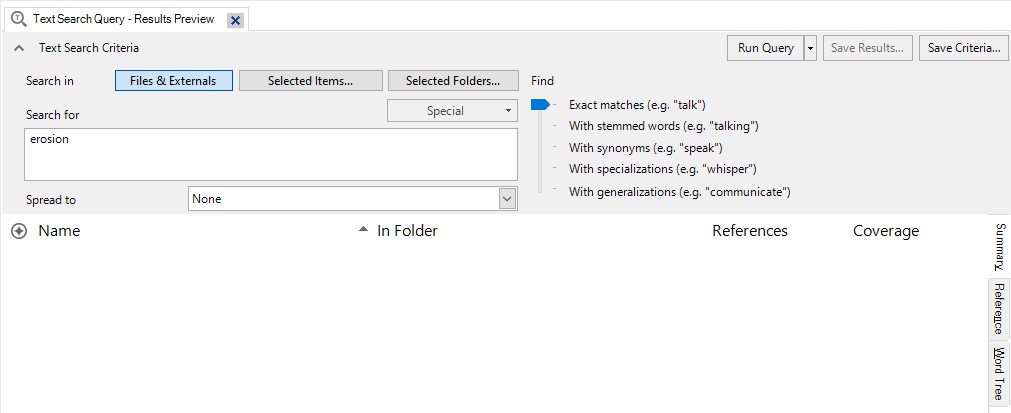
The results of the text search query will then be displayed underneath in a series of tabs:
- The Summary tab is the default display tab, showing all files that contain the search word(s), and the number of occurrences.
- The Reference tab displays a snippet of the context of each instance of the search word, sorted by file (note that to change the context to view more, or less, you can highlight and then RHC on the selected instance(s), then select ‘Coding Context’ and change it; alternatively, you can always run the query again with a different ‘Spread to’ option if preferred, and/or you can click on the file location link to see the results highlighted in the original document).
- File-specific tabs (for example PDF, Dataset) do the same, but each file is displayed on a separate page.
- The Word Tree tab displays the results of the search in a word tree, with the search term in the middle and the preceding and subsequent text on either side (listed alphabetically). Double clicking on any part of a sentence will open it in the file where it appears. The word tree can be exported, printed or copied by right clicking on it and selecting the required option from the menu.
If you want to keep a copy of your text search query, you can choose to either save the results as a new code (or merged with an existing code) or to save the query criteria (for future use), by selecting the ‘Save Results…’ or ‘Save Criteria…’ buttons respectively. For example, to save the query criteria of your most recent search do the following:
- Select ‘Save Criteria…’
- Give a name to the new query criteria (for example Erosion), and a description if required
- Click ‘OK’
You can also filter a text search query according to a particular file classification type or types, or according to a particular attribute of a file classification. For example, to run the previous query again but this time only for items classified as a ‘Reference’ with the Year attribute set to 2010, open the saved Erosion query criteria (located in the List View of Query Criteria) and do the following:
- For the ‘Search in’ option, this time choose ‘Selected Items…’
- Select the ‘Filter’ button (bottom left hand corner)
- Tick ‘Classified items where’ (bottom option)
- Click ‘Select…’, choose the file classification and then attribute that you want to filter your search by (in this case ‘Reference’ and Year), then select ‘OK’
- Choose the filter criteria (in this case choose ‘equals value’)
- Choose the value of the attribute you want to filter your search by (‘2010’)
- Select ‘Find Now’
- When you look through the project items in the ‘Select Project Items’ dialog box now (by clicking on the names of folders in the list on the left hand side, clicking on the ‘+’ signs to open sub-folders as required), everything except items that adhere to the filter will be greyed out. So you can either select the applicable non-greyed out item(s), or (easier) just tick the ‘Files’ box and all the non-greyed out files will be automatically ticked (do this now).
- Select ‘OK’
- Adjust the other search options as required (as detailed previously)
- Select ‘Run Query’
The search results will only include occurrences of the word ‘erosion’ in files of the type ‘Reference’ from the ‘Year’ 2010. You can then save these results as a code (if wished) as follows:
- Select ‘Save Results…’
- Choose whether to ‘Create Results as New Code or Case’ or ‘Merge Results into Existing Code or Case’
- Choose a Location; the default is to store the results code in the Query Results folder, but you can choose to store it in the Codes or Cases folder, or a sub-folder of these, instead (keep Query Results as the location for this example)
- Give a name to the new code (for example Erosion 2010), and a description if required
- Click ‘OK’
Word frequency queries
A word frequency query is used to determine the most frequently occurring words in various project items and folders, and to display them in different ways.
To run a word frequency query for project materials in the Interviews folder, for example, do the following:
- Select Query Criteria in the Navigation View (in the ‘Queries’ group), then right click in the white space in the List View and select ‘New Query’ and ‘Word Frequency’ (alternatively, select the ‘Explore’ tab on the ribbon at the top of the screen, then select the ‘Word Frequency’ option under it)
- Choose where you would like to search; the default is ‘Files & Externals’, but if you would like to search specific items or folders then click on the appropriate button and make your selections in the dialog box that appears (for example to run the query for the Interviews files only, click on the ‘Selected Folders…’ button and tick the Interviews sub-folder in the Files folder, then click ‘OK’). Note you can also filter the query as detailed for text search queries.
- Enter the number of words you would like displayed (for example 20), and the minimum length (keep as 3)
- Choose how precise you wish to be with words in your search using the ‘Grouping’ slider on the right choose to search for Exact matches, With stemmed words, With synonyms, etc.)
- Select ‘Run Query’
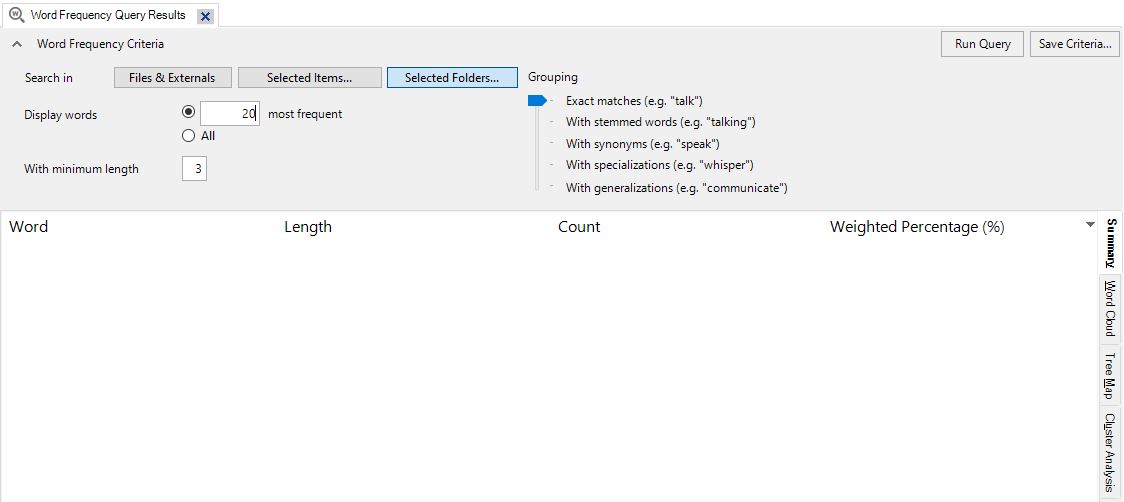
The results of the word frequency query will then be displayed underneath in a series of tabs, two of which are as follows:
- The Summary tab (the default display tab): this shows the most frequently used words and the number of occurrences.
- The Word Cloud tab: this displays the most frequently occurring words in a word cloud. You can change the look of the word cloud using the menu at the top of the screen, and can export, print or copy it by right clicking on it and selecting the required option from the menu.
Note that you can remove a particular word from the search results, and therefore also from the word cloud, by selecting it in the Summary tab and then either right clicking and selecting ‘Add to Stop Words List’, or choosing this from the menu at the top of the screen. Either way, press ‘OK’ and then run the query again to the view the updated results.
If you want to keep a copy of your word frequency query you can choose to save the results in the Queries Results folder (in the ‘Queries’ group) by selecting the ‘Save Criteria…’ button and naming the query as appropriate.
Coding queries
Coding queries allow you to search content that has been coded, either to code(s) or case(s), according to specific combinations of codes, cases or attribute values. For example, if you are interested in knowing what males think about infrastructure in the sample project you would do the following:
- Select Query Criteria in the Navigation View (in the ‘Queries’ group), then right click in the white space in the List View and select ‘New Query’ and ‘Coding’ (alternatively, select the ‘Explore’ tab on the ribbon at the top of the screen, then select the ‘Queries’ drop down menu and choose ‘Coding’)
- Choose where you would like to search; the default is ‘Files & Externals’, but if you would like to search specific items or folders then click on the appropriate button and make your selections in the dialog box that appears. Note you can also filter the query as detailed for text search queries.
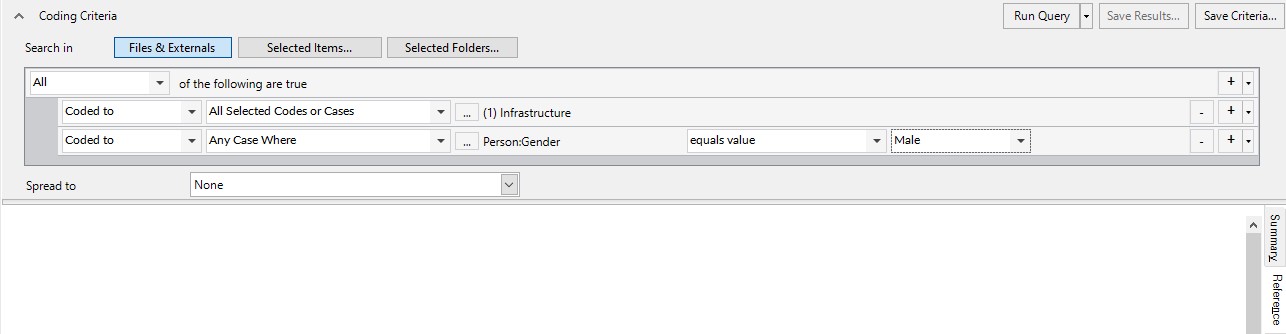
- Choose either ‘All’ or ‘Any’ for ‘of the following are true’, depending on if you want to search for material that meets ALL the conditions you are about to specify, or just ANY (for example to search for material that has been coded to the Infrastructure code and has ‘Male’ as the value for the attribute Gender, choose ‘All’)
- Next to ‘Coded to’ ‘All Selected Codes or Cases’, click on the button with the ellipsis and tick the applicable code(s) (for example Infrastructure), then click ‘OK’
- Click on the ‘+’ sign at the end of that row, to add a new condition
- This time, change the value in the second box to ‘Any Case Where’, click on the button with the ellipsis, click on the ‘+’ sign next to the case classification you are interested in (for example ‘Person’) to display the attributes, choose the appropriate attribute (for example Gender) and click ‘OK’
- Now choose which values of this attribute you want to use for the condition (for example keep the first new box as ‘equals value’, and change the second new box to ‘Male’)
- Select ‘Run Query’
The results of the coding query will then be displayed underneath in a series of tabs, as per a code. If you want to keep a copy of your coding query you can do so by choosing ‘Save Results…’ or ‘Save Criteria…’. In this case it would be appropriate to choose ‘Save Results…’ and to change the location to be a sub-code of the Infrastructure code (by clicking on ‘Select…’, clicking on the plus sign next to the Codes folder, selecting the Infrastructure code and pressing ‘OK’), so that the new code sits with the existing codes as a sub-code of the Infrastructure code.
Matrix coding queries
You can use matrix coding queries to make comparisons and look for patterns in your data. For example, you can look at how much and what content has been coded at intersections of different codes, and at how much and what content has been coded for different cases for different codes. For example, you can compare positive and negative attitudes to four different issues in the sample project by finding which content has been coded at the intersection of different codes, as follows:
- Select Query Criteria in the Navigation View (in the ‘Queries’ group), then right click in the white space in the List View and select ‘New Query’ and ‘Matrix Coding Query’ (alternatively, select the ‘Explore’ tab on the ribbon at the top of the screen, then select the ‘Matrix Coding Query’ under it)
- Choose where you would like to search; the default is ‘Files & Externals’, but if you would like to search specific items or folders then click on the appropriate button and make your selections in the dialog box that appears. Note you can also filter the query as detailed for text search queries.
- Choose what you would like displayed in the Rows of the matrix by clicking on the ‘+’ sign underneath the ‘Rows’ box. For example, click on ‘+’ and choose ‘Select Items…’, then click on ‘Codes’ to view the list of available codes and tick Balance, Community change, Economy and Infrastructure (for example) and click ‘OK’. You will then see a list of codes that will display as rows in the matrix; if there are any you decide you don’t want after all then select and click the ‘-‘ sign.
- Now click on the ‘+’ sign underneath the ‘Columns’ box to choose what you would like in the columns; for example choose ‘Select Items…’ again, then click on ‘Codes’ to view the list of available codes, click on the plus sign next to the Attitude code, tick Negative and Positive and click ‘OK’. Again you will see a list of codes that will display in the matrix, this time in the columns; if there are any you decide you don’t want after all then select and click the ‘-‘ sign.
- When you are happy with the selected options choose ‘Run Query’.
Once you have your matrix, to view the codings for each intersection (cell in the matrix) you can double click on it. You can also choose to colour code the matrix according to which intersections have the most and least coding by selecting the appropriate cell shading option from the ribbon, and can save the matrix by choosing ‘Save Results…’ or ‘Save Criteria…’
Crosstab queries
As with a matrix coding query, you can use a crosstab query to make comparisons and look for patterns in your data. While the two queries are very similar, and indeed can both be used in similar ways, a crosstab query is the best choice when you want to compare codes between different values for an attribute of a classification. For example, you can compare how often people from different townships responded to four different issues in the sample project as follows:
- Select Query Criteria in the Navigation View (in the ‘Queries’ group), then right click in the white space in the List View and select ‘New Query’ and ‘Crosstab’ (alternatively, select the ‘Explore’ tab on the ribbon at the top of the screen, then select the ‘Queries’ drop down menu and choose ‘Crosstab’)
- Choose where you would like to search; the default is ‘Files & Externals’, but if you would like to search specific items or folders then click on the appropriate button and make your selections in the dialog box that appears. Note you can also filter the query as detailed for text search queries.
- Keep ‘Crosstab codes against’ as ‘Attributes’ (you would change it to ‘Cases’ if you want to compare for different cases instead of attributes).
- Click on the ‘+’ sign underneath the ‘Codes’ box to choose what you would like in the rows of the table; tick Balance, Community change, Economy and Infrastructure (for example) and click ‘OK’
- Keep the ‘Classification’ as ‘Person’ and ‘Attribute1’ as Township
- When you are happy with the selected options choose ‘Run Query’
Once you have your table, to view the codings for each intersection (cell in the table) you can double click on it. You can also choose to colour code the table according to which intersections have the most and least coding by selecting the appropriate cell shading option from the ribbon, and can save the table by choosing ‘Save Results…’ or ‘Save Criteria…’