Introduction to NVivo
One of the most helpful features of NVivo is that it enables you to readily store related content from different project materials together in the same place, allowing you to more easily synthesise and discover patterns in the data. The process of doing this is called coding, and the related material is stored together in codes. The codes you create and the coding method you use will vary according to the purpose of your analysis, your research methodology and/or your personal preference, however generally you will create codes for particular topics, themes or concepts. Depending on the coding structure you use you may find that you will then code the same material to more than one code, and this can in fact be very helpful when it comes to identifying patterns in your data.
In brief, this page covers the following:
- Different ways of creating codes and coding material to them
- How to view the contents of the codes you have created
- How to uncode material from codes
- Using coding stripes and highlighting to explore which parts of files have been coded
- Creating sub-codes and moving codes, merging codes and renaming codes
Note that in order to follow the examples in this page, you can either use the project you created in the Setting up a project page, or you can make use of the Environmental Change Down East sample project (as detailed in the Sample projects page).
Creating codes and coding material
There are a few different ways you can create new codes, depending on whether you set up all your codes first and then code, or whether you create new codes as you code (you will likely find that you do a combination of both).
Before you begin
To create a code before you begin coding, for example a Development code, do the following:
- Click Codes in the Navigation View (in the ‘Coding’ group)
- Right click in the white space in the List View and select ‘New Code…’
- Type in the name of the code (for example Development), and add a Description and Nickname if you wish. You can also use colour for the code, for example to identify different members of the team.
- Click ‘OK’
(Alternatively, you can do this by selecting the ‘Create’ tab on the ribbon at the top of the screen, and then selecting the ‘Code’ option under it).
While coding
As an example of creating a code while coding, open the Maria and Daniel interview file (in the Interviews sub-folder of Files) and scroll down to the ‘Q.4. Community and environmental change’ heading, then continue scrolling to Elizabeth’s second question (on fisheries) and Daniel’s response. To code this response to a new code, for example a Fishing Industry code, do the following:
- Highlight the text
- Right click and select ‘Code Selection’
- Click in the box under ‘Create New:’
- This will create a ‘New Code’ button towards the bottom of the dialog box
- Type in the name of the new code (for example Fishing Industry)
- Click on ‘Code Selection to ‘New Code’’
You can then check that the text you selected has been coded to the new code by clicking on Codes in the Navigation View (in the ‘Coding’ group) and double clicking on the Fishing Industry code.
Existing codes
It is also possible to use the method above to code material to existing codes. Alternatively, another way of doing this is by dragging and dropping the text to the required code. For example, you can code text from the Maria and Daniel file to the Development code by doing the following:
- Open the file (for example the Maria and Daniel file)
- Highlight the part of the text you wish to code (for example a portion relating to development)
- Click Codes in the Navigation View (in the ‘Coding’ group)
- Hold down the left mouse button and drag the highlighted text to the code you wish to code to (for example the Development code)
Once you have done this, repeat the process for the Margaret file (also in the Interviews sub-folder of Files).
Note that you can also code material from existing codes (as opposed to material from files) to new or existing codes using the methods described above; this is known as ‘coding on’.
Exploring codes
You can view all the material you have coded to codes by opening the various codes in the Details View. For example, if you open the Development code you will notice that there are three tabs on the right hand side, which are as follows:
- Reference tab: this shows the content that has been coded from each file. It is the default display tab.
- Summary tab: this summarises the files that have been coded to the code.
- Text tab: this displays content that has been coded to the code from each text file individually.
Note that if there were any other types of files besides text coded to the code, such as picture files, then the content for each such file would be displayed in an appropriate tab (for example a Picture tab).
Uncoding material
The easiest way to uncode (remove) material you have previously coded to a code is to highlight the text you wish to uncode (either in the file or in the code), then right click and select one of the following from the dialog box that appears:
- ‘Uncode…’, to select the code(s) you wish to uncode from.
- ‘Uncode from Recent Codes’, to select the code(s) you wish to uncode from using the list of recent codes displayed.
- ‘Uncode from This Code’ (if you are in the code), to uncode from the code you are in.
Alternatively, if you simply wish to make a change to material that has been coded, such as a correction to spelling, make the change in the file itself. The change will then be made automatically in all the codes where the material appears.
Coding stripes and highlighting
Coding stripes and highlighting allow you to see how much of a file has been coded (and where it has been coded to, in the case of coding stripes).
Coding stripes are coloured stripes that you can choose to display in the Details View of a file (or a code if you have coded on). To display coding stripes, for example for the Maria and Daniel file, do the following:
- Open the file (or code) in the Details View
- In the ‘Document’ tab that appears, select the ‘Coding Stripes’ option (if it’s a PDF file there will be a ‘PDF’ tab)
- Select the type of coding stripes you would like, for example ‘Recently Coded’
- If you have colour coded your codes, you can display these by clicking on ‘Coding Stripes’ and then on ‘Item Colors’
For this particular example, you should observe that the coding stripes show which sections of the Maria and Daniel file have been coded to the Development, Fishing Industry and other recently used codes. You can also see how often each part of the document has been coded, by looking at the ‘Coding Density’ stripe (a darker colour indicates that section of the document has been coded more).
Highlighting works in a similar way, in that it allows you to see how much of a file (or code) has been coded (although not where it has been coded to). To highlight a file or code simply select the ‘Highlight’ option on the ribbon (next to ‘Coding Stripes’), and choose whether you would like to highlight all coding or selected items only.
Sub-codes and moving codes
If you decide at any time that you want to make changes to your codes, for example moving, merging and/or renaming them, you can do so with relative ease (although if you want to make a lot of changes it might be worth saving a copy of your original project first just in case). The procedures for making these changes are described in this and the following sections.
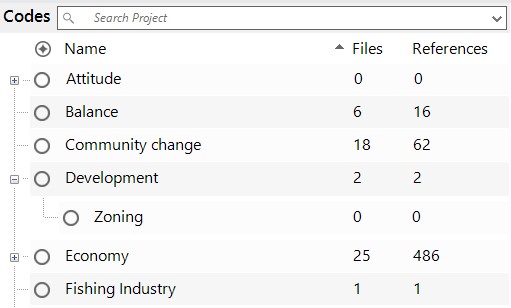
To create sub-codes of parent codes, simply right hand click on the parent code in the List View and select ‘New Code…’. Alternatively, if you want to rearrange your codes and make an existing code a sub-code of another existing code you can do that too. As an example, create a new code Zoning. To then move this code to sit as a sub-code under the Development code, do the following:
- Right click on the code you want to make the sub-code (for example Zoning)
- Select ‘Cut’
- Right click on the code you want to make the parent code (for example Development)
- Select ‘Paste’
The Zoning code then becomes a sub-code of the Development code:
Merging codes
Eventually you might also want to merge two or more codes (with similar themes) that you originally created as separate codes.
As an example, create a new code Sustainable Fishing, then open the Margaret file and code the portion of text pertaining to sustainable fishing (as part of Margaret’s response to Nancy’s third question on the future of the fishing industry under the ‘Q.2. Connection to Down East natural environment’ heading) to it.
To then merge this code with the Fishing Industry code, do the following:
- Right click on the code you wish to merge (for example the Sustainable Fishing code)
- Select ‘Cut’
- Right click on the code you wish to merge into (for example the Fishing Industry code)
- Select ‘Merge into Selected Code…’
- Click ‘OK’
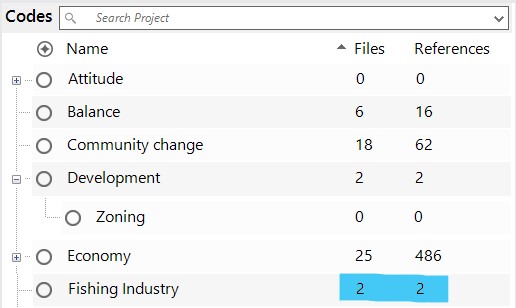
The Sustainable Fishing code is then merged with the Fishing Industry code, which should now have two references coded to it (the original Fishing Industry reference along with the Sustainable Fishing reference just coded).
Renaming codes
To rename a code, for example the Fishing Industry code to simply Fishing, do the following:
- Right click on the code you wish to rename (for example the Fishing Industry code)
- Select ‘Code Properties…’
- Enter a new name for the code (for example Fishing)
- Click ‘OK’
Alternatively, you can click once on the code to select it, then click again to make the name editable.