EndNote essentials
Export references from databases
Most research databases let you export citation details straight into EndNote. This means you can quickly create references without typing them yourself. When you are searching in a database, look for options like: Export, Direct export, Export to reference manager, Send to Citation Manager, or Export to RIS. These terms indicate that the database can send citation information directly to EndNote.
Each database works a bit differently, so if you are not sure how to export your references, check the Help section in the database for instructions.
It is important to preview your references to make sure they are formatted correctly in the referencing style you have chosen. EndNote is not able to tell if any information is wrong or missing, so you should always compare your references with the referencing guide or style manual to make sure they are accurate.
Manually create references
Sometimes you will need to add references yourself, especially for sources that cannot be exported from a database—like printed books, reports, or websites.
- Click on the New Reference icon
 or go to the References menu and select New Reference
- Choose a Reference Type from the drop down list. The default is Journal Article. Check the guide below to see which type to use for the Curtin EndNote styles
- Fill in the details for your item in the relevant fields. You only need to complete the fields required for your chosen referencing style
- When you have entered all the required information, click Save (Windows), or click the red cross in the top left corner of the New Reference window (Mac).
- The reference will now be added to your library.
Filling in the Author field
When you enter author names in EndNote, follow these rules:
- Use the format: Last Name, First Name. Example: Smith, John J.
- Put each author on a new line
- For corporate authors (like organisations or government departments), add a comma at the end of the name. Example: Department of Health,
- Use correct capitalisation when typing author names.
Reference types to select and fields to populate
This short guide explains which reference types to choose and which fields to fill in when using the Curtin EndNote styles for: APA 7th, Chicago 18th Author-Date and Vancouver.
Important tips:
- Always check your references in EndNote against the referencing guide to make sure they are accurate.
- When adding a reference to EndNote, you only need to enter the basic information. Unless this guide says otherwise, do not add punctuation or formatting such as: colons, full stops, brackets, italics, or words like In, Retrieved from, ed., or Ed. EndNote will automatically add these when it formats your reference.
APA 7th reference types
- For print items, leave the DOI/URL field blank
- If the author and the Source/Publisher are the same, leave the Publisher field blank
- Some reference types may require manual changes - see Convert to Plain Text
| Reference type | EndNote fields | Notes |
|---|---|---|
|
Audiovisual Material Use for: TV series For a single episode from a series use Television Episode |
Author, Cast, Year, Title, Type, Publisher, URL | Cast field: Enter the contributors role |
|
Blog Use for: Blog post |
Author, Year, Date, Title of Entry, Title of WebLog, URL | |
|
Book Use for: Book |
Author, Year, Title, Edition, Publisher, DOI or URL | |
|
Book section Use for: Chapter in an edited book |
Author, Year, Title, Editor, Book Title, Edition, Pages, Publisher, DOI or URL | |
|
Case Use for: Case |
Case Name, Year Decided, Reporter Volume, Reporter Abbreviation, First Page, URL | |
|
Conference paper Use for: Conference paper |
Author, Year, Date, Title, Type, Conference Name, Conference Location, DOI or URL | Type field: Enter Paper presentation or Poster presentation |
|
Computer program Use for: Specific Gen-AI chat, Gen-AI tools |
Programmer, Year, Access Date, Title, Description, Publisher, URL | |
|
Dataset Use for: Dataset |
Investigators, Year, Title, Distributor, DOI or URL | |
|
Dictionary Use for: Online dictionary or encyclopedia entry For an entry in a print dictionary or encyclopedia use Book Section |
Author, Year, Title, Editor, Dictionary Title, Edition, Publisher, Access Date, URL | Access Date field: Enter in the format Month Day, Year |
|
Film or Broadcast Use for: Film or Video |
Director, Year Released, Title, Medium, Distributor, URL | Distributor field: Enter the production company. Separate multiple companies with a semi-colon and space |
|
Journal Article Use for: Journal article |
Author, Year, Title, Journal, Volume, Issue, Pages, DOI or URL | |
|
Journal Article Use for: Journal article with an article number |
Author, Year, Title, Journal, Volume, Issue, Article Number, DOI or URL | Do not populate the Pages field |
|
Journal Article Use for: Journal article - Advance online publication |
Author, Year, Title, Journal, Label, DOI or URL | Label field: Enter Advance online publication |
|
Legal Rule or Regulation Use for: United Nations Treaties or Conventions |
Title, Date of Code Edition, Year, URL | |
|
Music Use for: Single song or track |
Composer, Year, Title, Form of Item, Album Title, Publisher, URL | Form of Item field: Enter Song |
|
Newspaper Article Use for: Newspaper article |
Reporter, Year, Issue Date, Title, Newspaper, Pages, URL | For a print newspaper, include the page number in the Pages field |
|
Online Database Use for: AMH, MIMs, Martindale, UpToDate |
Author, Year, Title, Publisher, Date Accessed, URL | Date Accessed field: Enter in the format Month Day, Year |
|
Pamphlet Use for: Brochure, Fact sheet or Pamphlet |
Author, Year, Title, Type of Work, Publisher, URL | Type of Work field: Enter the format, e.g. Brochure |
|
Podcast Use for: Podcast episode For a whole podcast series use Audiovisual Material |
Author, Year, Title of Podcast, Number, Type, Title of Show, Publisher, URL | Type field: Enter Audio podcast episode |
|
Press Release Use for: Press release |
Author, Year, Date, Title, Type of Work, Publisher, URL | Type of Work field: Enter Press release |
|
Report Use for: Government or organisation report, Australian Curriculum |
Author, Year, Title, Report Number, Institution, DOI or URL | For Australian Curriculum, enter the version in the Report Number field |
|
Social Media Use for: Facebook, Instagram etc. |
Username, Handle, Year, Post Date, Post Text, Type of Work, Provider, URL | Enter capitalisation and spelling exactly as it appears in the post Original Post field: if needed, include the format |
|
Standard Use for: Standards |
Institution, Year, Title, Document Number, Publisher, URL | |
|
Statute Use for: Act of Parliament |
Name of Act, Code, Sections, URL | |
|
Television Episode Use for: TV series episode For a whole TV series use Audiovisual Material |
Producer, Year, Episode Title, Season, Episode No., Series Director, Title, Distributor, URL |
Producer field: Enter the writer and director Series Director field: Enter the executive producers Manually add the contributors roles |
|
Thesis Use for: Thesis |
Author, Year, Title, Degree, University, Place Published, URL |
Degree field: Enter Doctoral dissertation or Master’s thesis Place Published field: Enter the database name |
|
Web Page Use for: Webpage on a website |
Author, Year, Title, Publisher, URL | |
|
Web Page Use for: Webpage on a news website |
Author, Year, Date cited, Title, Publisher, URL | Date Cited field: Enter Month Day article was posted |
|
Web Page Use for: YouTube or streaming video |
Author, Year, Date cited, Title, Type of Medium, Publisher, URL |
Date Cited field: Enter Month Day video was posted Type of Medium field: Enter Video |
|
Web Page Use for: Lecture |
Author, Year, Title, Type of Medium, Publisher, URL | Type of Medium field: Enter the format, e.g. iLecture, PowerPoint Slides |
Chicago reference types
- For print items, leave the DOI/URL field blank
- Some reference types may require manual changes
| Reference type | EndNote fields | Notes |
|---|---|---|
|
Audiovisual Material Use for: YouTube or streaming video |
Author, Year, Title, Publisher, Format, Extent of Work, URL | Enter Video in the Format field Enter the running length time in the Extent of Work field |
|
Blog Use for: Blog post |
Author, Year, Date, Title of Entry, Title of WebLog, Description, URL | Enter the word blog in the Description field if it doesn’t appear in the blog name |
|
Book Use for: Book |
Author, Year, Title, Edition, Publisher, DOI or URL | Enter EPUB in the Type of Work field if the book was accessed in EPUB format |
|
Book section Use for: Chapter in an edited book |
Author, Year, Title, Book Title, Editor, Edition, Publisher, DOI or URL | Enter EPUB in the Label field if the book was accessed in EPUB format |
|
Case Use for: Case |
Case Name, Year Decided, Reporter Volume, Reporter Abbreviation, First Page, URL | |
|
Conference paper Use for: Conference paper |
Author, Year, Title, Conference Name, Conference Location, Date, DOI or URL | |
|
Dataset Use for: Dataset, Dataset created using a company database |
Investigators, Year, Title, Dataset(s), Original Release Date, DOI or URL | For a dataset from company database, enter Dataset in the Dataset(s) field and include an include an Access Date in the format Month Day, Year |
|
Film or Broadcast Use for: Film or Video |
Director, Year Released, Title, Distributor, Date released, Format, URL | Add the contributor’s role in the Cast field, e.g. Director |
|
Generic Use for: News broadcasts, Company and industry report created using a database, Company and industry profile from a database, Lecture |
Author, Year, Title, Secondary Title, Date, Type of Work, Publisher, DOI or URL | |
|
Journal Article Use for: Journal article, Journal article with an article number, Journal article - Advance online publication |
Author, Year, Title, Journal, Volume, Issue, Pages, DOI or URL | For Advance online publication, enter ahead of print in the Type of Article field |
|
Music Use for: Song or album |
Composer, Producer, Year, Title, Volume, Album Title, Format of Music, Publisher, URL |
Producer field: Enter creator’s role, e.g. vocalist, band For single song, enter track number in the Volume field |
|
Newspaper Article Use for: Newspaper article |
Reporter, Year, Issue Date, Title, Newspaper, Name of Database, URL | If there is no author, you will need to manually alter the reference to comply with Chicago requirements If there is no suitable URL, include the Name of Database instead |
|
Pamphlet Use for: Brochure, Fact sheet or Pamphlet |
Author, Year, Title, Publisher, URL | |
|
Podcast Use for: Podcast episode |
Author, Year, Title of Podcast, Version, Title of Show, Type, Publisher, Date, Type, Running Time, URL |
Type field: Enter podcast Enter Author’s role in Narrator field, e.g. host |
|
Press Release Use for: Press release |
Author, Year, Date, Title, Type of Work, Date, URL | Type of Work field: Enter type of release e.g., Media release, Press release |
|
Report Use for: Government or organisation report, Annual report |
Author, Year, Title, Report Number, Institution, DOI or URL | |
|
Social Media Use for: Facebook, Instagram etc. |
Username, Handle, Year, Post Text, Provider, Post Date, URL | You will need to manually alter the capitalisation used in the post text to comply with Chicago requirements |
|
Standard Use for: Standards |
Institution, Year, Title, Document Number, Publisher, URL | |
|
Statute Use for: Act of Parliament |
Name of Act, Code, Sections, URL | |
|
Television Episode Use for: TV series episode |
Producer, Year, Episode Title, Season, Episode No., Title, Broadcast Date, Access Date, Network Name, URL | |
|
Thesis Use for: Thesis |
Author, Year, Title, Thesis Type, University, URL |
Thesis Type field: Enter Master’s thesis or PhD diss. For a thesis retrieved from a commercial database, enter the Database in the Name of Database and any identification number in the Document Number field. |
|
Web Page Use for: Webpage on a website |
Author, Year, Title, Publisher, Access Date, URL | If there is no date, enter n.d. in the Year field and include Access Date in the format Month Day, Year |
Vancouver reference types
- Enter access dates in the format Month Day, Year
- For print items, leave the DOI/URL and Access Date fields blank
| Reference type | EndNote fields | Notes |
|---|---|---|
|
Audiovisual Material Use for: YouTube or streaming video |
Author, Title, Type, Date, Year, Access Date, URL | Type field: Enter source name |
|
Blog Use for: Blog post |
Author, Title of Entry, Title of WebLog, Date, Year, Access Date, URL | |
|
Book Use for: Entire book |
Author, Title, Edition, Publisher, Year, Access Date, DOI or URL | |
|
Book section Use for: Chapter in an edited book |
Author, Title, Editor, Book Title, Edition, Publisher, Year, Pages, Access Date, DOI or URL | |
|
Case Use for: Case |
Case Name, Year Decided, Reporter Volume, Reporter Abbreviation, First Page | |
|
Conference paper Use for: Conference paper or poster |
Author, Title, Type, Conference Name, Date, Year, Conference Location, Access Date, DOI or URL | Type field: Enter the type of presentation, e.g. Paper, Poster |
|
Journal Article Use for: Journal article, Journal article with an article number, Cochrane systematic review |
Author, Title, Journal, Year, Volume, Issue, Pages, DOI or URL | Enter article numbers in the Pages field For Cochrane, enter Cochrane Database Syst Rev in the Journal field |
|
Journal Article Use for: Journal article - Advance online publication |
Author, Title, Journal, Original Publication, DOI or URL | Original Publication field: Enter Published online and the date |
|
Journal Article Use for: Journal article published in a supplement |
Author, Title, Journal, Year, Volume, Issue, Part/Supplement, Pages, DOI or URL | Part/Supplement field: Enter suppl and the supplement number or letter |
|
Newspaper Article Use for: Newspaper article |
Reporter, Title, Newspaper, Issue Date, Year, Section, Pages, Access Date, URL | |
|
Podcast Use for: Podcast episode |
Author, Title of Show, Title of Podcast, Date, Year, Access Date, URL | |
|
Report Use for: Government or organisation report |
Author, Title, Institution, Year, Report Number, Access Date, DOI or URL | |
|
Social Media Use for: Facebook, Instagram etc. |
Username, Post Text, Post Date, Year, Access Date, URL | Post Date field: Enter Month and day |
|
Statute Use for: Act of Parliament |
Name of Act, Code, Access Date, URL | |
|
Thesis Use for: Thesis |
Author, Title, Thesis Type, University, Year, Access Date, URL | Thesis Type field: Enter Dissertation or Master’s thesis |
|
Web Page Use for: Webpage on a website, Online reference works (AMH, Martindale, MIMs, UpToDate) |
Author, Title, Publisher, Dated Cited, Year, Last Update Date, Access Date, Access Year, URL | Publisher field: Enter name of website |
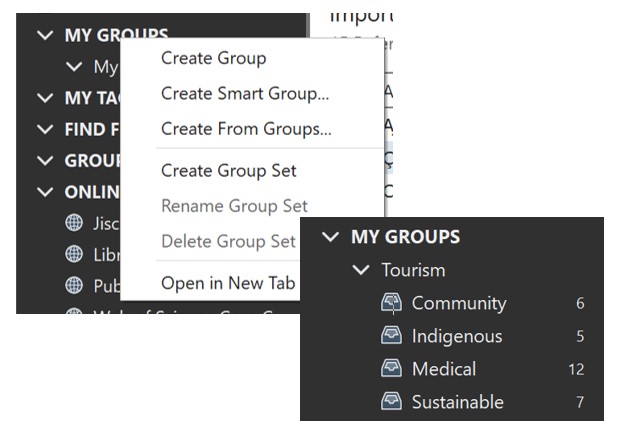
Organise references into groups
When you add new references to your EndNote library, they will first appear in the Unfiled group in the Groups panel. You can create your own groups to organise your references for different assessments or projects.
- Click Groups in the menu bar and choose Create Group, or right-click on My Groups in the Groups panel and choose Create Group
- Type a name for your group and press Enter
- To add references to your group, highlight the references and drag and drop them into the group, or right-click on a reference, choose Add References To, and select the group.
A Group Set helps you organise related groups within your EndNote library.
- Click Groups in the menu bar, or right-click on My Groups in the Groups panel and choose Create Group Set
- Type a name for the Group Set and press Enter
- You can right-click on the Group Set and choose Create Group to add a new group, or drag and drop existing groups into the Group Set.
Add tags
The Tags feature in EndNote lets you create custom labels to help organise your references.
- Click Tags in the menu bar and choose Create Tag…
- Type a name for your tag, choose a colour, and click Create Tag
- Select the reference you want to tag, then click Manage Tags in the Summary tab
- Choose the tag (or tags) you want to apply and click OK
- Tagged references will appear under My Tags in the Groups panel.