
EndNote-Online-printable-guide-UniSkills.pdf
EndNote Online
Table of Contents
Introduction
EndNote Online is a web-based reference management and bibliography-creation tool. It allows you to collect, organise and store references online, share references with other EndNote Online users, and create citations and reference lists in Microsoft Word.
This self-paced module introduces you to the key functionality of the EndNote Online application. Work through step-by-step or if you are already familiar with EndNote Online skip to the relevant section using the tabs above.
What you will learn
In this module you will learn how to:
- Set up an EndNote Online account
- Add references to your EndNote Online library
- Edit references
- Attach PDFs to your references
- Organise your references using groups
- Share references with other EndNote Online users
- Insert and edit citations in Microsoft Word
- Troubleshoot issues.
Please note: This module is primarily for Curtin students and staff who do not have access to the EndNote desktop software. If you are using EndNote Online with EndNote desktop, please see our EndNote Extras guide for information on syncing between the applications.
</div> Set-up
To begin using EndNote Online you will first need to set up an account.
- From the Library website select the Databases link and click on the Web of Science database
- Login to Web of Science using your Curtin ID and OASIS password
- Click on Register at the top right of the page
- Follow the prompts to create a Web of Science account
- Once registered, click on Products in the top toolbar and select EndNote from the drop down menu to access your EndNote Online library.

If you have an existing Web of Science account, use these details to Sign In then select Products in the top toolbar and EndNote to access your EndNote Online library.
Web of Science will send you a confirmation email when setting up your account. If you do not receive it, check the junk/spam folder in your email.
</div>
Navigate your EndNote Online library
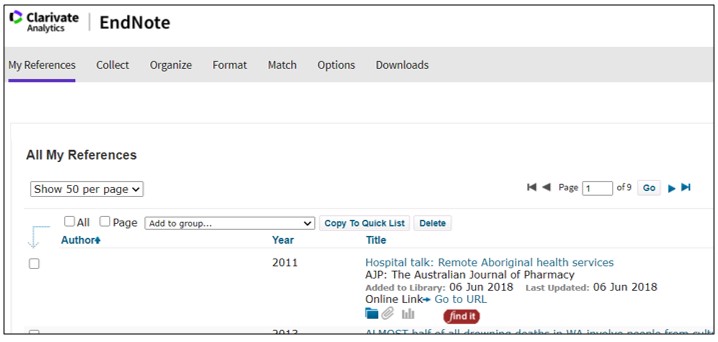
- My References displays the references in your EndNote Online library
- Collect allows you to manually add or import references to your library
- Organize allows you to create groups to organize your references and share groups with other EndNote Online users
- Format allows you to select a referencing style when working with Microsoft Word Add references
Direct export
Direct export provides a quick and easy way to transfer citation information from selected databases into your EndNote Online library.
Direct export from Web of Science
- Login to Web of Science and perform a search for your topic
- On the search results page, tick the boxes next to the articles you wish to send to EndNote Online
- Once all are selected, click the Export button which appears at the top of the results list and select the EndNote Online option
- You will be prompted to sign-in to your account (if you are not already logged in)
- Once logged in an Export Records to EndNote Online dialogue box will appear
- Click Export and the records will be added to your EndNote Online account.
Direct export from Ebsco databases
Direct export is available from databases including Business Source Ultimate, CINAHL Ultimate, Art Full Text and SPORTDiscus.
- Login to the database and perform a search for your topic
- On the search results page, click the blue folder icon next to the articles you wish to send to EndNote Online
- Once all are selected, click on Folder in the top toolbar
- Tick the boxes next to the references you want to export or Select All
- Click the Export option in the right hand menu
- Under Save citations to a file formatted for: select Direct Export to EndNote Web
- Click Save
- You will be prompted to sign-in to your EndNote Online account (if you are not already logged in)
- Once logged in, the references will be added to your account.
Always check the references exported from the databases to ensure the information is correct and complete. EndNote Online is not able to recognise if there is missing or incorrect data.
</div>
Manual entry
You will need to manually create references for sources where reference information cannot be exported from a database or is not available online, e.g. print materials, reports, webpages etc.
- Click on the Collect tab and select the New Reference option
- Select a Reference Type from the drop down list
- Enter the item details into the relevant fields
- Click Save.
Populating the author field:
- Use the format Last Name, First Name e.g. Smith, John J.
- Enter each author on a new line
- For corporate authors enter a comma at the end of the name e.g. Department of Health,
- Use the correct capitalisation when entering author names
The following documents outline which reference types to select and which fields to populate when using the Curtin EndNote styles:
Edit references
- Click on the My References tab
- Locate the reference you wish to edit and click on the title to open the reference form
- Click into the relevant fields and make necessary changes. If you need to add information to fields that aren’t displayed select Show Empty Fields
- Click Save.
Add attachments
You can add up to 2GB of attachments (such as PDFs and Word documents) to references in your EndNote Online Library.
- Select the My References tab to display all of your references
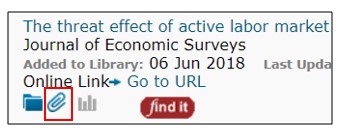
- Locate the reference you wish to add the PDF to and click the paper clip icon to open the File Attachments box
- Click Attach files and follow the prompts to locate and upload the file
- Once the file is attached the paper clip icon will change to blue.
Organise and share
Create groups
EndNote Online allows you to organise your references into groups. By default EndNote Online places references into the Unfiled group.
To create a new group:
- Click the Organize tab, which will display the Manage My Groups page
- Click the New group button in the My groups table
- Enter a name in the text box provided
- Click the OK button.
Add references to groups
- Select the My References tab
- Tick the boxes next to the references you want to add to the group
- Choose the group name from the Add to group… menu.
You can place a reference in multiple groups. To see which group(s) a given reference is currently in, click on the folder icon below the reference.
</div>
Share a group
EndNote Online allows you to share your reference groups with other EndNote Online users.
- Click on the Organize tab and choose the Manage My Groups page
- Tick the Share box for the group you want to share then click Manage Sharing
- Click on Start sharing this group
- Enter the email addresses of the people you want to share the group with. Use the email address they are using for their EndNote Online account
- Choose Read Only or Read & Write access to your group
- Click on Apply to start sharing the group
- Shared groups will appear under My References with the Shared groups icon beside them. They will appear under Groups Shared by Others for the EndNote Online user you are sharing them with.
Please note that attachments (e.g. PDFs) are not included when sharing.
- Read Only allows those you share with to use your references in Word documents, copy your references to their own library, and view the data for your references.
- Read & Write access allows users to do all of the above as well as make changes to your references, add new references to the group, and delete references from the group.
</div>
Find duplicate references
- Click on the Find Duplicates link under the Organize tab
- References are compared by the Author, Year, Title and Reference Field types
- References identified as duplicates will be ticked
- Click on Delete to remove duplicates. Microsoft Word
Cite While You Write (CWYW) plug-in for Word
The Cite While You Write (CWYW) tool allows you to insert references, and format citations and reference lists automatically while you write your papers in Word. You will need to install the Cite While You Write plug-in. To do this:
- In EndNote Online click the Format tab and Cite While You Write Plug-In
- Click on the Installation Instructions link, select either the Windows or Mac option and follow the provided instructions to install the plug-in.
Once installed, an EndNote tab will be added to your Microsoft Word ribbon:

Select a referencing style
In EndNote Online:
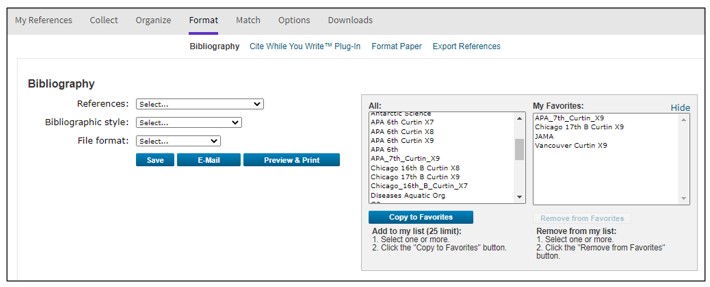
- Select the Format tab and Bibliography
- Next to the Bibliographic style drop down menu, click on Select Favorites
- Select the styles you wish to use and click Copy to Favorites
- These will then appear in the Bibliographic style drop down menu.
In Microsoft Word:
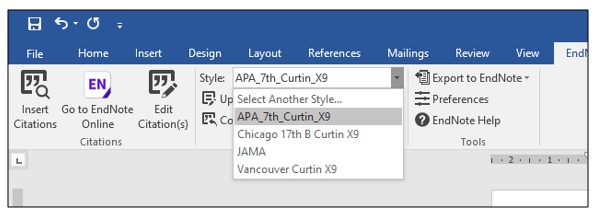
- Click the arrow next to the Style box in the CWYW toolbar
- Select your required style from the drop down menu (this will display the styles you have added to Favorites).
A limited selection of referencing styles are listed in EndNote Online. Please contact Curtin Library if you require other styles to be added.
</div>
Insert citations
- Ensure you are logged in to your EndNote Online account
- Place the cursor in the Word document where you want to insert the citation
- Click the Insert citation(s) button in the CWYW toolbar
- In the search field enter identifying text from the reference (e.g. title, author surname) and click Find
- Select the reference you wish to use then click Insert
- The citation will then appear in text and the full reference will appear at the end of the document (reference list).
Edit citations
Changes to in-text citations should be made using the Edit citations function in the CWYW toolbar.
- Select the citation you wish to edit (citation will be highlighted in grey)
- Click the Edit Citation(s) (Windows) or Edit & Manage Citation(s) (Mac) in the CWYW toolbar
- In the Edit Citation panel you can exclude the author or year from the citation or add page numbers (if required for your style).
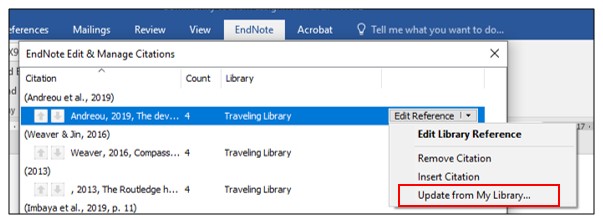
If you need to alter reference list entries, make the necessary edits in your EndNote Online library then select the citation in Word, click on Edit Citation(s) (Windows) or Edit & Manage Citation(s) (Mac) and from the Edit Reference drop down menu select Update from My Library… to apply the changes.
Remove citations from your document
While EndNote formatting is active you should avoid manually deleting citations from the Word document. Invisible field codes may be left behind which can affect the document formatting or lead to the citation reappearing when you close and reopen the document. To safely remove citations:
- Click the Edit Citation(s) (Windows) or Edit & Manage Citation(s) (Mac) in the CWYW toolbar
- In the Citation panel, click Edit Reference and select Remove Citation from the drop down menu.
Convert document to plain text
It is recommended that you convert your finalised document to plain text before submitting for assessment or publication. Converting to plain text creates a second copy of the document which isn’t linked to your EndNote Online library. Creating a plain text copy also allows you to make manual changes to your citations and reference list.
- In the CWYW toolbar click Convert Citations and Bibliography (Windows) or Tools (Mac) and select Convert to Plain Text
- A new unsaved document with no field codes (not linked to EndNote) will be created
- Save it with a new file name (your original document with the field codes will be unchanged and still be linked to EndNote Online).
It is important to keep the original document with the EndNote formatting in case you need to make changes to it later (EndNote Online citations cannot be reactivated from a plain text copy). Troubleshoot issues
Error messages
A Google search can be effective in locating instructions to rectify issues you encounter with EndNote Online.
EndNote support website
The EndNote Knowledge Base is a comprehensive FAQs database with instructions on solving common issues experienced with EndNote Online.
- EndNote Support About UniSkills
UniSkills was created and is maintained by Curtin University Library. To report issues with UniSkills contact Library Help.
Twemoji icons by Twitter, Inc and other contributors, licensed under a CC-BY 4.0 licence.
Except where otherwise noted, UniSkills content in all it’s forms (website, PDFs etc) are licensed under a Creative Commons Attribution ShareAlike 4.0 International Licence. We ask that you attribute any use of the content as created by Curtin University Library with a link to the Library website.
This license does not extend to other Curtin University and Curtin University Library webpages, or to Curtin branding and trademarks. Curtin University’s copyright information is available on the Curtin website.