
Microsoft-Word-Essentials-printable-guide-UniSkills.pdf
Microsoft Word Essentials
Table of Contents
Introduction
This self-paced module takes you through some key features of Microsoft Word, and how you can use it for your university assignments. Work through step-by-step, or skip to the relevant section using the tabs above. Where possible, the instructions provided are general so they can apply to whatever version of the software you have; however, these instructions and screenshots specifically apply to Word 2016 on a Windows 10 operating system. If you find that the instructions differ from your version of Word, you can use the Help box in Word to search for the option you need. For detailed instructions on any of the topics covered (or anything else not covered), remember Google is your friend and other guides can usually be found online.
What you will learn
In this module you will learn how to:
-
Create templates in Microsoft Word
-
Save as a Word document or PDF
-
Add and format page numbers
-
Edit and create font styles
-
Format paragraphs (hanging indent or first line indented, and line spacing)
-
Change the margins of your document
-
Add content (including lists, tables, images, and hyperlinks)
-
Add section breaks.
As a Curtin Australia student, you can download the Microsoft Office suite of programs for free. Instructions on how to do this are available on the Current students site.
The Microsoft Office software is also available on any Curtin computer at the Curtin Perth (Bentley) campus.
</div>
The PDF below is a printable version of this guide, which you can download and refer to later.
Templates
When you first open Microsoft Word you can choose to create a blank document or you can use a template. There are a whole range of templates available, from résumé and cover letters, to flyers, cards and many more. You can also search the wide range of online templates to hopefully find what you’re looking for.
For this tutorial, choose the Blank document to open Word’s default Normal template.
You’ll be able to make changes to the document setup and save it as your own template, so that you can use it again and again for your assignments, without needing to change your formatting and layout each time. In the following sections we’ll show you how to change your document margins, heading styles, paragraph formatting and more. You can then save these changes to a template, ready to use for your next assignment.
To save your template:
- Go to File > Save As
- Name your file
- Where it says Save as type select “Word Template (*.dotx)”.
If you are working on your own PC, your template will be saved to a folder called “Custom Office Templates”. If you are working on a public computer (such as the Curtin campus computers), make sure to save your template somewhere where you will be able to find it easily, such as a USB or into cloud storage (OneDrive, iCloud, Dropbox, etc.).
Next time you open a new document in Word, you can select the template you have created and begin typing your assignment straight away, without needing to worry about your document setup.
Saving your document
Although Microsoft Word has an in-built auto-save function, you should still continually save your document, and keep multiple copies as a backup (such as one on your personal computer, another on a removable storage device, and one in cloud storage.
Saving as a document
In the section above, we demonstrated how to save your work as a template. Saving as a document is exactly the same, except you will save your work as a document file (.docx) instead of a template file (.dotx).
- Go to File > Save As
- Select Browse to choose the location you want to save your file (document) to (such as a USB)
- Name your file
- Ensure the file type is “Word Document (*.docx)”.
- Click Save.
Saving as a PDF
In some cases, you may wish to save your document as a PDF. This ‘locks down’ your formatting, and makes your document more secure/less likely to be inadvertently edited by others who view it.
- Go to File > Save As Adobe PDF (you may be prompted to save as a Word document first)
- Choose the location you want to save your PDF to (such as a USB)
- Name your file
- Ensure the file type is “PDF files (*.pdf)”.
- Click Save.
Watch this YouTube video
Document setup
Listed below are some common requirements for formatting your assignments.
- Student ID/name as a header/footer
- Page numbers
- 2.5cm margins
- Size 12, Times New Roman font
- First line indented
- Hanging indent for reference list
- 1.5 or double line spacing.
The sections below will demonstrate how to change each of these settings.
Note: Your tutor will specify the individual requirements for your assignment. If you are unsure about what exactly is required, make sure you check with them before submission.
</div>
Adding a header/footer
Your tutor will usually require your name and student ID to be a header across the top, or a footer at the bottom of each of your pages. To insert your name and ID on each page, follow the steps below.
- Go to the Insert tab
- Choose Header (for top of page) or Footer (for bottom of page)
- Select the style that you want, or choose Blank
- Type your text (for example your name and student ID)
- Select Close Header and Footer.
Adding and formatting page numbers
Adding a page number
To add a page number, again go to the Insert tab.
- Select Page Number
- Choose the location and style of your page numbers (Note: If you add a page number in the same area as your header or footer, the text you typed will be overwritten)
- Select Close Header and Footer.
Formatting page numbers
To change the format of your page numbers, go to the Insert tab
- Select Page Number > Format Page Numbers
- In this window, you can change the number format (for example, to Roman numerals) and the number you want to start the numbering at. If you need different numbering styles throughout your document (for example Roman Numerals for the Contents page, and standard numbering for the body of your assignment) you will need to insert section breaks.
Adding a page number and header/footer on the same line
To add your page number and header/footer on the same line, follow these instructions:
- Double-click in the header or footer where you want the page numbers to go
- Type your name and ID if you haven’t already, and click to place your cursor at the end of your text
- Press the Tab key on your keyboard to move your cursor to the position you want your page number
- Go to the Insert tab, OR the Header and Footer Tools (these should automatically appear when you double-click in the header or footer area)
- Select Page Number > Current Position
- Choose a style
- Close Header and Footer.
Note: If you need to make further changes to the position of the page number, click in front of the number and press the Tab key to move it to the right, or the Backspace key to move it to the left.
</div>
The playlist below covers each of the three topics above.
Formatting page numbers between different sections
To change the formatting of your page numbers between different sections of your assignment, you will need to insert section breaks.
-
Insert a section break by going to Layout > Breaks > Section Break (next page)
Note: You can check if your section break inserted correctly by showing your paragraph marks, which is this symbol
 in the Home tab.
 -
Next, you’ll need to break the link between your sections, so that you can format them independently.
- Double-click in the section of your header or footer on your second page, and deselect “Link to Previous”
- You can then format the page numbers or text of your header and footer independently.
Note: If you only want to remove the page number and header/footer on the first page, you will not need to add section breaks. Instead, double-click into the footer of the first page and select “Different first page” under the Design tab. Your header, footer and page numbers will be removed from the first page, and you can re-add them in the format you need.
Margins
Check your assignment guidelines carefully to see whether your tutor has specified the margin size for your assignment. For this example, we’ll assume the requirement is 2.5cm on all sides.
- Go to the Layout tab
- Click on the arrow under Margins
- Select the option at the very bottom of the list that says Custom Margins…
- You can then change each of the settings for the top, bottom, left and right sides
- Click OK.
Changing your font
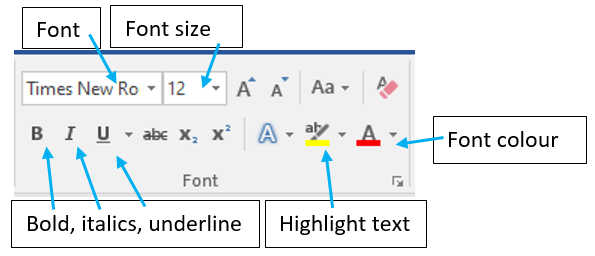
Most of your changes to your font can be done in the Home tab, within the Font box.
In the image below, we have highlighted the areas you can edit your font size (e.g. 12), type (e.g. Times New Roman), emphasis (e.g. bold or italics) and colour (of the text or highlighted background).
Styles
Styles store the formatting settings you use frequently, so that you can be consistent in your headings and body text.
You should be able to see the default styles in the Home tab. You can use these styles as they are, modify them, or create your own. To use an existing style, type some text, highlight it, and then select the style you want to change it to (such as Heading 1).
The ‘Normal’ style is the default style of Word. You’ll notice that when you press Enter to get to a new line, the style will revert back to Normal. Keep this in mind when adding text to your assignment.
Modifying an existing style
If you like the look of an existing style, but just want to change it a little bit, you can do so by modifying it.
- Highlight the text you want to change
- Make your changes (change font size to 16, Times New Roman, bold)
- Right-click on the style you want to update (such as Heading 1)
- Select Update Heading 1 to match selection
- You should see your changes reflected in the style you have just updated.
Now, whenever you add a Heading 1 style, it will automatically be formatted with your changes. Word will also automatically update the style throughout your document if you make any further modifications.
Creating a new style
To create a new style, follow steps 1 and 2, above. Then,
- Right-click on the text you have updated
- Select Styles, and Create a Style
- Type a name for your new style, such as “Style 1”
- Click OK.
Paragraphs
First line indented and hanging indents
First lines are usually indented to indicate the start of a new paragraph. A hanging indent is used commonly for reference lists (such as APA style).
- Type a few lines of text and highlight them (you will only be able to see your changes reflected if your text spans across multiple lines)
- In the Home tab, select Paragraph settings (click the small downwards arrow in the bottom right-hand corner of the Paragraph box)
- In the Indents and Spacing window, change the indentation under Special to “Hanging” or “First line”
- You will see a preview of what your paragraph text will look like
- Click OK
- If you want to, you can highlight the text you have formatted and create a new style (for example “Paragraph text” or “Reference list”).
Line spacing
- Highlight your body text
- In the Home tab, select Paragraph settings (click the small downwards arrow in the bottom right-hand corner of the Paragraph box)
- In the Indents and Spacing window, change the Line spacing to “1.5 lines” or “Double”, depending on your assignment requirements
- Click OK
- Highlight your text and update your paragraph style to match the selection. Adding content
This section will demonstrate how to add common elements to your assignments, such as lists, tables, hyperlinks and pictures.
Lists
To add a list, you first need to add a few items on separate lines.
For example:
Apples
Oranges
Strawberries
Pineapples
Once you have your list items, highlight them by clicking and dragging over the text.
In the Home tab, under Paragraph choose Bullets or Numbering.
You can change the style of your bullets or numbers by selecting the small arrow next to the Bullets or Numbering icons. This will allow you to add stylised bullet points, or to change the numbering style.
Tables
- Go to the Insert tab, and select Table. Word will provide a preview of what your table will look like as you hover your mouse over the grid provided
- Choose how many columns and rows you want, and click on the square that corresponds with your choice
- Alternatively, you can click Insert Table and manually enter the number of columns and rows you need.
Once you have created your table you will be able to adjust the design and layout in the Table Tools tab.
Note: The Table Tools tab will only show when you have the table selected. Underneath Table Tools you should see two tabs for Design and Layout.
</div>
Hyperlinks
Hyperlinks, or links, are useful for leading your reader to further information. To add a hyperlink to your document, add some text that describes the website or web page that you will be linking to, for example “Curtin Library Home page”.
- Highlight your text by clicking and dragging your mouse across it
- Right-click over your highlighted text, and select Hyperlink (or Link, depending on what version of Word you have)
- In the Existing File or Web Page window, type or paste the URL (web address) of the site you are linking to, for example https://library.curtin.edu.au
- Click OK.
Your text should now appear underlined and blue like this. Test your link by right-clicking on it and selecting Open Hyperlink.
Note: Check with your tutor whether it is okay for you to add links to your assignments — in some cases it will not be appropriate.
</div>
Pictures
There are a few different ways you can insert pictures into your document. The easiest way is to copy an image (right-click and Copy) from a website or other source, and pasting it (right-click and Paste) into your document. Two other methods for inserting pictures are outlined below.
Note: You should always try to source creative commons licensed images for your work wherever possible, and reference appropriately. Check out our online referencing guides for information on how to reference images in your assignments.
</div>
Insert online image
- Click on the Insert tab
- Select Online Pictures
- Type in the search bar what you are looking for, for example “dogs”
- Choose an image you like, and click to select it
- Click Insert.
Note: By searching in Word’s online image database, you can choose to filter for creative commons images. However, some images won’t be accompanied by their source information, which you will need to provide as a reference in your assignments.
</div>
Insert picture from file
Make sure you have already saved the image you want to use to a file on your computer (for instance, if you have taken a photo yourself, make sure you have uploaded it from your camera or phone and can access it on your computer).
- Click on the Insert tab
- Select Pictures
- Navigate to the folder where your image is saved and click to select it
- Click Insert.
Formatting your images
Once you have inserted your images, you can format them as you like. To adjust the size of the picture, click and drag from the corners. Holding down the Shift key while you do this will ensure that the image doesn’t get distorted. You can make further changes to the formatting (such as aligning the image, editing the colour, and cropping it) by right-clicking on the picture and choosing from the options available. Handy hints
This section outlines some useful tips for checking and formatting your assignment.
Checking your document
There are a few things you should always check before submitting your assignments. The instructions below will show you how to do a final check of your document before your submission.
Word count
- Go to the Review tab
- Under Proofing select Word Count.
You will be presented with an overview of how many words, paragraphs, pages and so on that you have in your document.
If you want to view the word count for a particular section of your document, highlight the paragraph/s you want to check before selecting the word count function.
Spell check
Make sure you check your grammar and spelling before submitting your assignments. Word has an in-built tool for this, but please note that it is not fool-proof! You will need to check through the suggestions from Word carefully to see if the corrections are necessary.
- Go to the Review tab
- Click Spelling & Grammar
- Go through the suggested corrections from Word, and either ignore or accept the changes.
Note: Grammarly is a useful online tool that can also suggest corrections to your work. Hemingway Editor is another tool that can help to improve the clarity of your writing.
Formatting shortcuts
Format painter
Format painter is a handy tool that allows you to “paint” a section of text with the same formatting as another.
The icon looks like this:  in the Home tab.
- Highlight the text that you want to copy the formatting from
- Select the Format Painter tool
- Highlight the text you want to “paint” the formatting onto.
Clear all formatting
Sometimes you will accidentally introduce formatting errors into your document. If this happens, often the best thing to do is clear your formatting and start again. Try this with the section of your document that is causing problems, or apply it to the whole document if you need to.
- Select the section of text to remove formatting from
- Select the Clear All Formatting Tool (the icon looks like this:
 in the Home tab).
Your formatting will be cleared. If this does not solve your formatting problem check out the Microsoft Office Support page for more options.
Keyboard shortcuts (for PC)
For a complete list of shortcuts (and for the Mac equivalents) go to Microsoft Word 2016 shortcuts.
Undo: Ctrl Z
If you make a mistake, press Ctrl + Z.
Redo: Ctrl Y
If you want to redo something you have just undone, press Ctrl + Y. You will be taken a step forward.
Insert hyperlink: Ctrl K
The dialogue box will pop up and you can add your hyperlink as desired.
Highlight text: Ctrl Alt H
Select the text you want to highlight, and press Ctrl + Alt + H.
Save document: Ctrl S
Save As: F12
This will allow you to easily save your document under a different name or in another folder.
Copy: Ctrl C
Select the text you want to copy, and press Ctrl + C.
Paste: Ctrl V
Select the area you want to paste your text or object into, then press Ctrl + V.
Bold text: Ctrl B
Select the text you want to make bold and press Ctrl + B. Press Ctrl+ B again to unbold the text.
Italicise text: Ctrl i
Select the text you want to italicise and press Ctrl + i.
Underline text: Ctrl U
Select the text you want to underline and press Ctrl + U.
Print document: Ctrl P
Find a word or phrase: Ctrl F
Press Ctrl + F. You will then be able to type in the word or phrase into the search box, and replace it if desired.
Indent text or move to the next cell: tab key
Indent your text (as shown here) or move to the next cell in a table by pressing the tab key (underneath the 1 on your keyboard). About UniSkills
UniSkills was created and is maintained by Curtin University Library. To report issues with UniSkills contact Library Help.
Twemoji icons by Twitter, Inc and other contributors, licensed under a CC-BY 4.0 licence.
Except where otherwise noted, UniSkills content in all it’s forms (website, PDFs etc) are licensed under a Creative Commons Attribution ShareAlike 4.0 International Licence. We ask that you attribute any use of the content as created by Curtin University Library with a link to the Library website.
This license does not extend to other Curtin University and Curtin University Library webpages, or to Curtin branding and trademarks. Curtin University’s copyright information is available on the Curtin website.