Introduction to NVivo
Classifications enable you to store values for key attributes of the cases and files in your project, for the purpose of making comparisons and/or filtering searches according to particular attributes (examples of both are provided in the Searching page of this module). While they are not essential, they can be a helpful addition to your project and many are in fact created automatically.
This page explains the two different types of classifications, case classifications and file classifications, and details when they are created and how you can create your own. In order to follow some of the examples, you can either use the project you created in the Setting up a project page, or make use of the Environmental Change Down East sample project (as detailed in NVivo sample projects).
Case classifications
Case classifications enable you to store demographic information about cases (e.g. people or places) in your project. You can add case classifications to your project in a number of ways, including by importing emails or survey data or importing from SPSS; by using one of NVivo’s pre-defined classifications; or by creating your own classification.
Creating a case classification by importing
Case classifications are automatically created when emails and survey data are imported into an NVivo project, and when you import from SPSS.
When you import an email into NVivo, the ‘Person’ case classification is created and the attributes are populated for the sender and recipient(s) using information available from the email (for example the name and email address). This pre-defined case classification is described in the next section.
When you import survey data into NVivo, the Survey Import Wizard creates a new classification with attributes created and populated using the closed-ended questions in the survey (the default name for the classification is ‘Survey Respondent’, but this can be changed). You can see how survey questions correspond with the classification attributes by opening a data set in the Details View in NVivo (e.g. the Survey Responses file in the Surveys folder, or another data set you have imported), then selecting the Case Classifications folder in the Navigation View (in the ‘Cases’ group) and clicking on the plus sign next to the classification (e.g. ‘Survey Respondent’) to view the attributes. You should see that these match up with the closed-ended questions (i.e. those in the grey columns) in the survey file (with the exception of the ID column).
You can also import case classifications from SPSS, by right clicking on the Case Classifications folder in the Navigation View or by opening the Case Classifications folder in the List View and right clicking in the white space. Either way, by selecting ‘Import from SPSS…’ you can choose an SPSS file and use it to create a new classification, or import it to an existing classification. Doing this will result in the variables in the SPSS file becoming the attributes of the new classification (or being added to the attributes of the existing classification), the cases (or rows of data) in the SPSS file becoming cases in NVivo, and the data in each row of the SPSS file becoming the attribute values for each case.
Using a pre-defined case classification
NVivo has two pre-defined case classifications; one for a person (with Name, Sex, Age Group, Occupation, Country of Birth and Email address attributes) and one for an organisation (with Name, Sector, Size and Industry attributes). To create a new ‘Person’ classification, for example, do the following:
- Click on the Case Classifications folder in the Navigation View (in the ‘Cases’ group), if it is not already open
- Right click in the blank area in the List View
- Select ‘New Classification’
- Select ‘Add one or more predefined classifications to the project’, and choose ‘Person’
- Click ‘OK’
You will see that a new ‘Person’ case classification has been created, with the attributes as listed above (click on the plus sign to view them).
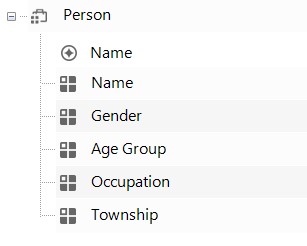
Note that even though the ‘Person’ case classification is pre-defined, you can always rename it or edit, delete or add new attributes to it as the need arises. For example, you could delete the Country of Birth and Email address attributes, change the Sex attribute to Gender, and add a new Township attribute as follows:
- Click on the Case Classifications folder in the Navigation View (in the ‘Cases’ group), if it is not already open
- Click on the plus sign next to the ‘Person’ case classification to display the attributes
- Select both Country of Birth and Email address, right click and choose ‘Delete’
- Double click on Sex, change the name to Gender and select ‘OK’
- Right click on ‘Person’, choose ‘New Attribute’, enter the name Township and select ‘OK’
The attributes should now be as follows:
Next, to create a case from an existing file (e.g. the Margaret file) and assign it to this case classification, do the following:
- Right click on the file you want to create the case and case classification for in the List View (e.g. Margaret, in the Interviews folder)
- Scroll down to ‘Classification’
- Select ‘Person’ (under ‘Create as Case and Assign to Case Classification’; note that if you hadn’t already created the ‘Person’ case classification you could do this now as well, by selecting the ‘New Case Classification’ option instead)
- Use the ‘General’ tab to rename the case and provide a description, nickname and colour if desired
- Use the ‘Attribute Values’ tab to enter values for the attributes (e.g. enter the Name ‘Margaret’, the Gender ‘Female’, the Age Group ’50 - 59’, the Occupation ‘Museum educator’ and the Township ‘Davis’)
- Select ‘OK’, then open the Case Classifications folder in the List View and double click on the ‘Person’ classification to view the new classification in the Details View

(Alternatively, you could have done things the other way around and created the case first by right clicking on the Margaret file and choosing ‘Create As’ and ‘Create as Cases’. Again you are given the option of assigning it to the ‘Person’ classification at the same time as well, or you can do so at any time later by right clicking on the Margaret case, selecting ‘Classification’ and ‘Person’. You can also create a case from scratch and then assign it to the classification, as described in the next section.)
Finally, to remove a case from a particular case classification, click on the name of the classification in the Navigation View (e.g. the ‘Person’ case classification in the Case Classifications folder), then right click on the particular case you wish to remove in the List View (e.g. Margaret), and select ‘Classification’ and ‘No Classification’. You can also delete case classifications at any time by opening the Case Classifications folder in the List View, right clicking on the appropriate case classification (e.g. ‘Person’) and selecting ‘Delete’, and you can delete cases in the same way (e.g. you could delete the Margaret case in the Cases folder).
Creating your own case classification
Alternatively, you may wish to create your own classification from scratch. To create a ‘Place’ case classification, for example, do the following:
- Open the Case Classifications folder in the List View, and right click in the blank area
- Select ‘New Classification’
- Enter a name for the new classification (e.g. ‘Place’)
- Select ‘OK’
- You can then add attributes to the new case classification as described above, i.e. by right clicking on ‘Place’ in the List View of the Case Classifications folder, then selecting ‘New Attribute’ (e.g. add Name, Population Size and State attributes, ensuring you change the ‘Type’ to ‘Integer’ for Population Size)
You can create a case from an existing file and assign it to this classification using the method described previously, or you can create a case from scratch. To create one from scratch, right click on the Cases folder in the Navigation View (or in the blank area in the Cases folder in the List View) and select ‘New Case’. Enter a name for the case (e.g. Davis) and a nickname and colour, if desired, in the ‘General’ tab. To then assign the case to the new case classification ‘Place’, select the ‘Attribute Values’ tab and select ‘Place’ as the case classification. Finally, enter values for the attributes in the table that will appear below (e.g. enter the Name ‘Davis’, the Population Size ‘422’ and the State ‘North Carolina’).
Note that to add data to the Davis case, you can code to it as you would to a code (as described in the Codes & coding page of this module). Doing this will allow you to analyse the data stored in the case using the attributes of the case classification.
File classifications
File classifications are very similar to case classifications, only they are used to store descriptive information about files in your project. You can add file classifications to your project in a number of ways, including by importing emails or importing from EndNote or SPSS; by using one of NVivo’s pre-defined classifications; or by creating your own.
Creating a file classification by importing
File classifications are automatically created when emails are imported into an NVivo project, and when you import from EndNote and SPSS.
When you import an email into NVivo, the pre-defined ‘Email Message’ file classification is created and the attributes are populated using information available from the email (for example the subject, who it is from and to and the date sent and date received).
When you import from EndNote into NVivo, there is the option to assign to the ‘Reference’ file classification or to assign to different classifications based on the reference type (‘Journal Article, ‘Book’, ‘Report’, etc.). All of these are pre-defined file classifications in NVivo, and all will be populated with the relevant reference information. To see the file classifications that have been created for references, either in the sample project or in the project you have created in this module, click on the File Classifications folder in the Navigation View (in the ‘Data’ group). You should see at least one file classification; either ‘Reference’ (if in the sample project, or if in your own project and you chose to assign all records to a single classification when importing) or ‘Journal Article’ and ‘Book’ (if in your own project and you chose to assign records to different classifications based on type). To see the attributes of any of these (or other) classifications, click on the plus sign next to the relevant classification (as with case classifications, to create a new attribute for a classification right click on it and select ‘New Attribute…’). To see the files that have been classified as a particular file classification, double click on it so that the classification sheet opens in the Details View.
Importing file classifications from SPSS is done in the same way as for case classifications (as described in the Case classifications section), only using the File Classifications rather than Case Classifications folder. Doing this will result in the variables in the SPSS file becoming the attributes of the new classification (or being added to the attributes of the existing classification), the cases (or rows of data) in the SPSS file becoming ‘External’ files in NVivo, and the data in each row of the SPSS file becoming the attribute values for each ‘External’ file.
Using a pre-defined file classification
NVivo has many different pre-defined file classifications; from ‘Ancient Text’ and ‘Artwork’ to ‘Web Page’ and ‘YouTube’, and everything in between. To create a new pre-defined file classification, right click on File Classifications in the Navigation View, or in the white space in the File Classifications folder in the List View, and select ‘New Classification’. Next choose to ‘Add one or more predefined classifications to the project’ and choose one from the list; experiment by choosing ‘Reference’ for example. You can view the attributes of this new file classification by clicking on the plus sign next to the ‘Reference’ file classification in the File Classifications folder in the List View, and can always rename, edit, delete or add these in the same way as for a case classification. Finally, to assign any of the files in your project to this new classification, right click on it in the List View and choose ‘Classification’ and ‘Reference’.
Creating your own file classification
You can also create your own file classification from scratch, again by right clicking on File Classifications in the Navigation View, or in the white space in the File Classifications folder in the List View, and selecting ‘New Classification’. Give a name to the new classification and a description if wished (e.g. try the name ‘Book2’), and select ‘OK’. You can then add attributes to the new file classification by right clicking on ‘Book2’ in the List View of the File Classifications folder, and selecting ‘New Attribute’.