
Introduction-to-NVivo-printable-guide-UniSkills.pdf
Introduction to NVivo
Table of Contents
Introduction
Welcome to the Introduction to NVivo module. NVivo is software that allows you to store, organise and analyse qualitative data. It can be used to assist with research projects, literature reviews and other assignments and analyses big and small, and is installed on most computers at Curtin’s Australian campuses.
If you are an Australian-based student or staff member and would like access on a personal computer, you can request a free NVivo download by going to the ‘SupportU’ self-service portal found in OASIS (students) or the staff portal (staff), searching ‘Request Home Use Software’, selecting the search result and entering the required information. If you would like access on a Curtin device, you can download NVivo using the ‘Company Portal’ (newer Windows devices),’Install Applications’ (older Windows devices) or ‘Self-Service’ (Mac) tool on your desktop (please note that there are differences between the Windows and Mac versions of NVivo).
Alternatively, if you are a student or staff member outside of Australia and are not able to download NVivo, you may like to try using a free, open source alternative such as Taguette (for highlighting and coding materials), Qualcoder (for coding materials, creating notes and memos) or CATMA (for text annotation, analysis and visualisation).
This module looks at some of the ways you can use NVivo to analyse qualitative data, and uses some sample project materials as examples. The idea is that you can then apply these same concepts to any data of your own, regardless of your discipline or the amount of data you have.
Your feedback on this module is very welcome and can be provided at any time on the feedback page, or alternatively for any questions about the module please contact Library-UniSkills@curtin.edu.au
What you will learn
- How to access NVivo’s sample projects in order to explore the workspace and to get ideas for organising, coding and querying your materials.
- How to create a new NVivo project, and how to import materials including files saved on your computer (Word documents, PDFs, audio, video and image files), survey data, web content and references and PDFs from EndNote.
- Options for transcribing audio and video files.
- How to use codes to organise project materials according to specific topics, themes or concepts.
- How to store information about cases and files in an NVivo project using case and file classifications.
- How to use search project materials to find common words or phrases or to identify patterns and make comparisons.
- How to use mind maps to visualise the layout of codes.
- How to use NVivo to assist with literature reviews.
The PDF below is a printable version of this guide, which you can download and refer to later.
- Introduction to NVivo [PDF, 1314kB]Sample projects
When you launch NVivo for the first time you will be prompted to set up your user profile. To do this, just enter your name or ID and initials and select a language, then press ‘OK’. Once you have done this you can get started exploring the NVivo sample projects and workspace, as detailed in this page.
In brief, it covers the following:
- The different NVivo sample projects available for use
- The key components of the NVivo workspace
- NVivo’s folder structure for organising, storing and summarising project materials
- Using the sample project to explore coding and query ideas
</div>
NVivo sample projects
NVivo comes complete with five different sample projects which are great for exploring and experimenting with before you start on your own project. Links to two of these projects are displayed at the top of the screen when you launch NVivo, and you can also click the provided link to read about and download any of the others - including a sample literature review project.
For parts of this module we will work with materials from the first sample project (the multi-method project), which is called Environmental Change Down East. Select this project to open it now, or choose a different project if you prefer.
Note that upon opening a new project you will be presented with the opportunity to take a tour of the software. For the time being click on ‘Skip tour’, but to view it at a later time go to: File > Help > Help Resources > Tour
The NVivo workspace
Once the sample project has opened you can explore the NVivo workspace. For example, you may wish to double click on the Overview of Sample Project document (or a similar document) to open it and read about the sample project. When you do this you will notice there are three different views, as described and shown below:
- The Navigation View on the left of screen displays groups and folders. For example, there is a ‘Data’ group which contains Files, File Classifications and Externals folders (detailed in the next section), and within each of these are sub-folders containing the data for the sample project.
- The List View in the middle of the screen lists the contents of the folder selected in the Navigation View. For example, when the Files folder is selected the List View of the Environmental Change Down East sample project shows the Overview of Sample Project document (the only document in the parent Files folder; others have been organised into sub-folders).
- The Details View on the right of screen displays open project items. For example, the Overview of Sample Project document opened previously.
Close the Overview of Sample Project document when you are finished with it (note that while you can have multiple windows open in the Details View, to avoid confusion it is generally best to keep these to a minimum).
Organising project materials
The ‘Data’ group in the Navigation View contains three folders where all of the project materials are stored. These folders are detailed below, and you are encouraged to have a look in each to see what has been included for the sample project:
- Files is where you should import or create materials for your project, organising them into sub-folders as desired. This is the folder that you will use for your project materials most, if not all, of the time.
- File Classifications is where you can summarise general information about the materials in your project using classifications - either predefined ones or ones you have created or imported (for more on classifications see the Classifications page of this module). Working with these is optional.
- Externals is where you can summarise materials you cannot import into your project (for example, physical books). You may not need to use this folder.
When importing materials into NVivo you can create your own folders and sub-folders according to how you wish to organise your data. For the Environmental Change Down East sample project, for example, the folders and sub-folders that have been used to store the project materials in the Files folder are:
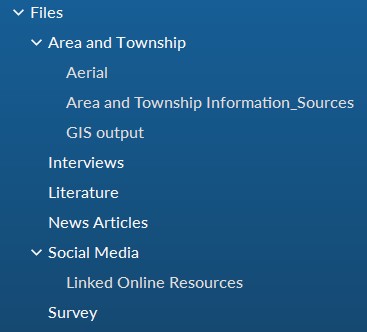
By exploring the folders in the sample project (which you can do by clicking the relevant ‘>’ icons) you can see the different types of materials that can be imported into NVivo. These range from text documents and PDFs to images, audio files, video files, social media content and survey data.
Codes and queries
If you are unsure where to start when coding, the NVivo sample projects are a good place to get ideas and inspiration. For example, the Environmental Change Down East sample project contains a range of different codes in the Codes folder of the ‘Coding’ group. These range from codes for themes present in the project (for example Economy, Infrastructure, Natural environment and related sub-codes), to codes for different attitudes (Mixed, Negative, Neutral and Positive) and a Memorable quotes code.
Note that some of the content in the sample project has been coded to more than one place, and that this can be used to identify patterns in the data and to create sub-codes using queries. The sample project also provides examples of different types of queries, which again can give you ideas for the kinds of queries you might run in your own project.Setting up a project
This page details how to set up your own project in NVivo by importing and organising your project materials.
In brief, it covers how to do the following:
- Create a new project in NVivo
- Create folders to organise project materials
- Import materials saved on your computer into an NVivo project
- Import survey data into an NVivo project
- Import web content into an NVivo project
- Import EndNote references into an NVivo project
- Import emails into an NVivo project
- Open and edit project materials
- Create a picture file from a PDF
</div>
Note that this page includes a number of examples that make use of materials from the Environmental Change Down East sample project. While you can follow these examples using your own materials, if you would like to import the specified materials then you will first need to export them. You can do this by opening the Environmental Change Down East sample project (as detailed in the Sample projects page), then:
- To export the required Word documents: Select the Interviews folder under Files. Select the Margaret and Maria and Daniel files together, then right click and choose ‘Export’ and ‘Export Documents…’. Make sure the ‘MS Word (*.docx)’ file type is selected, choose an appropriate save location and then select ‘OK’.
- To export the required audio file: Select the Interviews folder under Files. Select the Helen file, then right click and choose ‘Export’ and ‘Export Audio/Transcript…’. Select to export the Media Item (.mp3) only, choose an appropriate save location and then select ‘OK’.
- To export the required PDF: Select the Literature folder under Files. Select the Analyzing Estuarine Shoreline Change~ A Case Study of Cedar Island, North Carolina file, then right click and choose ‘Export’ and ‘Export PDF…’. Choose an appropriate save location and then select ‘OK’.
- To export the required Excel file: Select the Survey folder under Files. Select the Survey Responses file, then right click and choose ‘Export’ and ‘Export Dataset…’. Choose an appropriate save location and then select ‘OK’.
Creating a new project
To create a new project in NVivo go to File > New, then enter a name and description for your project and browse to choose a location to save it in (it will save as a .nvp file). For example:
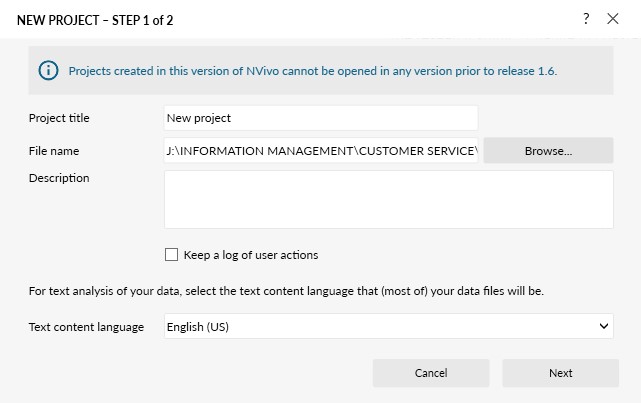
Click ‘Next’. You now have the option to choose ‘Yes’ or ‘No’ for a reminder to save your project. Click ‘Create project’, then click ‘Skip Tour’ and ‘Close’ for the information given under Files (once read).
Creating folders
It is generally easiest to create folders to store your project materials before you import them, as you can then import them straight into the appropriate folder. However, note that you can create new folders, move materials from one folder to another (by simply dragging and dropping), and delete folders or materials (by right clicking on them and selecting ‘Delete’) at any time.
To create a new folder, for example an Interviews folder, do the following:
- Right click on the Files folder contained in the ‘Data’ group (or if you would like the new folder to be a sub-folder of a different folder, right click on that instead)
- Select ‘New Folder…’ from the top of the list, and the ‘New Folder’ dialog box will appear
- Enter a name for your new folder (for example Interviews), and a description if required
- Click ‘OK’ and then ‘Close’ for the information given under Files
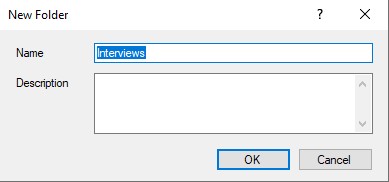
(Alternatively, you can create a new folder by clicking on the Files folder, or another parent folder of choice, selecting the ‘Create’ tab on the ribbon at the top of the screen, and then selecting ‘Folder’.)
Repeat this process to create folders titled Literature, Surveys, Web Content, Email Content, and Pictures, plus a sub-folder of Literature called EndNote, so that the folders for your project files are as follows:
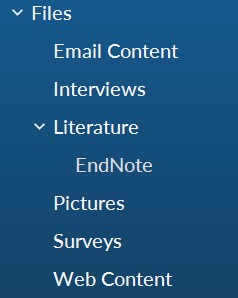
You can now import files directly into the folders you have created, as explained in the next sections.
Importing materials saved on your computer
The simplest materials to import into your project are Microsoft Word, text, PDF, audio, video and/or picture files saved on your computer. To import files of these types, do the following:
- Select the folder you wish to import the files into (for example Literature), so that the folder opens in the List View (close the information about Files)
- Right click in the blank area in the List View
- Select ‘Import Items…’
- Locate the file/s you wish to import (for example Analyzing Estuarine Shoreline Change), then import either by:
a. selecting the individual file and clicking ‘Open’ (as in this case); or
b. selecting multiple documents and clicking ‘Open’ - Click ‘Import’
- When importing an individual file, a ‘Properties’ box will appear giving you the opportunity to rename the item and to provide a description and colour if desired (note you can still do this for items imported as part of a group by right clicking on the relevant item in the List View, then selecting ‘Document Properties…’ or ‘Video Properties…’, etc. as applicable)
(Alternatively, you can import an item into a folder by clicking on the appropriate folder, selecting the ‘Import’ tab on the ribbon at the top of the screen, and then selecting the ‘Files’ option.)
Once you have done this, repeat the process for the Interviews folder, this time importing the Margaret and Maria and Daniel files together.
Importing surveys
You can create data sets in your project by importing Microsoft Excel spreadsheets, text files with comma or tab separated values and/or results from SurveyMonkey or Qualtrics. When you you do this, note that not only is the survey data set created in the relevant folder (in Files in the ‘Data’ group), but ‘codes’ are created for the responses to each open-ended question (in Codes in the ‘Coding’ group), and ‘cases’ and ‘case classifications’ are created for each survey respondent (in Cases and Case Classifications respectively in the ‘Cases’ group). Codes are covered in the Codes & coding page of this module, while cases and case classifications are covered in the Classifications page.
In the meantime, to import an Excel file do the following:
- Select the folder you wish to import the data set into (for example Surveys)
- Right click in the blank area in the List View
- Select ‘Import Survey’, and choose where you wish to import from (for example ‘From Microsoft Excel File…’)
- Locate the file you wish to import (for example Survey Responses.xlsx) and click ‘Open’
- Navigate through the Survey Import Wizard. While you can keep the default settings if importing the example survey data, note that the wizard gives you the opportunity to:
- Specify the number of header rows and the format of any dates in the survey data
- Specify the name of the folder to store the cases in, and select a survey variable to be a unique ID for these
- Specify a name for the case classification the cases will be grouped together in
- Identify open and close-ended questions in the survey, and any you don’t wish to import
- Choose whether to autocode themes and sentiment
(Alternatively, you can import survey data into a folder by clicking on the appropriate folder, selecting the ‘Import’ tab on the ribbon at the top of the screen, and then selecting the appropriate option in the ‘Survey’ group, for example ‘Excel’.)
For more information on preparing a Microsoft Excel spreadsheet for importing and on importing other types of data sets, you may like to view the NVivo User Help - Surveys and datasets online help.
Importing web content
You can import web content (for example articles, blog posts or social media content) into your project using a free web browser extension called NCapture for Google Chrome, which may well have been included with your NVivo download. To check, open Google Chrome and look for the NCapture icon to the right of the address bar:

If the icon is not visible try clicking on the ‘Extensions’ icon (the puzzle piece). If NCapture is listed as an extension, choose to pin it to the toolbar. If it is not listed, you can search for the extension by clicking on the ‘Customize and control Google Chrome’ icon (the three vertical dots to the right of the address bar), then selecting ‘More tools’ and ‘Extensions’. Search for the ‘NCapture’ extension and if it is listed, move the switch to the right so that the icon is visible, then pin it to the toolbar.
If you find that NCapture is not installed for Google Chrome, you can download it from the Chrome Web Store.
Alternatively, if you would like more information about NCapture you may like to view the NCapture online help.
Once you have NCapture installed for your chosen web browser, open the browser and locate a web page that you would like to import. For example, in keeping with the sample project you may like to import the web article North Carolina’s Fishing Industry Catches Up to a Changing World.
You can import this or another item of web content into NVivo using NCapture by clicking on the NCapture for NVivo icon. The NCapture dialog box will then open as follows:
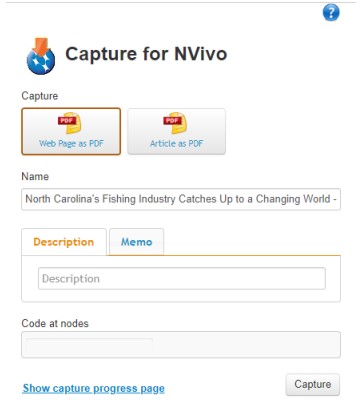
Note that you can choose to save an article either as a PDF of the web page or as a PDF of just the article, the latter of which should remove any additional, unnecessary content (other types of web content will have different source type options). Once you have made your selection, check that you are happy with the source name (amend if not), add a description if desired and click ‘Capture’ (you can also code to either new or existing codes if wished).
Once you have captured the web content in this way, you can import it in NVivo as follows:
- Select the folder you wish to import the web content into (for example Web Content)
- Right click in the blank area in the List View
- Select ‘Import from’, and choose ‘Import from NCapture…’
- Click ‘Browse’ to locate the web content you just captured (for example in your Downloads folder)
- Select the item(s) you wish to import
- Click ‘Import’
(Alternatively, you can import web content into a folder by clicking on the appropriate folder, selecting the ‘Import’ tab on the ribbon at the top of the screen, and then selecting the ‘NCapture’ option.)
Importing from EndNote
Importing EndNote references into NVivo is a two-step process, which first requires exporting them from EndNote. Instructions for both steps are provided below, and these make use of a sample EndNote library containing references for seven journal articles (with attached PDFs) and a book. If you wish to work through the instructions using the sample library you can download it from the following link (alternatively, you can make use of your own EndNote Library):

Once you have identified and opened an EndNote library, you can export references from it as follows:
- Select the references to export into NVivo (for the sample EndNote library provided this will be all eight references; for a large library it can take some time to import into NVivo, so it is recommended that you work with smaller groups of references at a time)
- Go to File > Export…
- Give an appropriate name for the file (or leave as is) and choose a location that will be easy to find (for example your Desktop)
- Save as a .xml file by using the drop down arrow at ‘Save as type:’
- Adjust the referencing ‘Output style’ if required
- Click on ‘Save’
The second step of the process involves importing the references into an appropriate folder in NVivo, as follows:
- Open Files or one of the folders you have created (it doesn’t matter which) in the List View
- Right click in the blank area
- Select ‘Import from’, and choose ‘Import from EndNote…’
- Browse to the .xml file and select ‘Open’
- Choose whether to name the records by ‘Title’ (the default option) or by ‘Author and Year’ in the ‘Name by’ option
- Choose whether to assign all the records to ‘A single classification (Reference)’ (the default option; this creates one ‘Reference’ file classification for all references) or to ‘Different classifications based on record type’ (which will create different file classifications for each type of reference, for example ‘Journal Article’, ‘Book’, ‘Report’, etc.) in the ‘Assign to’ option
- Check that the number of records coming into NVivo is correct (the figure below shows 8) and choose the appropriate folder at ‘Create Files in’ (for example Files\Literature\EndNote)
- Click on ‘Import’
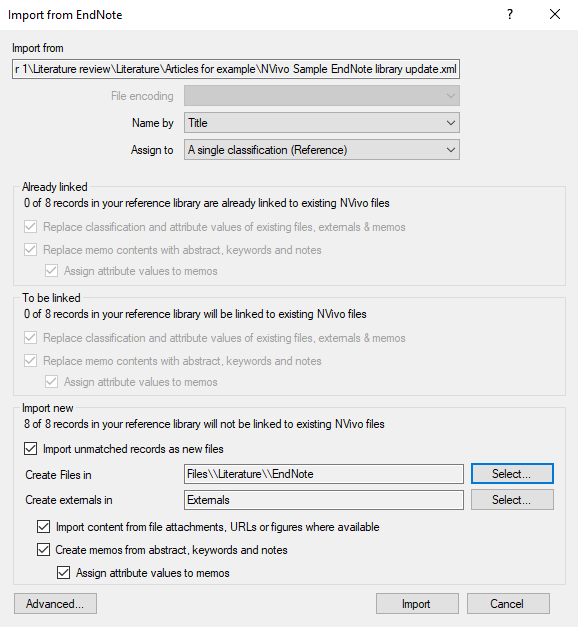
Some additional things to note about the import process are as follows:
- NVivo recognises when records have previously been imported and will not import duplicates.
- Only one file attachment, URL or figure per reference can be imported into NVivo. If a reference contains multiple file attachments then by default the first file attachment is imported. If you want to import a different file, click the ‘Advanced…’ button (on the import dialog box) and select the file you wish to import for that particular reference using the drop down arrow in the ‘Import Content’ column.
- Changes you make to your EndNote library or your NVivo project will not automatically make changes in the other.
Furthermore, note that when EndNote references are imported to NVivo the following happens:
- References with attachments (such as word documents, text files and PDFs) will be stored in the specified folder in Files (for example the references with PDFs in the sample EndNote library have gone into the EndNote folder for the example above).
- References without attachments will be stored in the Externals folder. By right clicking on an external reference in the List View, choosing ‘External Properties…’ and selecting the ‘External’ tab, you can retrieve the reference. The ‘General’ tab shows the abstract (if applicable). You can also select the ‘Attribute Values’ tab to view the reference information (also available as per below).
- Referencing information will be stored in the File Classifications folder, either in one ‘Reference’ classification or in different file classifications, depending on what was selected in step 6 above. These can be seen in the List view when File Classifications is selected in the Navigation View, and new attributes can be added to a reference type as required (see the Classifications page of this module for details).
- Abstracts, keywords and notes for applicable references will be stored in memos. To view these, click on the ‘Notes’ group in the Navigation view then on Memos, and double click on any item you wish to open. Alternatively, open the folder containing the PDF or reference in the List View, then right click and choose ‘Memo Link’ and ‘Open Linked Memo’ (if there is one). You can also add additional notes of your own to these memos; for details on this see the Memos page of this module.
Importing from Microsoft Outlook
If you use the desktop version of Outlook (as opposed to Office 365 on the web) you can import emails into NVivo quickly and easily, either by dragging the email into the appropriate folder in the List View in NVivo or by saving it as a .msg file in Outlook and then importing it. Either way it will be imported as a PDF, and any associated email attachments will also be imported and saved in a folder called Email Attachments (except for Excel files, which need to be saved first and then imported, and any unsupported file types). This new folder will be a sub-folder of the folder where you imported the email, however you can then move the attachment(s) to another folder (and delete unnecessary folders) if preferred.
Importing emails in this way will also create a ‘file classification’ for the email and ‘cases’ and ‘case classifications’ for the sender and the recipients (note that classifications are covered in the Classifications page of this module), as well as ‘relationships’ between the sender and the recipients (in Recipients in the ‘Coding’ group). For more information on how to import emails in this way, the results of the process and how to work with them, you may like to view the NVivo User Help - Email online help.
Alternatively, you can import email attachments without the associated email as follows:
- Select the folder you wish to import the attachment into in NVivo (for example Email Content)
- Open the email with the attachment(s) that you wish to import
- Drag the attachment(s) into the List View of the appropriate folder
Opening and editing project materials
To open project materials once you have imported them, open the appropriate folder in the Navigation View (if required) then double click on the file in the List View. It will then open in the Details View on the right. Note that you can open multiple files at once if you wish, navigating between them by clicking on the tabs at the top of the Details View.
To edit a document (not a PDF) that is open in the Details View, tick the ‘Edit’ box. Once you have done this you can make any changes you wish to the editable document. Additionally, you can run a spell check on the document by selecting the ‘Spelling’ option in the ‘Edit’ tab on the ribbon at the top of the screen.
You can also turn any pictures found in PDF files into files of their own, if required. For example, to turn the large Figure 3 on page 821 of the Analyzing Estuarine Shoreline Change PDF into a picture file, do the following:
- Right click anywhere in the document and choose ‘Selection Mode’, then change it to ‘Region’
- Click on the appropriate picture in the PDF file so that it is selected (surrounded by a dotted line)
- Right click and select ‘Copy’
- Select the folder where you want to place the new picture file from the list of folders in the Navigation View (for example Pictures)
- Right click in the blank area in the List View for that folder
- Select ‘Paste’
- Enter a name for the picture, and a description if you wish, and click ‘OK’
Once you have done this, you can comment on a particular area of a picture by selecting it, right clicking and choosing ‘Insert Row’. The coordinates of the selected region will then automatically be entered in the ‘Region’ column, and you can type any comments in the ‘Content’ column. When the number(s) assigned to a particular row(s) is selected at a later date, that region of the picture will be highlighted.Transcribing
There are a few different options for working with audio or video files in NVivo, one of which is to simply listen to and code from the audio or video timeline rather than creating a transcript. Generally it is easiest to work with a transcript, though, and obtaining one is the focus of this page.
In brief, it covers the following:
- Creating a transcript yourself in NVivo
- Creating a transcript using NVivo Transcription (a paid service)
- Other options for creating a transcript
</div>
Transcribing in NVivo
To transcribe an audio or video file yourself in NVivo, first open it in the Details View (for example open the Helen file if you have imported this previously) then tick the ‘Edit’ box. When you do this, you will notice that a new row appears underneath the waveform image of the audio file. The default is for the transcript to only have two columns of information, ‘Timespan’ and ‘Content’, but if you wish to add more (for example a ‘Notes’ column) go to: File > Project Properties (under the ‘Project Information’ heading). Then in the ‘Project Properties’ dialog box that opens:
- Select the ‘Audio/Video’ tab
- Select as appropriate either the ‘Audio’ or ‘Video’ tab under the ‘Custom Transcript Fields’ heading
- Select the ‘New’ button (note you can also remove a column you have created by selecting it and pressing the ‘Remove’ button)
- Type in the name of your new column (for example ‘Notes’)
- Select ‘Apply’ to apply the change while keeping the dialog box open, or ‘OK’ to apply the change and close the dialog box
Once you are happy with the columns for your transcript there are two ways you can transcribe the file. The first, default, option is using the ‘Normal’ Play Mode. Transcribing in this way requires you to enter the timespans for your transcript manually, and you can begin a new row whenever you like (typically when there is a change of speaker). The second option is using the ‘Transcribe’ Play Mode. Transcribing in this way means the timespans will be entered for you automatically, with timespans beginning and ending when you press play and stop respectively (note that pausing means you continue with the current timespan). You can switch between ‘Normal’ and ‘Transcribe’ modes by selecting the icons in the ‘Edit’ tab as shown below.
Whichever way you transcribe, note that you can alter the speed of the audio or video file by selecting the ‘Play Speed’ icon also found in the ‘Edit’ tab.

Transcribing with NVivo Transcription
NVivo Transcription is a paid service that you can either pay for as you go, or purchase a subscription for. More information on this service is available at the Lumivero website.
Transcribing with other software
There are plenty of transcription services available external to NVivo, and if you use one of these you can upload the finished transcript of your audio or video file into your project (there is no problem with having the audio or video file and the transcript as two separate items in your project). One example of transcription software that provides a limited amount of free transcription is Otter.ai.
Alternatively, you can create a free transcript using the Windows or online version of Microsoft Word (available through your Office 365 account). To create a transcript in this way:
- Create a new blank document
- Click on the drop-down next to ‘Dictate’ (in the ‘Home’ tab) and change it to ‘Transcribe’
- Select ‘Upload audio’
- Choose an audio file
- Click ‘Add to document’
- Save the transcript Codes & coding
One of the most helpful features of NVivo is that it enables you to readily store related content from different project materials together in the same place, allowing you to more easily synthesise and discover patterns in the data. The process of doing this is called coding, and the related material is stored together in codes. The codes you create and the coding method you use will vary according to the purpose of your analysis, your research methodology and/or your personal preference, however generally you will create codes for particular topics, themes or concepts. Depending on the coding structure you use you may find that you will then code the same material to more than one code, and this can in fact be very helpful when it comes to identifying patterns in your data.
In brief, this page covers the following:
- Different ways of creating codes and coding material to them
- How to view the contents of the codes you have created
- How to uncode material from codes
- Using coding stripes and highlighting to explore which parts of files have been coded
- Creating sub-codes and moving codes, merging codes and renaming codes
</div>
Note that in order to follow the examples in this page, you can either use the project you created in the Setting up a project page, or you can make use of the Environmental Change Down East sample project (as detailed in the Sample projects page).
Creating codes and coding material
There are a few different ways you can create new codes, depending on whether you set up all your codes first and then code, or whether you create new codes as you code (you will likely find that you do a combination of both).
Before you begin
To create a code before you begin coding, for example a Development code, do the following:
- Click Codes in the Navigation View (in the ‘Coding’ group)
- Right click in the white space in the List View and select ‘New Code…’
- Type in the name of the code (for example Development), and add a Description and Nickname if you wish. You can also use colour for the code, for example to identify different members of the team.
- Click ‘OK’
(Alternatively, you can do this by selecting the ‘Create’ tab on the ribbon at the top of the screen, and then selecting the ‘Code’ option under it).
While coding
As an example of creating a code while coding, open the Maria and Daniel interview file (in the Interviews sub-folder of Files) and scroll down to the ‘Q.4. Community and environmental change’ heading, then continue scrolling to Elizabeth’s second question (on fisheries) and Daniel’s response. To code this response to a new code, for example a Fishing Industry code, do the following:
- Highlight the text
- Right click and select ‘Code Selection’
- Click in the box under ‘Create New:’
- This will create a ‘New Code’ button towards the bottom of the dialog box
- Type in the name of the new code (for example Fishing Industry)
- Click on ‘Code Selection to ‘New Code’’
You can then check that the text you selected has been coded to the new code by clicking on Codes in the Navigation View (in the ‘Coding’ group) and double clicking on the Fishing Industry code.
Existing codes
It is also possible to use the method above to code material to existing codes. Alternatively, another way of doing this is by dragging and dropping the text to the required code. For example, you can code text from the Maria and Daniel file to the Development code by doing the following:
- Open the file (for example the Maria and Daniel file)
- Highlight the part of the text you wish to code (for example a portion relating to development)
- Click Codes in the Navigation View (in the ‘Coding’ group)
- Hold down the left mouse button and drag the highlighted text to the code you wish to code to (for example the Development code)
Once you have done this, repeat the process for the Margaret file (also in the Interviews sub-folder of Files).
Note that you can also code material from existing codes (as opposed to material from files) to new or existing codes using the methods described above; this is known as ‘coding on’.
Exploring codes
You can view all the material you have coded to codes by opening the various codes in the Details View. For example, if you open the Development code you will notice that there are three tabs on the right hand side, which are as follows:
- Reference tab: this shows the content that has been coded from each file. It is the default display tab.
- Summary tab: this summarises the files that have been coded to the code.
- Text tab: this displays content that has been coded to the code from each text file individually.
Note that if there were any other types of files besides text coded to the code, such as picture files, then the content for each such file would be displayed in an appropriate tab (for example a Picture tab).
Uncoding material
The easiest way to uncode (remove) material you have previously coded to a code is to highlight the text you wish to uncode (either in the file or in the code), then right click and select one of the following from the dialog box that appears:
- ‘Uncode…’, to select the code(s) you wish to uncode from.
- ‘Uncode from Recent Codes’, to select the code(s) you wish to uncode from using the list of recent codes displayed.
- ‘Uncode from This Code’ (if you are in the code), to uncode from the code you are in.
Alternatively, if you simply wish to make a change to material that has been coded, such as a correction to spelling, make the change in the file itself. The change will then be made automatically in all the codes where the material appears.
Coding stripes and highlighting
Coding stripes and highlighting allow you to see how much of a file has been coded (and where it has been coded to, in the case of coding stripes).
Coding stripes are coloured stripes that you can choose to display in the Details View of a file (or a code if you have coded on). To display coding stripes, for example for the Maria and Daniel file, do the following:
- Open the file (or code) in the Details View
- In the ‘Document’ tab that appears, select the ‘Coding Stripes’ option (if it’s a PDF file there will be a ‘PDF’ tab)
- Select the type of coding stripes you would like, for example ‘Recently Coded’
- If you have colour coded your codes, you can display these by clicking on ‘Coding Stripes’ and then on ‘Item Colors’
For this particular example, you should observe that the coding stripes show which sections of the Maria and Daniel file have been coded to the Development, Fishing Industry and other recently used codes. You can also see how often each part of the document has been coded, by looking at the ‘Coding Density’ stripe (a darker colour indicates that section of the document has been coded more).
Highlighting works in a similar way, in that it allows you to see how much of a file (or code) has been coded (although not where it has been coded to). To highlight a file or code simply select the ‘Highlight’ option on the ribbon (next to ‘Coding Stripes’), and choose whether you would like to highlight all coding or selected items only.
Sub-codes and moving codes
If you decide at any time that you want to make changes to your codes, for example moving, merging and/or renaming them, you can do so with relative ease (although if you want to make a lot of changes it might be worth saving a copy of your original project first just in case). The procedures for making these changes are described in this and the following sections.
To create sub-codes of parent codes, simply right hand click on the parent code in the List View and select ‘New Code…’. Alternatively, if you want to rearrange your codes and make an existing code a sub-code of another existing code you can do that too. As an example, create a new code Zoning. To then move this code to sit as a sub-code under the Development code, do the following:
- Right click on the code you want to make the sub-code (for example Zoning)
- Select ‘Cut’
- Right click on the code you want to make the parent code (for example Development)
- Select ‘Paste’
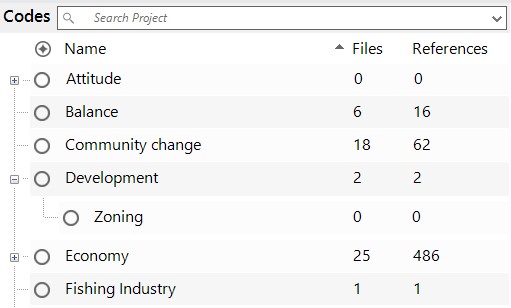
The Zoning code then becomes a sub-code of the Development code:
Merging codes
Eventually you might also want to merge two or more codes (with similar themes) that you originally created as separate codes.
As an example, create a new code Sustainable Fishing, then open the Margaret file and code the portion of text pertaining to sustainable fishing (as part of Margaret’s response to Nancy’s third question on the future of the fishing industry under the ‘Q.2. Connection to Down East natural environment’ heading) to it.
To then merge this code with the Fishing Industry code, do the following:
- Right click on the code you wish to merge (for example the Sustainable Fishing code)
- Select ‘Cut’
- Right click on the code you wish to merge into (for example the Fishing Industry code)
- Select ‘Merge into Selected Code…’
- Click ‘OK’
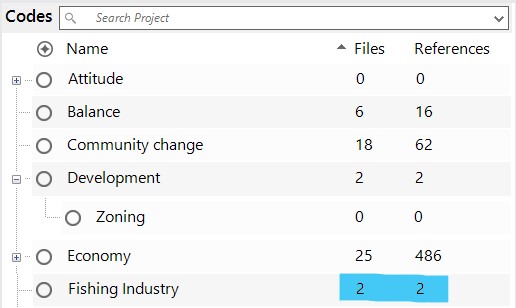
The Sustainable Fishing code is then merged with the Fishing Industry code, which should now have two references coded to it (the original Fishing Industry reference along with the Sustainable Fishing reference just coded).
Renaming codes
To rename a code, for example the Fishing Industry code to simply Fishing, do the following:
- Right click on the code you wish to rename (for example the Fishing Industry code)
- Select ‘Code Properties…’
- Enter a new name for the code (for example Fishing)
- Click ‘OK’
Alternatively, you can click once on the code to select it, then click again to make the name editable.Classifications
Classifications enable you to store values for key attributes of the cases and files in your project, for the purpose of making comparisons and/or filtering searches according to particular attributes (examples of both are provided in the Searching page of this module). While they are not essential, they can be a helpful addition to your project and many are in fact created automatically.
In brief, this page covers the following:
- Different ways to add case classifications to an NVivo project
- Different ways to add file classifications to an NVivo project
</div>
Note that in order to follow the examples in this page, you can either use the project you created in the Setting up a project page, or make use of the Environmental Change Down East sample project (as detailed in the Sample projects page).
Case classifications
Case classifications enable you to store demographic information about cases (for example people or places) in your project. You can add case classifications to your project in a number of ways, including by importing emails or survey data or importing from SPSS; by using one of NVivo’s pre-defined classifications; or by creating your own classification.
Creating a case classification by importing
Case classifications are automatically created when emails and survey data are imported into an NVivo project, and when you import from SPSS.
When you import an email into NVivo, the ‘Person’ case classification is created and the attributes are populated for the sender and recipient(s) using information available from the email (for example the name and email address). This pre-defined case classification is described in the next section.
When you import survey data into NVivo, the Survey Import Wizard creates a new classification with attributes created and populated using the closed-ended questions in the survey (the default name for the classification is ‘Survey Respondent’, but this can be changed). You can see how survey questions correspond with the classification attributes by opening a data set in the Details View in NVivo (for example the Survey Responses file in the Surveys folder, or another data set you have imported), then selecting the Case Classifications folder in the Navigation View (in the ‘Cases’ group) and clicking on the plus sign next to the classification (for example ‘Survey Respondent’) to view the attributes. You should see that these match up with the closed-ended questions (those in the grey columns) in the survey file (with the exception of the ID column).
You can also import case classifications from SPSS, by right clicking on the Case Classifications folder in the Navigation View or by opening the Case Classifications folder in the List View and right clicking in the white space. Either way, by selecting ‘Import from SPSS…’ you can choose an SPSS file and use it to create a new classification, or import it to an existing classification. Doing this will result in the variables in the SPSS file becoming the attributes of the new classification (or being added to the attributes of the existing classification), the cases (or rows of data) in the SPSS file becoming cases in NVivo, and the data in each row of the SPSS file becoming the attribute values for each case.
Using a pre-defined case classification
NVivo has two pre-defined case classifications; one for a person (with Name, Sex, Age Group, Occupation, Country of Birth and Email address attributes) and one for an organisation (with Name, Sector, Size and Industry attributes). To create a new ‘Person’ classification, for example, do the following:
- Click on the Case Classifications folder in the Navigation View (in the ‘Cases’ group), if it is not already open
- Right click in the blank area in the List View
- Select ‘New Classification’
- Select ‘Add one or more predefined classifications to the project’, and choose ‘Person’
- Click ‘OK’
You will see that a new ‘Person’ case classification has been created, with the attributes as listed above (click on the plus sign to view them).
Note that even though the ‘Person’ case classification is pre-defined, you can always rename it or edit, delete or add new attributes to it as the need arises. For example, you could delete the Country of Birth and Email address attributes, change the Sex attribute to Gender, and add a new Township attribute as follows:
- Click on the Case Classifications folder in the Navigation View (in the ‘Cases’ group), if it is not already open
- Click on the plus sign next to the ‘Person’ case classification to display the attributes
- Select both Country of Birth and Email address, right click and choose ‘Delete’
- Double click on Sex, change the name to Gender and select ‘OK’
- Right click on ‘Person’, choose ‘New Attribute’, enter the name Township and select ‘OK’
The attributes should now be as follows:
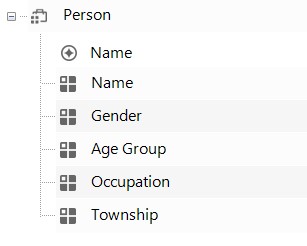
Next, to create a case from an existing file (for example the Margaret file) and assign it to this case classification, do the following:
- Right click on the file you want to create the case and case classification for in the List View (for example Margaret, in the Interviews folder)
- Scroll down to ‘Classification’
- Select ‘Person’ (under ‘Create as Case and Assign to Case Classification’; note that if you hadn’t already created the ‘Person’ case classification you could do this now as well, by selecting the ‘New Case Classification’ option instead)
- Use the ‘General’ tab to rename the case and provide a description, nickname and colour if desired
- Use the ‘Attribute Values’ tab to enter values for the attributes (for example enter the Name ‘Margaret’, the Gender ‘Female’, the Age Group ‘50 - 59’, the Occupation ‘Museum educator’ and the Township ‘Davis’)
- Select ‘OK’, then open the Case Classifications folder in the List View and double click on the ‘Person’ classification to view the new classification in the Details View

(Alternatively, you could have done things the other way around and created the case first by right clicking on the Margaret file and choosing ‘Create As’ and ‘Create as Cases’. Again you are given the option of assigning it to the ‘Person’ classification at the same time as well, or you can do so at any time later by right clicking on the Margaret case, selecting ‘Classification’ and ‘Person’. You can also create a case from scratch and then assign it to the classification, as described in the next section.)
Finally, to remove a case from a particular case classification, click on the name of the classification in the Navigation View (for example the ‘Person’ case classification in the Case Classifications folder), then right click on the particular case you wish to remove in the List View (for example Margaret), and select ‘Classification’ and ‘No Classification’. You can also delete case classifications at any time by opening the Case Classifications folder in the List View, right clicking on the appropriate case classification (for example ‘Person’) and selecting ‘Delete’, and you can delete cases in the same way (for example you could delete the Margaret case in the Cases folder).
Creating your own case classification
Alternatively, you may wish to create your own classification from scratch. To create a ‘Place’ case classification, for example, do the following:
- Open the Case Classifications folder in the List View, and right click in the blank area
- Select ‘New Classification’
- Enter a name for the new classification (for example ‘Place’)
- Select ‘OK’
- You can then add attributes to the new case classification as described above, that is by right clicking on ‘Place’ in the List View of the Case Classifications folder, then selecting ‘New Attribute’ (for example add Name, Population Size and State attributes, ensuring you change the ‘Type’ to ‘Integer’ for Population Size)
You can create a case from an existing file and assign it to this classification using the method described previously, or you can create a case from scratch. To create one from scratch, right click on the Cases folder in the Navigation View (or in the blank area in the Cases folder in the List View) and select ‘New Case’. Enter a name for the case (for example Davis) and a nickname and colour, if desired, in the ‘General’ tab. To then assign the case to the new case classification ‘Place’, select the ‘Attribute Values’ tab and select ‘Place’ as the case classification. Finally, enter values for the attributes in the table that will appear below (for example enter the Name ‘Davis’, the Population Size ‘422’ and the State ‘North Carolina’).
Note that to add data to the Davis case, you can code to it as you would to a code (as described in the Codes & coding page of this module). Doing this will allow you to analyse the data stored in the case using the attributes of the case classification.
File classifications
File classifications are very similar to case classifications, only they are used to store descriptive information about files in your project. You can add file classifications to your project in a number of ways, including by importing emails or importing from EndNote or SPSS; by using one of NVivo’s pre-defined classifications; or by creating your own.
Creating a file classification by importing
File classifications are automatically created when emails are imported into an NVivo project, and when you import from EndNote and SPSS.
When you import an email into NVivo, the pre-defined ‘Email Message’ file classification is created and the attributes are populated using information available from the email (for example the subject, who it is from and to and the date sent and date received).
When you import from EndNote into NVivo, there is the option to assign to the ‘Reference’ file classification or to assign to different classifications based on the reference type (‘Journal Article, ‘Book’, ‘Report’, etc.). All of these are pre-defined file classifications in NVivo, and all will be populated with the relevant reference information. To see the file classifications that have been created for references, either in the sample project or in the project you have created in this module, click on the File Classifications folder in the Navigation View (in the ‘Data’ group). You should see at least one file classification; either ‘Reference’ (if in the sample project, or if in your own project and you chose to assign all records to a single classification when importing) or ‘Journal Article’ and ‘Book’ (if in your own project and you chose to assign records to different classifications based on type). To see the attributes of any of these (or other) classifications, click on the plus sign next to the relevant classification (as with case classifications, to create a new attribute for a classification right click on it and select ‘New Attribute…’). To see the files that have been classified as a particular file classification, double click on it so that the classification sheet opens in the Details View.
Importing file classifications from SPSS is done in the same way as for case classifications (as described in the Case classifications section), only using the File Classifications rather than Case Classifications folder. Doing this will result in the variables in the SPSS file becoming the attributes of the new classification (or being added to the attributes of the existing classification), the cases (or rows of data) in the SPSS file becoming ‘External’ files in NVivo, and the data in each row of the SPSS file becoming the attribute values for each ‘External’ file.
Using a pre-defined file classification
NVivo has many different pre-defined file classifications; from ‘Ancient Text’ and ‘Artwork’ to ‘Web Page’ and ‘YouTube’, and everything in between. To create a new pre-defined file classification, right click on File Classifications in the Navigation View, or in the white space in the File Classifications folder in the List View, and select ‘New Classification’. Next choose to ‘Add one or more predefined classifications to the project’ and choose one from the list; experiment by choosing ‘Reference’ for example. You can view the attributes of this new file classification by clicking on the plus sign next to the ‘Reference’ file classification in the File Classifications folder in the List View, and can always rename, edit, delete or add these in the same way as for a case classification. Finally, to assign any of the files in your project to this new classification, right click on it in the List View and choose ‘Classification’ and ‘Reference’.
Creating your own file classification
You can also create your own file classification from scratch, again by right clicking on File Classifications in the Navigation View, or in the white space in the File Classifications folder in the List View, and selecting ‘New Classification’. Give a name to the new classification and a description if wished (for example try the name ‘Book2’), and select ‘OK’. You can then add attributes to the new file classification by right clicking on ‘Book2’ in the List View of the File Classifications folder, and selecting ‘New Attribute’.Searching
You can use queries in NVivo to search your project materials in a range of different ways and for a variety of purposes, from searching for specific words or phrases, or for frequently occurring words, in order to inform your coding; to searching material that has been coded to combinations of codes or to codes for particular classification attributes, in order to uncover patterns in the data. This page looks at some examples of different queries.
In brief, it covers the following:
- How to conduct a text search query to search for specific words and phrases in selected materials
- How to conduct a word frequency query to find the most frequently occurring words in selected materials
- How to use coding queries to find content that has been coded to combinations of codes, cases or attribute values
- How to use matrix coding queries to make comparisons and look for patterns in your data
- How to use crosstab queries to compare codes between different values of a classification attribute
</div>
Note that in order to follow the examples in this page, you should make use of the Environmental Change Down East sample project (as detailed in the Sample projects page).
Text search queries
A text search query is used to search project items and folders (for example all files, files in a specific folder, material coded to codes, etc.) for specific words and phrases.
To run a simple text search query, for example to search for the word ‘erosion’, do the following:
- Select Query Criteria in the Navigation View (in the ‘Queries’ group), then right click in the white space in the List View and select ‘New Query’ and ‘Text Search’ (alternatively, select the ‘Explore’ tab on the ribbon at the top of the screen, then select the ‘Text Search’ option under it)
- Choose where you would like to search; the default is ‘Files & Externals’, but if you would like to search specific items or folders then click on the appropriate button and make your selections in the dialog box that appears
- Enter the text to search for in the ‘Search for’ box (for example ‘erosion’); you can enter multiple words and/or can use special characters and operators to assist with your search using the ‘Special’ button if required
- You can alter the ‘Spread to’ from the default ‘None’ to a different context if you would prefer to see more, or less, of the context of the word(s) in the resulting query
- Choose how precise you wish to be with words in your search using the ‘Find’ slider on the right (for example choose to search for Exact matches, With stemmed words, With synonyms, etc.)
- Select ‘Run Query’
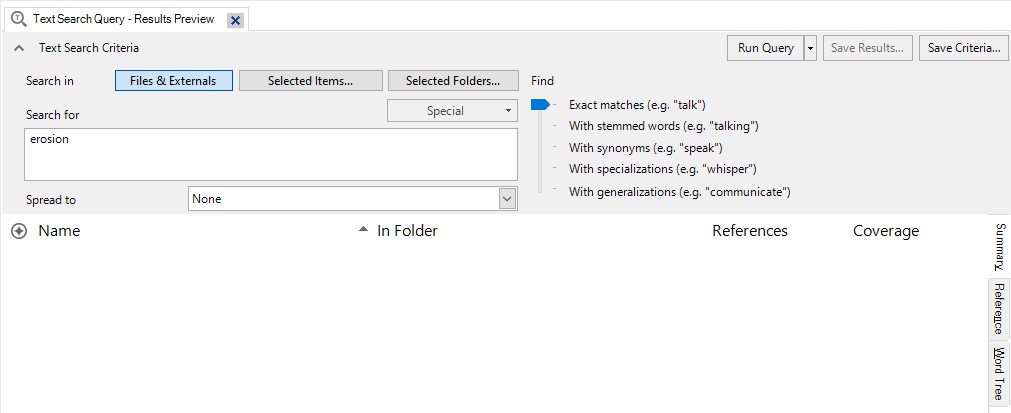
The results of the text search query will then be displayed underneath in a series of tabs:
- The Summary tab is the default display tab, showing all files that contain the search word(s), and the number of occurrences.
- The Reference tab displays a snippet of the context of each instance of the search word, sorted by file (note that to change the context to view more, or less, you can highlight and then RHC on the selected instance(s), then select ‘Coding Context’ and change it; alternatively, you can always run the query again with a different ‘Spread to’ option if preferred, and/or you can click on the file location link to see the results highlighted in the original document).
- File-specific tabs (for example PDF, Dataset) do the same, but each file is displayed on a separate page.
- The Word Tree tab displays the results of the search in a word tree, with the search term in the middle and the preceding and subsequent text on either side (listed alphabetically). Double clicking on any part of a sentence will open it in the file where it appears. The word tree can be exported, printed or copied by right clicking on it and selecting the required option from the menu.
If you want to keep a copy of your text search query, you can choose to either save the results as a new code (or merged with an existing code) or to save the query criteria (for future use), by selecting the ‘Save Results…’ or ‘Save Criteria…’ buttons respectively. For example, to save the query criteria of your most recent search do the following:
- Select ‘Save Criteria…’
- Give a name to the new query criteria (for example Erosion), and a description if required
- Click ‘OK’
You can also filter a text search query according to a particular file classification type or types, or according to a particular attribute of a file classification. For example, to run the previous query again but this time only for items classified as a ‘Reference’ with the Year attribute set to 2010, open the saved Erosion query criteria (located in the List View of Query Criteria) and do the following:
- For the ‘Search in’ option, this time choose ‘Selected Items…’
- Select the ‘Filter’ button (bottom left hand corner)
- Tick ‘Classified items where’ (bottom option)
- Click ‘Select…’, choose the file classification and then attribute that you want to filter your search by (in this case ‘Reference’ and Year), then select ‘OK’
- Choose the filter criteria (in this case choose ‘equals value’)
- Choose the value of the attribute you want to filter your search by (‘2010’)
- Select ‘Find Now’
- When you look through the project items in the ‘Select Project Items’ dialog box now (by clicking on the names of folders in the list on the left hand side, clicking on the ‘+’ signs to open sub-folders as required), everything except items that adhere to the filter will be greyed out. So you can either select the applicable non-greyed out item(s), or (easier) just tick the ‘Files’ box and all the non-greyed out files will be automatically ticked (do this now).
- Select ‘OK’
- Adjust the other search options as required (as detailed previously)
- Select ‘Run Query’
The search results will only include occurrences of the word ‘erosion’ in files of the type ‘Reference’ from the ‘Year’ 2010. You can then save these results as a code (if wished) as follows:
- Select ‘Save Results…’
- Choose whether to ‘Create Results as New Code or Case’ or ‘Merge Results into Existing Code or Case’
- Choose a Location; the default is to store the results code in the Query Results folder, but you can choose to store it in the Codes or Cases folder, or a sub-folder of these, instead (keep Query Results as the location for this example)
- Give a name to the new code (for example Erosion 2010), and a description if required
- Click ‘OK’
Word frequency queries
A word frequency query is used to determine the most frequently occurring words in various project items and folders, and to display them in different ways.
To run a word frequency query for project materials in the Interviews folder, for example, do the following:
- Select Query Criteria in the Navigation View (in the ‘Queries’ group), then right click in the white space in the List View and select ‘New Query’ and ‘Word Frequency’ (alternatively, select the ‘Explore’ tab on the ribbon at the top of the screen, then select the ‘Word Frequency’ option under it)
- Choose where you would like to search; the default is ‘Files & Externals’, but if you would like to search specific items or folders then click on the appropriate button and make your selections in the dialog box that appears (for example to run the query for the Interviews files only, click on the ‘Selected Folders…’ button and tick the Interviews sub-folder in the Files folder, then click ‘OK’). Note you can also filter the query as detailed for text search queries.
- Enter the number of words you would like displayed (for example 20), and the minimum length (keep as 3)
- Choose how precise you wish to be with words in your search using the ‘Grouping’ slider on the right choose to search for Exact matches, With stemmed words, With synonyms, etc.)
- Select ‘Run Query’
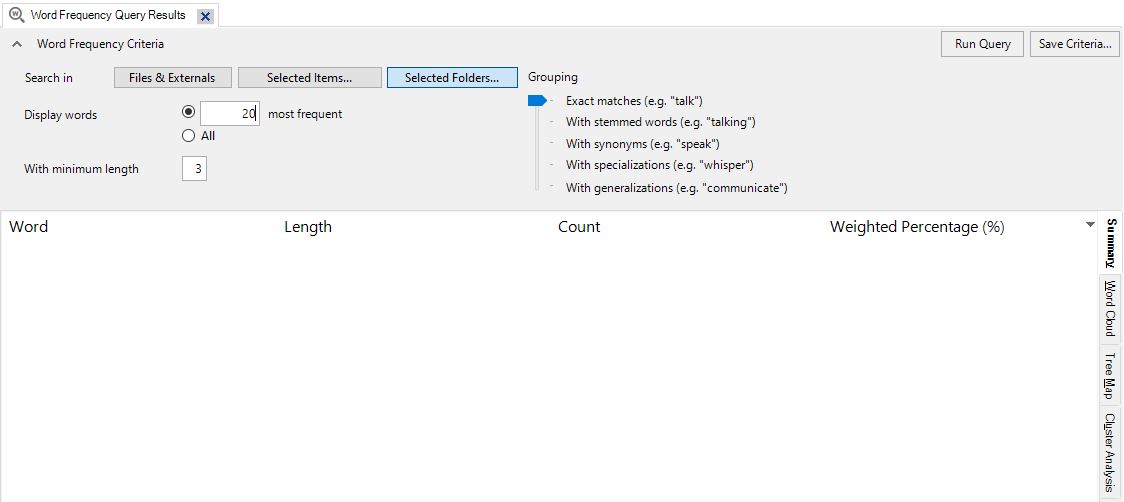
The results of the word frequency query will then be displayed underneath in a series of tabs, two of which are as follows:
- The Summary tab (the default display tab): this shows the most frequently used words and the number of occurrences.
- The Word Cloud tab: this displays the most frequently occurring words in a word cloud. You can change the look of the word cloud using the menu at the top of the screen, and can export, print or copy it by right clicking on it and selecting the required option from the menu.
Note that you can remove a particular word from the search results, and therefore also from the word cloud, by selecting it in the Summary tab and then either right clicking and selecting ‘Add to Stop Words List’, or choosing this from the menu at the top of the screen. Either way, press ‘OK’ and then run the query again to the view the updated results.
If you want to keep a copy of your word frequency query you can choose to save the results in the Queries Results folder (in the ‘Queries’ group) by selecting the ‘Save Criteria…’ button and naming the query as appropriate.
Coding queries
Coding queries allow you to search content that has been coded, either to code(s) or case(s), according to specific combinations of codes, cases or attribute values. For example, if you are interested in knowing what males think about infrastructure in the sample project you would do the following:
- Select Query Criteria in the Navigation View (in the ‘Queries’ group), then right click in the white space in the List View and select ‘New Query’ and ‘Coding’ (alternatively, select the ‘Explore’ tab on the ribbon at the top of the screen, then select the ‘Queries’ drop down menu and choose ‘Coding’)
- Choose where you would like to search; the default is ‘Files & Externals’, but if you would like to search specific items or folders then click on the appropriate button and make your selections in the dialog box that appears. Note you can also filter the query as detailed for text search queries.
- Choose either ‘All’ or ‘Any’ for ‘of the following are true’, depending on if you want to search for material that meets ALL the conditions you are about to specify, or just ANY (for example to search for material that has been coded to the Infrastructure code and has ‘Male’ as the value for the attribute Gender, choose ‘All’)
- Next to ‘Coded to’ ‘All Selected Codes or Cases’, click on the button with the ellipsis and tick the applicable code(s) (for example Infrastructure), then click ‘OK’
- Click on the ‘+’ sign at the end of that row, to add a new condition
- This time, change the value in the second box to ‘Any Case Where’, click on the button with the ellipsis, click on the ‘+’ sign next to the case classification you are interested in (for example ‘Person’) to display the attributes, choose the appropriate attribute (for example Gender) and click ‘OK’
- Now choose which values of this attribute you want to use for the condition (for example keep the first new box as ‘equals value’, and change the second new box to ‘Male’)
- Select ‘Run Query’
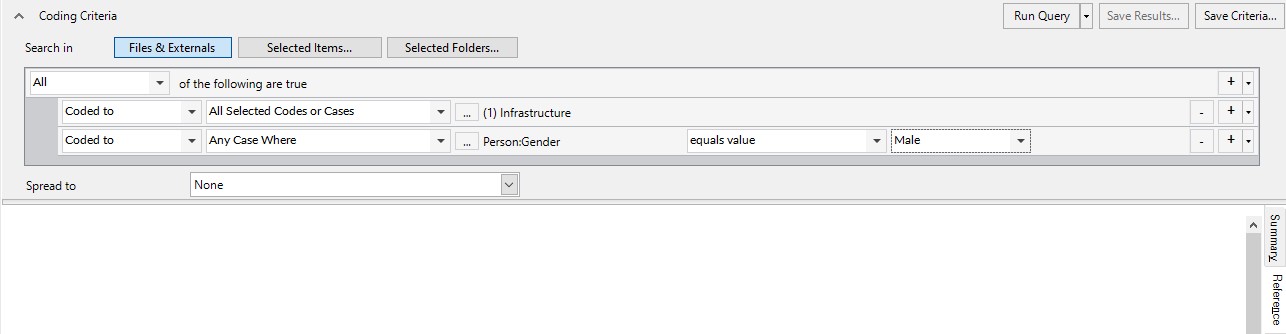
The results of the coding query will then be displayed underneath in a series of tabs, as per a code. If you want to keep a copy of your coding query you can do so by choosing ‘Save Results…’ or ‘Save Criteria…’. In this case it would be appropriate to choose ‘Save Results…’ and to change the location to be a sub-code of the Infrastructure code (by clicking on ‘Select…’, clicking on the plus sign next to the Codes folder, selecting the Infrastructure code and pressing ‘OK’), so that the new code sits with the existing codes as a sub-code of the Infrastructure code.
Matrix coding queries
You can use matrix coding queries to make comparisons and look for patterns in your data. For example, you can look at how much and what content has been coded at intersections of different codes, and at how much and what content has been coded for different cases for different codes. For example, you can compare positive and negative attitudes to four different issues in the sample project by finding which content has been coded at the intersection of different codes, as follows:
- Select Query Criteria in the Navigation View (in the ‘Queries’ group), then right click in the white space in the List View and select ‘New Query’ and ‘Matrix Coding Query’ (alternatively, select the ‘Explore’ tab on the ribbon at the top of the screen, then select the ‘Matrix Coding Query’ under it)
- Choose where you would like to search; the default is ‘Files & Externals’, but if you would like to search specific items or folders then click on the appropriate button and make your selections in the dialog box that appears. Note you can also filter the query as detailed for text search queries.
- Choose what you would like displayed in the Rows of the matrix by clicking on the ‘+’ sign underneath the ‘Rows’ box. For example, click on ‘+’ and choose ‘Select Items…’, then click on ‘Codes’ to view the list of available codes and tick Balance, Community change, Economy and Infrastructure (for example) and click ‘OK’. You will then see a list of codes that will display as rows in the matrix; if there are any you decide you don’t want after all then select and click the ‘-‘ sign.
- Now click on the ‘+’ sign underneath the ‘Columns’ box to choose what you would like in the columns; for example choose ‘Select Items…’ again, then click on ‘Codes’ to view the list of available codes, click on the plus sign next to the Attitude code, tick Negative and Positive and click ‘OK’. Again you will see a list of codes that will display in the matrix, this time in the columns; if there are any you decide you don’t want after all then select and click the ‘-‘ sign.
- When you are happy with the selected options choose ‘Run Query’.
Once you have your matrix, to view the codings for each intersection (cell in the matrix) you can double click on it. You can also choose to colour code the matrix according to which intersections have the most and least coding by selecting the appropriate cell shading option from the ribbon, and can save the matrix by choosing ‘Save Results…’ or ‘Save Criteria…’
Crosstab queries
As with a matrix coding query, you can use a crosstab query to make comparisons and look for patterns in your data. While the two queries are very similar, and indeed can both be used in similar ways, a crosstab query is the best choice when you want to compare codes between different values for an attribute of a classification. For example, you can compare how often people from different townships responded to four different issues in the sample project as follows:
- Select Query Criteria in the Navigation View (in the ‘Queries’ group), then right click in the white space in the List View and select ‘New Query’ and ‘Crosstab’ (alternatively, select the ‘Explore’ tab on the ribbon at the top of the screen, then select the ‘Queries’ drop down menu and choose ‘Crosstab’)
- Choose where you would like to search; the default is ‘Files & Externals’, but if you would like to search specific items or folders then click on the appropriate button and make your selections in the dialog box that appears. Note you can also filter the query as detailed for text search queries.
- Keep ‘Crosstab codes against’ as ‘Attributes’ (you would change it to ‘Cases’ if you want to compare for different cases instead of attributes).
- Click on the ‘+’ sign underneath the ‘Codes’ box to choose what you would like in the rows of the table; tick Balance, Community change, Economy and Infrastructure (for example) and click ‘OK’
- Keep the ‘Classification’ as ‘Person’ and ‘Attribute1’ as Township
- When you are happy with the selected options choose ‘Run Query’
Once you have your table, to view the codings for each intersection (cell in the table) you can double click on it. You can also choose to colour code the table according to which intersections have the most and least coding by selecting the appropriate cell shading option from the ribbon, and can save the table by choosing ‘Save Results…’ or ‘Save Criteria…’Charts & mind maps
In addition to the word trees and word clouds discussed in the Searching page of this module, NVivo can also be used to create other visualisations in the form of charts, maps, and diagrams.
In brief, this page covers the following:
- How to create a chart to visualise various aspects of the codes, files and cases in your project
- How to create different types of maps to visualise ideas and display connections in your project
</div>
Note that in order to follow the examples in this page, you should make use of the Environmental Change Down East sample project (as detailed in the Sample projects page).
Creating a chart
NVivo allows you to create charts to visualise various aspects of the codes, files and cases in your project. For example, you could create a chart to show how many of each reference type exist in the sample project, using the Reference Type attribute of the ‘Reference’ file classification. You can do this as follows:
- Go to the ‘Explore’ tab and choose ‘Chart’
- Select ‘Charts…’ from the drop down menu
- Select ‘Files’ and click ‘Next’
- Choose ‘Files by attribute for an attribute’ (to just work with one attribute), then choose ‘Next’ again
- Click on ‘Select…’ to choose the attribute to display on the x-axis (for example choose the Reference Type attribute of the ‘Reference’ file classification), then click ‘OK’
- Change the ‘X-axis attribute’ to be “All attribute values except ‘Unassigned’, ‘Not Applicable’” (to not display these values in the graph if preferred)
- Select ‘Finish’ and your graph will display
Note that you can edit your chart once created using the options available in the ‘Chart’ tab on the ribbon, and you can export, print or copy the chart by right clicking on it and selecting the required option from the menu.
For more information on charts, you may like to view the you may like to view the NVivo User Help - Charts online help.
Creating maps
You can create different types of maps to visualise ideas and displays connections and links in your NVivo project. In particular, a mind map can be used to display ideas and relationships and can be used to create codes, while a concept map can be used to define and connect concepts and a project map can be used to visualise items and links in a project. This section provides an example of how to create a mind map, but for more on this or on other types of maps you may like to view the NVivo User Help - Maps online help.
Creating a mind map
A mind map is a brainstorming tool that starts with a central topic or main idea. Ideas that relate to the central topic are represented by an individual shape and connected with a line to the main idea, either at the same level or in a hierarchy. Additionally, an idea that is not connected to any other ideas can be added as a floating idea in the mind map.
To create a new mind map for the sample project, do the following:
- Select Maps in the Navigation View (in the ‘Visualizations’ group), then right click in the white space in the List View and select ‘New Mind Map…’ (alternatively, select the ‘Explore’ tab on the ribbon at the top of the screen, then select the ‘Maps’ drop down menu and choose ‘Mind Map’)
- Enter a name for the map (for example ‘Sample mind map’) and a description if wished, then click ‘OK’
- The new map should open in the Details View and will also be stored in the Maps folder (in the ‘Visualizations’ group). To add items to the map, for example items that relate to the sample project, do the following:
- Enter the name of a key concept or topic in the circle displayed in the mind map (for example ‘Shoreline Changes’)
- Right click on this circle and select ‘Insert Sibling Idea’ or ‘Insert Child Idea’ and add text to the box that appears (for example choose ‘Insert Child Idea’ and add the text ‘Development’)
- Right click on the latest idea (for example ‘Development’) and select ‘Insert Sibling Idea’, then add text to the box that appears (for example ‘Fishing’)
- Right click on the latest idea (for example ‘Fishing’) and select ‘Insert Child Idea’, then add text to the box that appears (for example ‘Recreational Fishing’)
- Right click on the latest idea (for example ‘Recreational Fishing’) and select ‘Insert Sibling Idea’, then add text to the box that appears (for example ‘Commercial Fishing’) (alternatively, you could right click on ‘Fishing’ and select ‘Insert Child Idea’)
- Right click in the white space and select ‘Insert Floating Idea’, then add text to the box that appears (for example ‘Community Views’)
- To edit any item labels, either rick click on the item and choose ‘Edit Label’ from the menu, or double click on the item
- To delete any ideas, right click on the item and choose ‘Delete’ from the menu
Note that you can use the menu items in the ‘Mind Map’ tab at the top of the screen to change the Fill, Border Colour and Border Width of various components of the mind map if necessary, and also to change the layout (for example to be top down).
To export or print your mind map, right click in the mind map area and select the required option from the menu. To create codes for items in the mind map, click on ‘Create as Codes or Cases’ in the menu and then click ‘OK’. The mind map will be converted into the themed code hierarchy under Codes in the List View (or under Cases if this option is selected). Literature reviews
NVivo can be a helpful tool to assist with literature reviews as it allows you to organise, summarise and search the literature you have found on your particular topic. When conducting a literature review, if you have already used referencing software (for example EndNote) to store your references, then you can import them to NVivo using the instructions provided in the Importing from EndNote section of this module (or similar if using different referencing software). Alternatively, if you have not uploaded them to referencing software then you can import them from a saved location on your computer using the instructions provided in the Importing materials saved on your computer section of this module.
Once you have added your literature to an NVivo project, you can create codes and search project materials as described previously in this module. This page provides some examples of codes and searches that could help with a literature review, and also explains some other features that might be useful.
In brief, it covers the following:
- How to highlight and make short notes on your materials using annotations
- How to make notes on your materials in linked documents called memos
- Ideas for coding and querying materials in your literature review
- How to group similar articles together by visualising them in a cluster analysis
- How to create a working document for your literature review
</div>
Note that in order to follow some of the examples provided, you can either use the project you created in the Setting up a project page, or make use of the Virtual Reality and Health sample project (as detailed in the Sample projects page).
Annotations
Annotations can be used for a range of purposes, including to highlight a word or phrase that needs further definition, or to clarify or comment on a particular aspect of an argument.
To add an annotation to a document, open it and highlight the text you wish to annotate. Then either right click and choose ‘New Annotation’ from the menu that appears, or click on the down arrow for the ‘Annotations’ icon above the document (the icon which looks like a speech bubble) and choose ‘Add Annotation’. Either way, you can then type your annotation.
To show or hide the list of annotations at any time, select or deselect the ‘Annotations’ check box on the menu at the top of the screen, or click on the down arrow for the ‘Annotations’ icon above the document and select or deselect ‘View Annotations’. If you wish to delete an annotation, make sure the annotations are displayed and then select the item number for the relevant annotation, right click and choose ‘Delete’. Note that you can view the list of documents you have annotated by clicking on Annotations in the Navigation View (in the ‘Notes’ group), and can double click on any of these to view the annotation(s).
Memos
Memos are documents in your project that you can use to paraphrase what you have read, as well as to store your own personal insights, observations, interpretation and notes. Each memo is generally linked to an item in your project, although you can also create memos which are not linked if wished.
If you have imported from referencing software such as EndNote, the default is for a memo to be created for each reference containing the abstract, keywords and notes. You can check if this is the case for a particular reference by right clicking on it, either in the List View at the middle or in the Details View at the right of screen, and choosing ‘Memo Link’ (or ‘Links’ and then ‘Memo Link’) from the menu. If a memo already exists you will have the option to open or delete the memo; if it doesn’t, you will have the option to link to a new or existing memo. Either way, you can add your own content to a memo by opening it and selecting the ‘Edit’ box above it (once you have finished, click the ‘Edit’ box again to turn the edit mode off). You can also view a list of memos in your project by selecting Memos (or a sub-folder of Memos, for example Analysis memos and Article summaries in the sample project) in the Navigation View (in the ‘Notes’ group), and can double click to open any of these.
You might find that you prefer to code directly from the references in your project, or that you wish to paraphrase and add observations to memos for the items and to code from these instead (or you could do a combination of both).
Codes and queries
The process of coding for a literature review is the same as that described in the Codes & coding page of this module, and again you will generally create codes for particular topics and themes that occur in your literature. However, there are also some additional codes that you may want to consider including when using NVivo for a literature review. For example:
- Definitions
- Good quotes
- Methodology
- Methods
- Limitations
- References
- References to follow up
If you do create these or similar codes, you can store them together in a Literature Review folder by right clicking on Codes in the Navigation View and selecting ‘New Folder…’ then naming it as required. You can then create the codes in this folder, or can copy and paste (or drag and drop) them there if you have already created them somewhere else.
One of the reasons you might like to create a References code is that you can use it to help you find additional articles on the topic of your literature review. To do this, code the reference section from each of your existing articles to the References code, then run a word frequency query on that code only (by choosing ‘Selected Items…’ and selecting the References code in step 2 of the instructions). You can then double click on any of the words in the search results to view the references containing those words.
Conducting a cluster analysis
You can use a cluster analysis to find out which of your articles are most similar, which can help you decide the best order to read them. To do this, select all or some of your articles then right click and select ‘Visualize’ and choose ‘Cluster Analysis of Selected Items’. When you do this, the articles that appear closer together in the diagram are more similar and so you may find it helpful to read them together.
Creating a literature review document
Finally, if you would like to keep everything together in your NVivo project then you may like to create a working document for your topic. To do this, open the folder where you would like to store the document (or create a new one), then right click in the List View, choose ‘New File’ and ‘New Document…’. Name the document and click ‘OK’, and a blank document will open in the Details View.
The basic Microsoft Word functions for use in your working document will be available in the menu in the ‘Edit’ tab at the top of the screen, and you can turn on or turn off the edit mode by clicking on the ‘Edit’ box as per memos. You can use this document to keep track of your literature search strategies, the databases you use and so on. You can save this document to your computer at a later date if wished by right clicking on it either in the List View or in the Details View, choosing ‘Export’ and ‘Export Document…’ (or just ‘Export Document…’), browsing to choose where you would like to save it and then selecting ‘OK’.
Feedback
If you would like to provide feedback on this module please do so by answering some or all of the questions in the form below. Alternatively for any questions about the module please contact Library-UniSkills@curtin.edu.au
We review this feedback regularly, and take your suggestions on board to improve the module. Thank you for your feedback!
Explore more here
About UniSkills
UniSkills was created and is maintained by Curtin University Library. To report issues with UniSkills contact Library Help.
Twemoji icons by Twitter, Inc and other contributors, licensed under a CC-BY 4.0 licence.
Except where otherwise noted, UniSkills content in all it’s forms (website, PDFs etc) are licensed under a Creative Commons Attribution ShareAlike 4.0 International Licence. We ask that you attribute any use of the content as created by Curtin University Library with a link to the Library website.
This license does not extend to other Curtin University and Curtin University Library webpages, or to Curtin branding and trademarks. Curtin University’s copyright information is available on the Curtin website.