
EndNote-extras-printable-guide-UniSkills.pdf
EndNote extras
Table of Contents
Introduction
This guide outlines additional functionality available in the EndNote program and is designed to support Masters/PhD students and staff working on in-depth projects. If you are new to EndNote please complete the EndNote essentials module for an introduction to setting up and using EndNote.
What you will learn
- Library syncing, including setting up EndNote sync, and syncing your library to additional computers
- Finding and editing styles, including downloading additional journal styles and editing existing styles
- Working with PDFs, including creating references from PDFs and automatic importing of PDFs
- Managing your library, including record numbers, changing display fields, merging multiple libraries, finding reference updates and sharing libraries
- Working with long documents, including converting to unformatted citations, creating chapter and standalone bibliographies, merging chapters from different documents, exporting a traveling library, and working with track changes
- Using EndNote with other programs, including Word Online, Google Docs, Apple Pages, and Microsoft PowerPoint (Windows).
Library syncing
Library syncing Enabling sync in EndNote allows you to:
- Access your library from different computers and devices
- Share your library with other users
- Back up your references online
- Use additional features available in EndNote Web (for EndNote 21 and EndNote 2025).
This helps you keep your work safe and makes it easier to manage your references across multiple locations.
Set up EndNote Sync
It is recommended that you create a backup of your library before syncing.
- Go to the Edit menu (Windows) or the EndNote menu (Mac) and select Preferences/Settings, then click on Sync
- Click the Enable Sync button (this will open the EndNote login window)
- Click Sign Up to create a new account and follow the on-screen instructions to complete the registration.
Sync to additional computers
To sync on a second or third computer:
- Open EndNote and create a new EndNote library
- Click on Library in the toolbar and select Sync
- Enter your EndNote account details and perform your initial sync to add the existing references to this library.
Synced libraries and Word documents
When you sync libraries on multiple computers, the contents of the library will remain the same but the record numbers for the references will be different. If you open a Word document with EndNote citations on a new computer, you need to click Update Citations and Bibliography in the CWYW toolbar to associate the citations with the references in the synced library. Add & edit styles
Download additional styles
When you download EndNote, it automatically includes hundreds of referencing styles. The default style is called Annotated, but you can change it to another style. To choose a different referencing style:
- Select a reference in your Library and open the preview pane
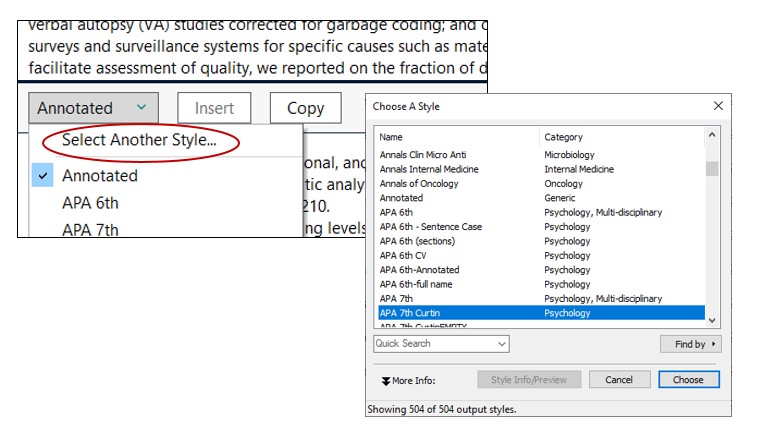
- Click on the Bibliographic Output Style box and from the drop-down menu, click Select Another Style
- A Choose A Style box will appear. It shows an expanded list of referencing styles
- Find the style you want, highlight it, and click Choose
- Your references will now appear in the style you selected
- After you choose a style from the list, it will be added to the drop-down menu in the Bibliographic Output Style box.
If the style you need is not already included in EndNote, you can download more styles from the EndNote website.
To download a new style:
- Go to the EndNote Output Styles page on the EndNote website
- Find the style you need and click Download next to it
- Double-click the downloaded style file. It should open in EndNote
- In EndNote, go to File and click Save As
- Remove the word ‘Copy’ from the style name and click Save
- Click File again and choose Close Style.
The style will now be available when you click Select Another Style in the Bibliographic Output Style drop down menu.
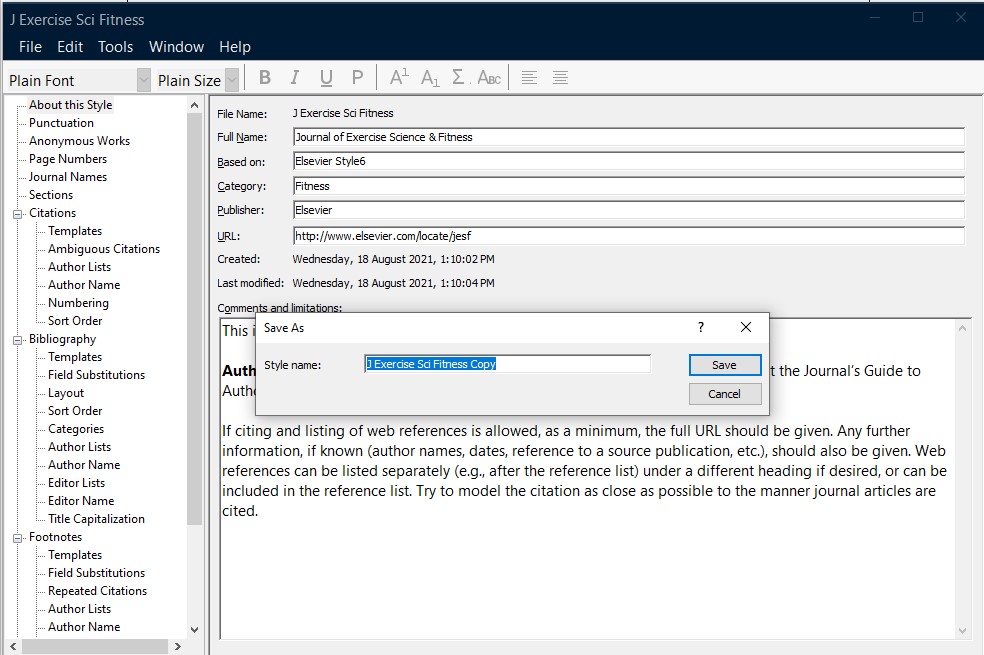
If a journal name includes an ampersand symbol (&), make sure to use the ampersand when searching on the EndNote styles page. For example, search for Journal of Exercise Science & Fitness. If you use the word ‘and’ instead of the ampersand symbol, the style may not appear in the search results.
</div>
Modify reference types and output styles
If you cannot find the referencing style you need on the EndNote website, or if you need to change an existing style, you can edit styles to match your referencing requirements. Curtin Library is not able to edit styles for you. However, Clarivate provides instructions on how to do this. In EndNote 20 and above, the Output Styles are found under the Tools menu.
- Style editing guide for Windows and macOS Attach PDFs
Import and create references from PDFs
EndNote can create references from PDF files. You can import a single PDF or a folder with multiple PDFs. EndNote will try to automatically create a reference for each file.
- In EndNote, go to File and Import
- Choose File… to import one PDF or Folder… to import several PDFs at once
- Click Choose and find your PDF file or folder
- For Import Option, select PDF
- Choose Discard Duplicates to avoid adding the same reference twice
- Click Import.
Your PDF will now appear as a reference in your EndNote library.
If the PDF does not include a DOI (Digital Object Identifier), EndNote will create a reference with only the filename of the PDF. You will need to edit the reference manually:
- Copy the title from the PDF and paste it into the Title field of the reference
- Save the reference
- Right-click the reference in your library and select Find Reference Updates
- If no updates are found, you must enter the reference details yourself.
Automatic import of PDFs
EndNote can automatically import PDFs from a folder on your computer.
- Create a folder on your computer (e.g. on your desktop) and save your PDFs there
- In EndNote, click the Edit menu, select Preferences and PDF Handling (Windows) OR click on EndNote, select Preferences and PDF (Mac)
- Tick Enable automatic importing under PDF Auto Import Folder
- A box will appear. Select the folder you created and click OK.
- Click Apply, then OK.
EndNote will now regularly check this folder, import any new PDFs, and create references in your library.
Cite from a PDF (EndNote 2025)
EndNote 2025 allows you to insert a highlighted quote from a PDF, along with a formatted citation, into your Word document with just one click. To do this:
- Open your Word document and place the cursor where you want to insert the quote and citation
- In your EndNote library, find the reference you want to cite and double-click it to open the reference
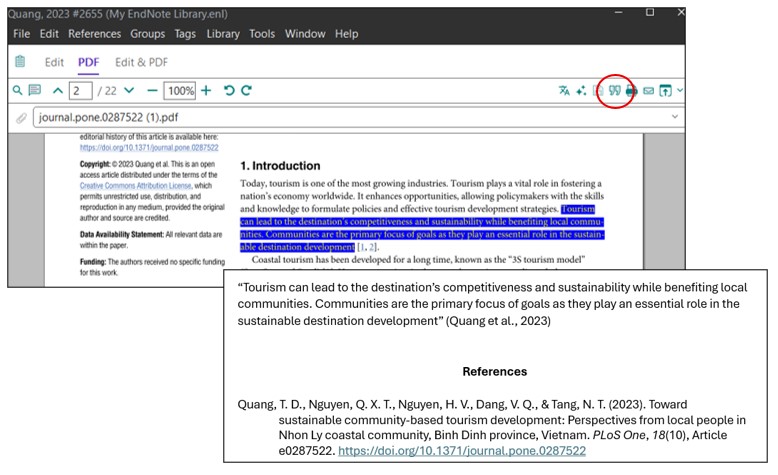
- Go to the PDF tab in the reference. To view the PDF in a separate window, click the Open in new window icon next to the PDF tab
- Highlight the text you want to quote in the PDF and click the quotation mark icon in the top right corner
- The quote will be inserted into your Word document, followed by the in-text citation in your selected referencing style.
 Manage your library
Record numbers
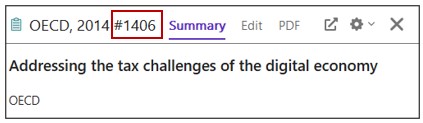
EndNote automatically gives each reference a unique record number (e.g. #1, #2, #3). These numbers are assigned in order and cannot be changed. If you delete a reference, its number will not be reused.
Display fields
You can change which fields (such as Author, Year, Title) are shown in the Reference panel and the order they appear.

- Go to Edit menu (Windows) or EndNote (Mac) and click on Preferences
- Click on Display Fields from the left menu
- Use the drop-down menu next to each column to choose the field you want to show
- Click Apply and OK.
Merge multiple libraries
You can combine two EndNote libraries by importing one into another. Always make a backup of your main library before merging.
- Open your main library (the one you want to add references to)
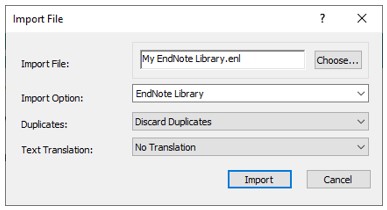
- Go to File, select Import and File…
- For Import Option, choose EndNote Library
- Click Choose… and find the library file (.enl) you want to import
- Select Discard Duplicates
- Click on Import
The references will be added to your main library and given new record numbers.
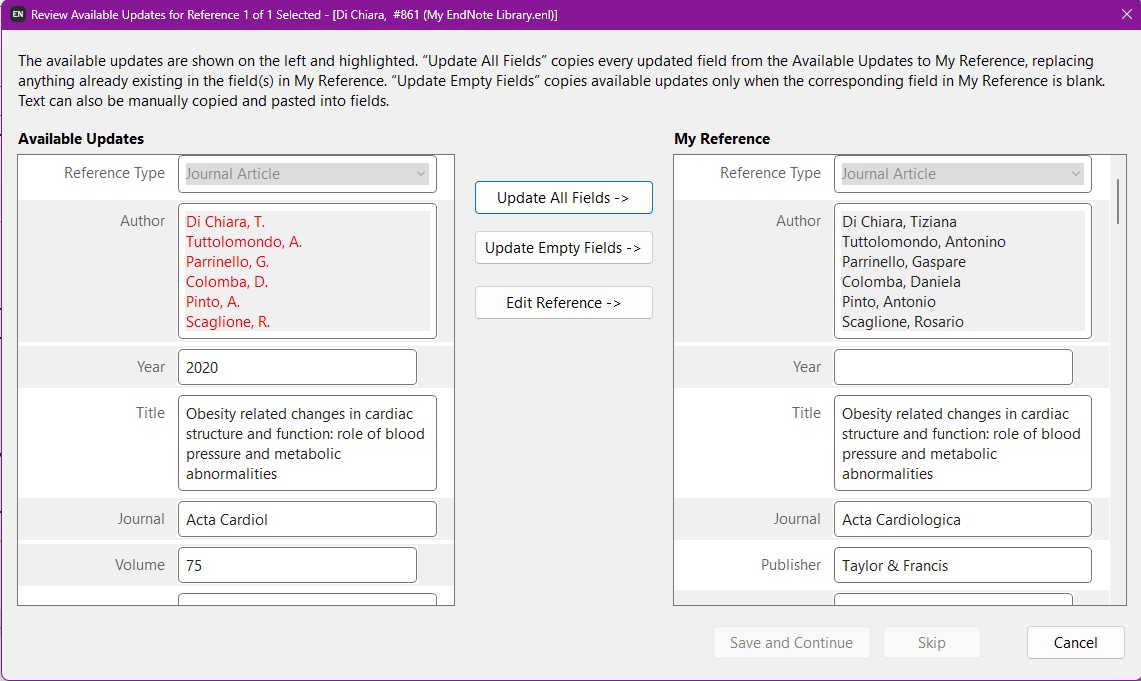
Find reference updates This feature checks if updated information is available for a reference. It is useful for PDFs without a DOI, records from Google Scholar or advanced publications/in-press articles.
- Select the reference in your library
- Right-click the reference or go to the References menu
- Choose Find Reference Updates If updates are found, EndNote will show a side-by-side comparison. You can choose to: Update All Fields, Update Empty Fields or Edit Reference.
Sharing a group or library
EndNote lets you share a group of references or an entire library with other EndNote online users.
Sharing a group
- Make sure your EndNote library is synced with your EndNote online account
- In EndNote, right-click on a group or go to the Groups menu and choose Share Group
- A Sharing Group window will appear. Type the email address (or addresses separated by commas) of the people you want to invite (they must also have a synced EndNote Online account)
- Choose the access level for each person: Read & Write or Read Only. You can add a message if you want
- Click Invite.
The people you invite will get an email. To see the shared group, they need to sync their library. The shared group will appear under Groups Shared by Others in the Groups panel. Clicking on it will open the group in EndNote Online.
Sharing a library
- Make sure your EndNote library is synced with your EndNote online account
- In EndNote, go to File and Share. A box will open where you can manage sharing settings
- Enter the email address of the person you want to share your library with (they must also have a synced EndNote Online account)
- Choose the access level for each person: Read & Write or Read Only. You can add a message if you want
- Click Invite.
Users can open a shared library in EndNote by going to File and Open Shared Library…
Important notes:
- If you have a Premium Subscription, you can share your library with more than 100 people. If your subscription ends, you can only share with up to 14 users
- If you want several people to view the library at the same time without making changes, you can set the library to Read-Only
- EndNote is not a network program. Only one person can edit the library at a time, unless it is set to Read-Only.
Work with long documents
Convert to unformatted citations When working with long documents in Microsoft Word, it is recommended to use unformatted citations. Formatted citations take longer to process because EndNote updates every citation each time a new reference is added. Unformatted citations also make it easier to copy and paste text without damaging the document.
To convert to unformatted citations
- In Microsoft Word, go to the Cite While You Write (CWYW) toolbar
- Click on Convert Citations and Bibliography (Windows) or Tools (Mac)
- Select Convert to Unformatted Citations.
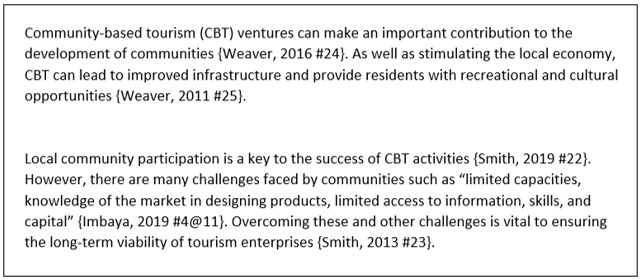
Your in-text citations will now look like this: {Author, year #record number} and the bibliography or reference list will disappear from the document.
To return to formatted citations and see your reference list again, click Update Citations and Bibliography in the CWYW toolbar.
Create chapter bibliographies
If your document has multiple sections or chapters, you can set EndNote to create a separate bibliography at the end of each section. You can also choose to include a full bibliography at the end of the document.
To modify the style:
- In EndNote, go to the Tools menu and select Output Styles
- Click Edit [your chosen style]
- In the left panel, click Sections
- Choose one of the following: Create a bibliography for each section or Create a bibliography for each section and a complete bibliography at the end of the document
- Click the X to close the window. You will be asked to save the changes. The new style will have Copy added to its name (e.g. APA 7th Copy)
- Click Save
- Select the modified style in the Bibliographic Output Style box and the Style box in the CWYW toolbar in Word.
You will now need to break your document into sections. To do this:
- In Word, click on the Page Layout tab and choose Breaks
- Under Section Breaks select Next Page each time you require a new section.
EndNote will now create a separate bibliography for each section based on your chosen settings.
Create a standalone bibliography
You can create a bibliography in Word using selected references from your EndNote library, without linking it to EndNote or inserting citations into the document.
- In EndNote, select the references you want to include in the bibliography
- Make sure your preferred referencing style is selected in the Bibliographic Output Styles box
- Go to the References menu and click Copy Formatted Reference
- Open your Word document and click Paste to insert the formatted bibliography.
Combine chapters from different documents
When working with multiple chapters or documents that include EndNote citations, follow these steps to combine them into one document with a single reference list.
- Open each Word document that contains EndNote citations
- In the CWYW toolbar, click Convert Citations and Bibliography (Windows) or Tools (Mac) and select Convert to Unformatted Citations. Your citations will now appear like this: {Author, year #Record number} and the reference list will disappear
- Open a new Word document
- Copy and paste each chapter into the new document in the correct order (e.g. Chapter 1, then Chapter 2, Chapter 3, etc.)
- In the CWYW toolbar of the new combined document, click Update Citations and Bibliography.
EndNote will format all in-text citations and create a single reference list at the end of the document.
Traveling Library
When you insert formatted EndNote citations into a Word document, invisible field codes are added. These contain the information needed to create in-text citations and reference list entries. This information is called the Traveling Library. If you open a Word document that includes EndNote citations not found in your library, the Traveling Library will be used to format the citations. You can also add these references to your EndNote library.
- Open the Word document that contains EndNote citations and go to the CWYW toolbar
- Click Export to EndNote, then select Export Traveling Library
- Choose the EndNote library you want to add the references to (each reference will be given a new record number when added)
- Once the references are in your library, click Update Citations and Bibliography to apply the changes in your Word document.
Important notes
- You can only export citations if they were originally inserted using EndNote
- You cannot export the Traveling Library if the Word document has been converted to plain text, because this removes the field codes.
</div>
Track changes
Using the Track Changes feature in Word while EndNote formatting is active can cause errors or crash your document.
To safely use Track Changes:
- Go to the Review tab in Word
- Find the Display for Review drop-down menu (located next to the Track Changes button)
- Change the setting to either Final or No Markup (depending on your version of Word).
This will help prevent issues while working with EndNote citations and formatting.
Hyperlink in-text citations in Word
EndNote allows you to automatically create clickable links between in-text citations and their matching reference list entries in your Word document.
- In the CWYW toolbar click on the small arrow in the right corner of the Bibliography section (Windows) or click on Configure Bibliography (Mac)
- In the Format Bibliography tab tick Link in-text citations to references in the bibliography. You can also choose to Underline linked in-text citations
- Click OK
Your in-text citations will now be linked to the reference list entries.
Note: If you save your document as a PDF the links will remain. If you convert your Word document to plain text, the links will be removed.
Using EndNote with other programs
CWYW add-in for Word Online & Google Docs
The EndNote Cite While You Write (CWYW) tool add-in lets you insert and format references and bibliographies in Word Online or Google Docs. To use the add-in, you first need to create an EndNote Web account in EndNote 21 or EndNote 2025 and sync to EndNote Web.
Word Online add-in
To install the add-in:
- Open Word Online
- Click on the Insert tab
- Select Add-ins and select Get Add-ins
- Search for EndNote
- Click Add next to EndNote Cite While You Write
- After installing, go to the EndNote tab in Word Online and click Sign In
- Enter your EndNote Web login details.
You will now be able to insert in-text citations and auto-generate a reference list
Important notes:
- You must be signed in to your EndNote Web account to use CWYW in Word Online
- The full range of referencing styles (including the Curtin styles) is not available via the CWYW add-in. If the style you require is not listed, you will need to use the desktop version of Word to access.
Google Docs add-in
To install the add-in:
- Open Google Docs
- Go to Extensions, select Add‑ons and Get add‑on
- Search for EndNote Cite While You Write
- Sign in to your Google account and grant access
- Review and accept the Terms & Conditions and privacy policy
- Click Allow, then Done
- In Google Docs, go to Extensions and click EndNote Cite While You Write to launch it
- Sign in to your EndNote Web account from within the sidebar.
You will now be able insert in-text citations and auto-generate a reference list in Google Docs. Multiple users can insert citations at the same time.
Important notes:
- Manual edits to the citations or bibliography will be removed when the CWYW tool reformats the document
- Copying or cutting full citations and pasting them elsewhere may break the citation link
- You will be able to see other users’ citations, but there is no way to track who added what. If two users edit the same citation simultaneously, the one who saves last will overwrite the other’s work
- The full range of referencing styles (including the Curtin styles) is not available via the CWYW add-in. If the style you require is not listed, you will need to use the desktop version of Word to access.
</div>
</div>
Apple Pages
EndNote provides a plug-in to use with the Apple Pages program. The following video from Clarivate explains how to use this:
Microsoft PowerPoint (Windows)
EndNote can be used to insert citations and create reference lists in PowerPoint presentations.
Important notes:
- EndNote does not work with PowerPoint on a Mac
- In-text citations and reference lists are added separately
- You must select your referencing style from the Bibliographic Output Style menu before inserting citations or references (changing the style later will not update existing citations)
- Citations and references added to PowerPoint are not linked to your EndNote library (they are added as plain text and can be edited directly in PowerPoint).

Insert in-text citations
- Place your cursor in the text box on the slide where you want to add the citation
- Click the Insert Citation icon in the CWYW toolbar
- Type keywords, author name, or other details in the search box and click Find
- Select the reference you want and click Insert
- To insert multiple references at once, highlight them in your EndNote library and click Insert Selected Citation(s) in PowerPoint.
Create a reference list
- Place your cursor in the text box on the slide where you want the reference list
- In EndNote, select all the references you want to include (hold down the Ctrl key and click each reference)
- In Word, click Insert Selected Reference(s) in the CWYW toolbar and the reference list will be added to your PowerPoint slide.
Important:
- Add all required references at the same time (references added later may not file correctly)
- References will not be in alphabetical or numerical order. You will need to sort them manually.
</div>
Troubleshoot issues
Error messages
If you see an error message while using EndNote, a Google search can help you find instructions to fix the problem. When searching, make sure you include: computer type (Windows or Mac), operating system (for example, Windows 11 or Mac Catalina), version of Microsoft Word and the exact error message you are receiving.
Software updates
If EndNote or the Cite While You Write (CWYW) toolbar in Word is not working properly, check for any software updates. Go to the Help menu (Windows) or EndNote menu (Mac) and click Check for Updates. Install any updates that are available. Then close and reopen both EndNote and Word. Restarting your computer may also help fix problems by applying system-wide updates.
EndNote support website
The EndNote Knowledge Base is a helpful website with answers to frequently asked questions. It includes instructions for solving common problems with EndNote.
Common issues with EndNote
Library syncing errors
Sync conflicts
Sometimes, when multiple users or devices edit the same reference in a shared or synced EndNote library, a sync conflict can occur where EndNote doesn’t know which version of the reference to keep.
To resolve conflicts:
- For EndNote 21 and earlier: Go to the Sync Conflicts group in your library, right-click on the group and select Resolve Sync Conflicts. For EndNote 2025: Click on Library Status and then Resolve Conflicts link
- A window will appear showing both versions of the reference. You can choose to: Keep Desktop Reference or Keep Online Reference. Note: the version that isn’t selected will be permanently deleted
- To resolve multiple conflicts: use the drop-down menu next to Skip and choose either: Keep All Desktop References or Keep All Online References.
Server.AuthenticationToken.invalidUserCredentials or Username / password specified is not valid
- Go to http://myendnoteweb.com and try logging in manually
- If login fails, click Forgot Password to reset it
- Open EndNote and go to Edit (Windows) or EndNote menu (Mac) and select Preferences
- Select Sync from the left panel
- Click “EndNote Default” at the bottom left, then click OK/Save
- Restart EndNote and reopen your library
- Go to the Library menu and select Sync
- Enter your EndNote online email and new password
- Attempt to sync your library. If successful, the error should be resolved.
Password expiration policy
Starting February 12, 2026, you will need to update your EndNote password every 180 days. If your password is older than this, you will be prompted to change it the next time you log in. If your password expires, the EndNote desktop app will continue working as usual. However, access to features like Syncing, Sharing, and other cloud services will stop until you update your password.
You will receive reminders when your password is about to expire.
To update your password:
- Go to the Forgot Password page
- After you confirm the email was sent, check your inbox (and your junk or spam folder) for the reset link
- Use that link to create a new password.
More information is available on the EndNote support website: Password policy change FAQs.
Field codes appearing in Microsoft Word instead of citations
If the in-text citations are not appearing correctly (e.g. displaying {ADDIN EN.JS.CITE} or long strings of code) and reference list entries are displaying with {HYPERLINK}, this means the display field codes setting in Word has been enabled.
To fix this:
- In Word, go to File and select Options
- Click Advanced
- Under Show document content, untick Show field codes instead of their values and click OK.
This should reinstate the correct formatting. If you are using track changes in the document, this may also cause issues with the field codes.

EndNote Online CWYW toolbar selected instead of desktop toolbar
When using EndNote with Microsoft Word, it is important to make sure you are using the correct Cite While You Write (CWYW) toolbar. Using the EndNote Online toolbar instead of the desktop version can cause problems when inserting citations and may limit your referencing style options. If the toolbar in Word is labelled “EndNote” without a version number (e.g. “EndNote 21” or “EndNote 2025”), this means you are using the online version of the toolbar.
To switch to the desktop version:
- In the CWYW toolbar, go to Preferences
- Select the Application tab
- Change Application: to EndNote.
Inserting footnote references in Word
If you are using a footnotes referencing style (such as AGLC or Chicago Notes & Bibliography), you need to insert the footnotes using the Word References tab.
To do this:
- Make sure the required style is selected in EndNote and the CWYW toolbar
- Place your cursor in the Word document where you want to add the citation
- Click on the References tab and Insert Footnote
- In the CWYW toolbar, click on Insert citation, and search for the required reference
- Click Insert
The reference will be added to the footnote and it will create a bibliography at the end of the document.
Word Online / Google Docs CWYW add-in errors
“EndNote failed to fetch data. Please try again” error in Word Online CWYW add-in
If you are experiencing problems with the EndNote CWYW panel, try clearing the local storage in your browser:
- Right-click on the CWYW panel in Word Online
- Select Inspect to open the developer tools. Depending on your browser: Chrome / Edge: Click on the Application tab or Firefox: Click on the Storage tab
- In the left sidebar, click on Local Storage
- Right-click (or Control-click on Mac) on each item listed and select Clear
- Restart your browser
- Reopen Word and try updating the citation again.
“Error while inserting citation” in Google Docs CWYW add-in
- Go to File and select New Document
- Try inserting citations in the new document
- If the new document works fine, copy the content from the original (problematic) document into the new one and try inserting a citation again. If it works, continue using the new document. You may need to reinsert citations manually
- If the new document shows the same error, clear your browser cache and cookies and then restart your browser and try again.
Find Full Text not working
The Library’s authentication system, OpenAthens, is not compatible with the Find Full Text feature in EndNote. You can try adding the suggested settings to your EndNote Preferences, but they are likely to provide only limited assistance in locating full-text articles.
- OpenURL path:
https://curtin.alma.exlibrisgroup.com/view/uresolver/61CUR_INST/openurl? - URL:
https://go.openathens.net/redirector/curtin.edu.au?url=
There are other options such as EndNote Click or automatic PDF importing that may be useful in accessing the full-text.
CWYW tools missing from Microsoft Word
Sometimes, the Cite While You Write (CWYW) toolbar might not appear in Microsoft Word. This can happen when you first install EndNote or after updating either EndNote or Word. In some cases, installing other referencing programs like Mendeley or Zotero can also cause the toolbar to disappear or stop working.
To fix this, visit the EndNote support website. It has detailed and searchable FAQs that explain how to install or restore the CWYW toolbar for both Windows and Mac computers. tools for both Windows and Macs.
Moving your library from cloud-syncing folders (iCloud, One Drive etc.)
It is important not to save your EndNote desktop library in cloud-syncing folders like iCloud, OneDrive, Dropbox, or Google Drive. Doing this can damage your library over time and cause errors. If your library is saved in a cloud folder, move both the .enl file and the .data folder to a location on your computer, such as your C: drive, desktop, or documents folder and open the library from that location.

For more details, check the EndNote support FAQ on their website.
Access to EndNote when you leave Curtin
To keep using your EndNote library after finishing your course, you have two options:
- Buy your own EndNote desktop licence, or
- Sign up for an EndNote Online account from the EndNote desktop software before you leave Curtin.
Before you leave Curtin:
- Log in to EndNote Online, click Options, then Email Address, and update it to your personal email
- Log in to EndNote Online from an authenticated IP address (on campus or using VPN). This will extend your premium access for one year from the date you log in. You can check your expiry date by going to Options > Subscription in EndNote Online.
After one year, your account will change to a Basic account, which has:
- Limited file storage (2GB)
- Fewer citation styles (21)
About UniSkills
UniSkills was created and is maintained by Curtin University Library. To report issues with UniSkills contact Library Help.
Twemoji icons by Twitter, Inc and other contributors, licensed under a CC-BY 4.0 licence.
Except where otherwise noted, UniSkills content in all it’s forms (website, PDFs etc) are licensed under a Creative Commons Attribution ShareAlike 4.0 International Licence. We ask that you attribute any use of the content as created by Curtin University Library with a link to the Library website.
This license does not extend to other Curtin University and Curtin University Library webpages, or to Curtin branding and trademarks. Curtin University’s copyright information is available on the Curtin website.