
EndNote-essentials-printable-guide-UniSkills.pdf
EndNote essentials
Table of Contents
Introduction
EndNote is a program that helps you manage references and create bibliographies (reference lists). You can use it to collect, organise, and store references, and to create formatted citations and reference lists in Microsoft Word.
This self-paced module will teach you the main features of the EndNote desktop software. You can go through it step-by-step, or if you already know how to use EndNote, you can skip to the section you need by using the tabs above.
What you will learn
In this module you will learn how to:
- Create an EndNote library
- Add references to your library and organise them using groups
- Choose a referencing output style
- Edit references to match the rules of your referencing style
- Attach PDFs to your references
- Insert and edit citations in Microsoft Word
- Save a backup copy of your EndNote library
- Fix common problems with the software Set up EndNote
Download the EndNote software
The EndNote desktop program is already installed on most computers at Curtin’s Australian campuses. If you are a Curtin student or staff member based in Australia, you can also download EndNote for free to use on your personal computer. To download EndNote:
- Students: Go to the My Library tab in Student OASIS
- Staff: Select the My Campus menu and Library services in the Staff Portal.
Make sure to choose the correct version for your operating system (Windows or Mac) when prompted.
If you have trouble downloading or installing EndNote, see Troubleshoot issues for some common problems and solutions.
Set up an EndNote library
After installing EndNote, you need to create a library to store your references. If you already have a library on your computer, it may open automatically. It is recommended that you only have one EndNote library.
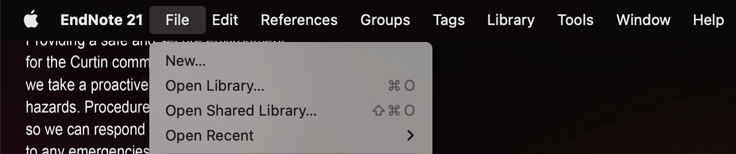
- Click Create a new library in the Set up EndNote Library box or go to File and select New (Note: on a Mac, a toolbar may appear at the top of your screen when you first open EndNote, but you will not see the full program until you have created a library)
- Enter a name for your EndNote library in the File Name field. The default name is My EndNote Library. If you are using a Mac, do not tick the Save as Package option
- Select a local folder on your computer to save your library in, such as your Desktop or Documents folder. Do not save to cloud folders like iCloud, Dropbox or OneDrive. These can corrupt your library over time. Saving to a network drive can also make EndNote run slowly
- Click Save and your library will now open in EndNote.
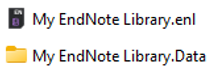
Important notes about your library files. Your EndNote library is made up of two parts:
- A file with the .enl extension (this is your library)
- A folder called .Data (this stores all of your references, attachments and settings)
These two files must stay in the same location and have the same name. If the .Data folder is deleted or moved away from the .enl file, your library will not work properly.
Navigate your EndNote Library
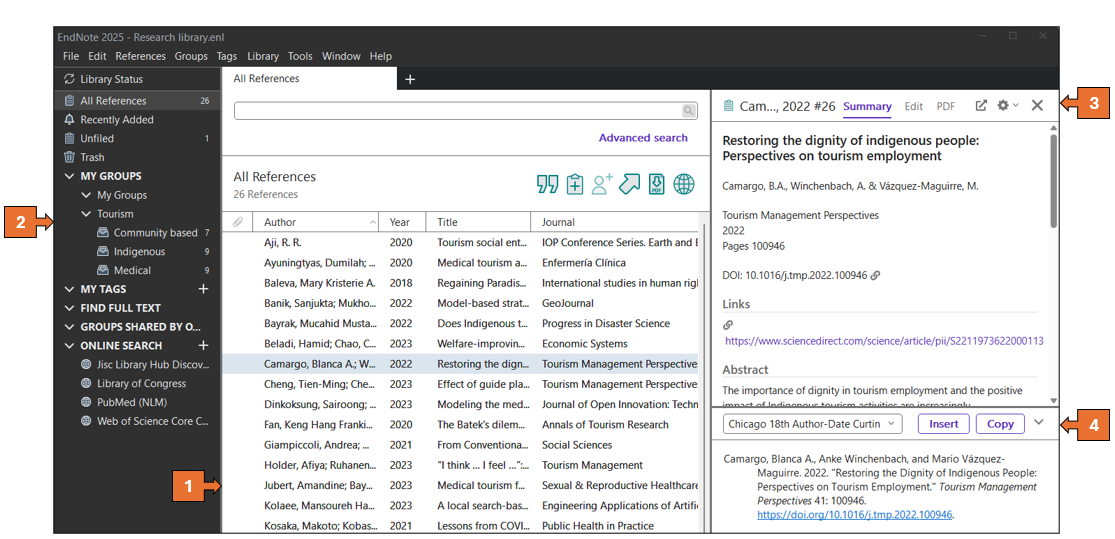
- The Reference panel shows all the references saved in your EndNote library
- The Groups panel displays the default groups and any groups or group sets you have created to organise your research
- The Tabs panel has three tabs: the Summary tab gives a quick overview of the reference you have selected; the Edit tab lets you change or update your reference details; and the PDF tab shows any files you have attached to the reference. Double-click on a reference to open the Tabs panel
- The Preview panel shows how your reference will look in the referencing style you have chosen. Add & organise references
Export references from databases
Most research databases let you export citation details straight into EndNote. This means you can quickly create references without typing them yourself. When you are searching in a database, look for options like: Export, Direct export, Export to reference manager, Send to Citation Manager, or Export to RIS. These terms indicate that the database can send citation information directly to EndNote.
Each database works a bit differently, so if you are not sure how to export your references, check the Help section in the database for instructions.
It is important to preview your references to make sure they are formatted correctly in the referencing style you have chosen. EndNote is not able to tell if any information is wrong or missing, so you should always compare your references with the referencing guide or style manual to make sure they are accurate.
</div>
Manually create references
Sometimes you will need to add references yourself, especially for sources that cannot be exported from a database—like printed books, reports, or websites.
- Click on the New Reference icon
 or go to the References menu and select New Reference
- Choose a Reference Type from the drop down list. The default is Journal Article. Check the guide below to see which type to use for the Curtin EndNote styles
- Fill in the details for your item in the relevant fields. You only need to complete the fields required for your chosen referencing style
- When you have entered all the required information, click Save (Windows), or click the red cross in the top left corner of the New Reference window (Mac).
- The reference will now be added to your library.
Filling in the Author field
When you enter author names in EndNote, follow these rules:
- Use the format: Last Name, First Name. Example: Smith, John J.
- Put each author on a new line
- For corporate authors (like organisations or government departments), add a comma at the end of the name. Example: Department of Health,
- Use correct capitalisation when typing author names.
Reference types to select and fields to populate
This short guide explains which reference types to choose and which fields to fill in when using the Curtin EndNote styles for: APA 7th, Chicago 18th Author-Date and Vancouver.
Important tips:
- Always check your references in EndNote against the referencing guide to make sure they are accurate.
- When adding a reference to EndNote, you only need to enter the basic information. Unless this guide says otherwise, do not add punctuation or formatting such as: colons, full stops, brackets, italics, or words like In, Retrieved from, ed., or Ed. EndNote will automatically add these when it formats your reference.
APA 7th reference types
- For print items, leave the DOI/URL field blank
- If the author and the Source/Publisher are the same, leave the Publisher field blank
- Some reference types may require manual changes - see Convert to Plain Text
| Reference type | EndNote fields | Notes |
|---|---|---|
|
Audiovisual Material Use for: TV series For a single episode from a series use Television Episode |
Author, Cast, Year, Title, Type, Publisher, URL | Cast field: Enter the contributors role |
|
Blog Use for: Blog post |
Author, Year, Date, Title of Entry, Title of WebLog, URL | |
|
Book Use for: Book |
Author, Year, Title, Edition, Publisher, DOI or URL | |
|
Book section Use for: Chapter in an edited book |
Author, Year, Title, Editor, Book Title, Edition, Pages, Publisher, DOI or URL | |
|
Case Use for: Case |
Case Name, Year Decided, Reporter Volume, Reporter Abbreviation, First Page, URL | |
|
Conference paper Use for: Conference paper |
Author, Year, Date, Title, Type, Conference Name, Conference Location, DOI or URL | Type field: Enter Paper presentation or Poster presentation |
|
Computer program Use for: Specific Gen-AI chat, Gen-AI tools |
Programmer, Year, Access Date, Title, Description, Publisher, URL | |
|
Dataset Use for: Dataset |
Investigators, Year, Title, Distributor, DOI or URL | |
|
Dictionary Use for: Online dictionary or encyclopedia entry For an entry in a print dictionary or encyclopedia use Book Section |
Author, Year, Title, Editor, Dictionary Title, Edition, Publisher, Access Date, URL | Access Date field: Enter in the format Month Day, Year |
|
Film or Broadcast Use for: Film or Video |
Director, Year Released, Title, Medium, Distributor, URL | Distributor field: Enter the production company. Separate multiple companies with a semi-colon and space |
|
Journal Article Use for: Journal article |
Author, Year, Title, Journal, Volume, Issue, Pages, DOI or URL | |
|
Journal Article Use for: Journal article with an article number |
Author, Year, Title, Journal, Volume, Issue, Article Number, DOI or URL | Do not populate the Pages field |
|
Journal Article Use for: Journal article - Advance online publication |
Author, Year, Title, Journal, Label, DOI or URL | Label field: Enter Advance online publication |
|
Legal Rule or Regulation Use for: United Nations Treaties or Conventions |
Title, Date of Code Edition, Year, URL | |
|
Music Use for: Single song or track |
Composer, Year, Title, Form of Item, Album Title, Publisher, URL | Form of Item field: Enter Song |
|
Newspaper Article Use for: Newspaper article |
Reporter, Year, Issue Date, Title, Newspaper, Pages, URL | For a print newspaper, include the page number in the Pages field |
|
Online Database Use for: AMH, MIMs, Martindale, UpToDate |
Author, Year, Title, Publisher, Date Accessed, URL | Date Accessed field: Enter in the format Month Day, Year |
|
Pamphlet Use for: Brochure, Fact sheet or Pamphlet |
Author, Year, Title, Type of Work, Publisher, URL | Type of Work field: Enter the format, e.g. Brochure |
|
Podcast Use for: Podcast episode For a whole podcast series use Audiovisual Material |
Author, Year, Title of Podcast, Number, Type, Title of Show, Publisher, URL | Type field: Enter Audio podcast episode |
|
Press Release Use for: Press release |
Author, Year, Date, Title, Type of Work, Publisher, URL | Type of Work field: Enter Press release |
|
Report Use for: Government or organisation report, Australian Curriculum |
Author, Year, Title, Report Number, Institution, DOI or URL | For Australian Curriculum, enter the version in the Report Number field |
|
Social Media Use for: Facebook, Instagram etc. |
Username, Handle, Year, Post Date, Post Text, Type of Work, Provider, URL | Enter capitalisation and spelling exactly as it appears in the post Original Post field: if needed, include the format |
|
Standard Use for: Standards |
Institution, Year, Title, Document Number, Publisher, URL | |
|
Statute Use for: Act of Parliament |
Name of Act, Code, Sections, URL | |
|
Television Episode Use for: TV series episode For a whole TV series use Audiovisual Material |
Producer, Year, Episode Title, Season, Episode No., Series Director, Title, Distributor, URL |
Producer field: Enter the writer and director Series Director field: Enter the executive producers Manually add the contributors roles |
|
Thesis Use for: Thesis |
Author, Year, Title, Degree, University, Place Published, URL |
Degree field: Enter Doctoral dissertation or Master’s thesis Place Published field: Enter the database name |
|
Web Page Use for: Webpage on a website |
Author, Year, Title, Publisher, URL | |
|
Web Page Use for: Webpage on a news website |
Author, Year, Date cited, Title, Publisher, URL | Date Cited field: Enter Month Day article was posted |
|
Web Page Use for: YouTube or streaming video |
Author, Year, Date cited, Title, Type of Medium, Publisher, URL |
Date Cited field: Enter Month Day video was posted Type of Medium field: Enter Video |
|
Web Page Use for: Lecture |
Author, Year, Title, Type of Medium, Publisher, URL | Type of Medium field: Enter the format, e.g. iLecture, PowerPoint Slides |
Chicago reference types
- For print items, leave the DOI/URL field blank
- Some reference types may require manual changes
| Reference type | EndNote fields | Notes |
|---|---|---|
|
Audiovisual Material Use for: YouTube or streaming video |
Author, Year, Title, Publisher, Format, Extent of Work, URL | Enter Video in the Format field Enter the running length time in the Extent of Work field |
|
Blog Use for: Blog post |
Author, Year, Date, Title of Entry, Title of WebLog, Description, URL | Enter the word blog in the Description field if it doesn’t appear in the blog name |
|
Book Use for: Book |
Author, Year, Title, Edition, Publisher, DOI or URL | Enter EPUB in the Type of Work field if the book was accessed in EPUB format |
|
Book section Use for: Chapter in an edited book |
Author, Year, Title, Book Title, Editor, Edition, Publisher, DOI or URL | Enter EPUB in the Label field if the book was accessed in EPUB format |
|
Case Use for: Case |
Case Name, Year Decided, Reporter Volume, Reporter Abbreviation, First Page, URL | |
|
Conference paper Use for: Conference paper |
Author, Year, Title, Conference Name, Conference Location, Date, DOI or URL | |
|
Dataset Use for: Dataset, Dataset created using a company database |
Investigators, Year, Title, Dataset(s), Original Release Date, DOI or URL | For a dataset from company database, enter Dataset in the Dataset(s) field and include an include an Access Date in the format Month Day, Year |
|
Film or Broadcast Use for: Film or Video |
Director, Year Released, Title, Distributor, Date released, Format, URL | Add the contributor’s role in the Cast field, e.g. Director |
|
Generic Use for: News broadcasts, Company and industry report created using a database, Company and industry profile from a database, Lecture |
Author, Year, Title, Secondary Title, Date, Type of Work, Publisher, DOI or URL | |
|
Journal Article Use for: Journal article, Journal article with an article number, Journal article - Advance online publication |
Author, Year, Title, Journal, Volume, Issue, Pages, DOI or URL | For Advance online publication, enter ahead of print in the Type of Article field |
|
Music Use for: Song or album |
Composer, Producer, Year, Title, Volume, Album Title, Format of Music, Publisher, URL |
Producer field: Enter creator’s role, e.g. vocalist, band For single song, enter track number in the Volume field |
|
Newspaper Article Use for: Newspaper article |
Reporter, Year, Issue Date, Title, Newspaper, Name of Database, URL | If there is no author, you will need to manually alter the reference to comply with Chicago requirements If there is no suitable URL, include the Name of Database instead |
|
Pamphlet Use for: Brochure, Fact sheet or Pamphlet |
Author, Year, Title, Publisher, URL | |
|
Podcast Use for: Podcast episode |
Author, Year, Title of Podcast, Version, Title of Show, Type, Publisher, Date, Type, Running Time, URL |
Type field: Enter podcast Enter Author’s role in Narrator field, e.g. host |
|
Press Release Use for: Press release |
Author, Year, Date, Title, Type of Work, Date, URL | Type of Work field: Enter type of release e.g., Media release, Press release |
|
Report Use for: Government or organisation report, Annual report |
Author, Year, Title, Report Number, Institution, DOI or URL | |
|
Social Media Use for: Facebook, Instagram etc. |
Username, Handle, Year, Post Text, Provider, Post Date, URL | You will need to manually alter the capitalisation used in the post text to comply with Chicago requirements |
|
Standard Use for: Standards |
Institution, Year, Title, Document Number, Publisher, URL | |
|
Statute Use for: Act of Parliament |
Name of Act, Code, Sections, URL | |
|
Television Episode Use for: TV series episode |
Producer, Year, Episode Title, Season, Episode No., Title, Broadcast Date, Access Date, Network Name, URL | |
|
Thesis Use for: Thesis |
Author, Year, Title, Thesis Type, University, URL |
Thesis Type field: Enter Master’s thesis or PhD diss. For a thesis retrieved from a commercial database, enter the Database in the Name of Database and any identification number in the Document Number field. |
|
Web Page Use for: Webpage on a website |
Author, Year, Title, Publisher, Access Date, URL | If there is no date, enter n.d. in the Year field and include Access Date in the format Month Day, Year |
Vancouver reference types
- Enter access dates in the format Month Day, Year
- For print items, leave the DOI/URL and Access Date fields blank
| Reference type | EndNote fields | Notes |
|---|---|---|
|
Audiovisual Material Use for: YouTube or streaming video |
Author, Title, Type, Date, Year, Access Date, URL | Type field: Enter source name |
|
Blog Use for: Blog post |
Author, Title of Entry, Title of WebLog, Date, Year, Access Date, URL | |
|
Book Use for: Entire book |
Author, Title, Edition, Publisher, Year, Access Date, DOI or URL | |
|
Book section Use for: Chapter in an edited book |
Author, Title, Editor, Book Title, Edition, Publisher, Year, Pages, Access Date, DOI or URL | |
|
Case Use for: Case |
Case Name, Year Decided, Reporter Volume, Reporter Abbreviation, First Page | |
|
Conference paper Use for: Conference paper or poster |
Author, Title, Type, Conference Name, Date, Year, Conference Location, Access Date, DOI or URL | Type field: Enter the type of presentation, e.g. Paper, Poster |
|
Journal Article Use for: Journal article, Journal article with an article number, Cochrane systematic review |
Author, Title, Journal, Year, Volume, Issue, Pages, DOI or URL | Enter article numbers in the Pages field For Cochrane, enter Cochrane Database Syst Rev in the Journal field |
|
Journal Article Use for: Journal article - Advance online publication |
Author, Title, Journal, Original Publication, DOI or URL | Original Publication field: Enter Published online and the date |
|
Journal Article Use for: Journal article published in a supplement |
Author, Title, Journal, Year, Volume, Issue, Part/Supplement, Pages, DOI or URL | Part/Supplement field: Enter suppl and the supplement number or letter |
|
Newspaper Article Use for: Newspaper article |
Reporter, Title, Newspaper, Issue Date, Year, Section, Pages, Access Date, URL | |
|
Podcast Use for: Podcast episode |
Author, Title of Show, Title of Podcast, Date, Year, Access Date, URL | |
|
Report Use for: Government or organisation report |
Author, Title, Institution, Year, Report Number, Access Date, DOI or URL | |
|
Social Media Use for: Facebook, Instagram etc. |
Username, Post Text, Post Date, Year, Access Date, URL | Post Date field: Enter Month and day |
|
Statute Use for: Act of Parliament |
Name of Act, Code, Access Date, URL | |
|
Thesis Use for: Thesis |
Author, Title, Thesis Type, University, Year, Access Date, URL | Thesis Type field: Enter Dissertation or Master’s thesis |
|
Web Page Use for: Webpage on a website, Online reference works (AMH, Martindale, MIMs, UpToDate) |
Author, Title, Publisher, Dated Cited, Year, Last Update Date, Access Date, Access Year, URL | Publisher field: Enter name of website |
Organise references into groups
When you add new references to your EndNote library, they will first appear in the Unfiled group in the Groups panel. You can create your own groups to organise your references for different assessments or projects.
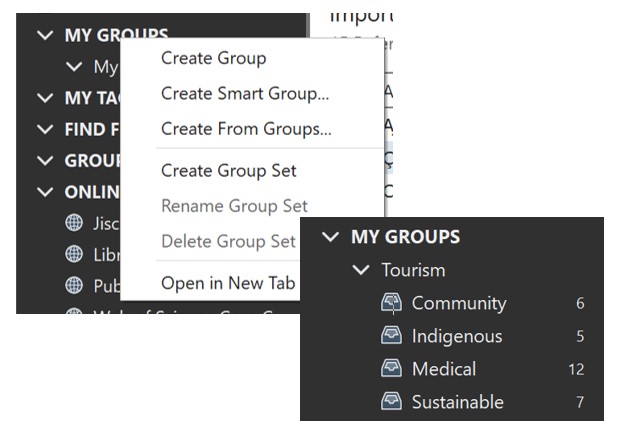
- Click Groups in the menu bar and choose Create Group, or right-click on My Groups in the Groups panel and choose Create Group
- Type a name for your group and press Enter
- To add references to your group, highlight the references and drag and drop them into the group, or right-click on a reference, choose Add References To, and select the group.
A Group Set helps you organise related groups within your EndNote library.
- Click Groups in the menu bar, or right-click on My Groups in the Groups panel and choose Create Group Set
- Type a name for the Group Set and press Enter
- You can right-click on the Group Set and choose Create Group to add a new group, or drag and drop existing groups into the Group Set.
Add tags
The Tags feature in EndNote lets you create custom labels to help organise your references.
- Click Tags in the menu bar and choose Create Tag…
- Type a name for your tag, choose a colour, and click Create Tag
- Select the reference you want to tag, then click Manage Tags in the Summary tab
- Choose the tag (or tags) you want to apply and click OK
- Tagged references will appear under My Tags in the Groups panel. Select a style
EndNote can format your in-text citations and reference list in a selected referencing style. When you download EndNote, it includes hundreds of referencing styles, including Curtin-specific styles for APA, Chicago Author-Date, and Vancouver.
Important note
EndNote will format your references based on the style you select. However, it does not recognise if any information is incorrect or missing. It is strongly recommended that you learn the rules of your referencing style and check your citations and reference list entries against the referencing guide or style manual. This will help you make sure your references are accurate and consistent. </div>
Select a style
- Highlight a reference in your library and click the arrow to expand the Preview panel under the Summary tab
- Click the Bibliographic Output Style box. The default style will be Annotated. A short list of styles will appear
- To find more styles, click Select Another Style… from the menu
- A Choose A Style box will open with a longer list of referencing styles
- Type the name of the style you need into the Quick Search box and press Enter
- Highlight the style you want to use, then click Choose
- Your reference will now appear in the style you selected.
Once you have chosen a style from the expanded list, it will be added to the Bibliographic Output Style drop-down menu for easy access.
Curtin EndNote styles
Curtin provides custom EndNote styles that match our referencing guides for APA 7th, Chicago 18th Author-Date and Vancouver. These styles are usually included in the Select A Style menu in EndNote. If they do not appear, you can download the files:

Installation instructions
Windows:
- Click on the style file to download it
- Select Open or Download (depending on the browser you are using). The style will open in EndNote
- Go to File and Save As, remove the word “Copy” and click Save
- Close the style file. It will now appear in your Select Another Style menu.
Mac:
- Click on the style file style and locate it in your Downloads folder
- Drag the style file into your Styles folder: Applications > EndNote > Styles
- It will now appear in your Select Another Style menu.
Abbreviate journal names (Vancouver)
Some referencing styles, such as Vancouver, require journal names to be written in abbreviated form. For example, New England Journal of Medicine becomes N Engl J Med. EndNote allows you to import a terms list so that journal names are automatically abbreviated.
Import a journal terms list
- Click on the Library menu, then select Open Term Lists and choose Journals Term List
- If there are already journal names listed under the Terms tab, highlight them and click Delete Term
- Click on the Lists tab, highlight Journals, and then click Import List…
- A folder called Terms List should open automatically. If it does not, go to: Windows: C:\Program Files (x86)\EndNote 2025\Terms Lists or Mac: Applications\EndNote 2025\Terms
- If you are using the Vancouver style, select the file named Medical.txt, then click Open. The list of journal abbreviations will be added
- Close the Terms List window
- Go to the Tools menu, select Output Styles, and click Edit “Vancouver Curtin”
- In the style editor, click on Journal Names and make sure the following options are selected: Abbreviation 2 and Abbreviate journal articles only
- Click File, then select Save As. Give the style a new name, such as Vancouver Curtin abbreviated.
- Click Save. This new style will now appear in your Select Another Style menu.
Preview and edit references
It is important to preview your references to make sure they are correctly formatted in the referencing style you have selected.
- Select the reference in your library, then click the arrow to open the Preview panel under the Summary tab
- To make changes, click on the Edit tab in the Tabs panel
- Click into the field you want to update and enter the correct information
- Click Save.
Change case
Some reference styles, like APA, show the title exactly as it is entered in EndNote. If the title has the wrong capitalisation, you need to fix it to match the style rules. A quick way to do this is:
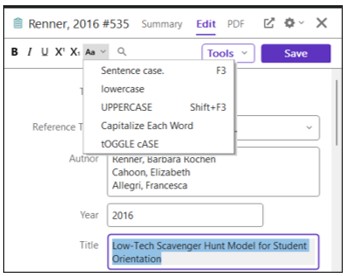
- Highlight the title in the reference
- Select the Change Case dropdown menu (Aa button) at the top of the Edit tab
- Click on the correct option (for example, Sentence case)
- Then click Save in the record.
Note: EndNote cannot tell if words are proper names and should be capitalised. You may need to fix these manually.
Change capitalisation for acronyms, abbreviations, etc.
Some referencing styles (for example, Chicago Author-Date) may change the capitalisation in titles. This can affect how acronyms, abbreviations or formulas display. For example, DNA may appear as dna or Dna. To fix this:
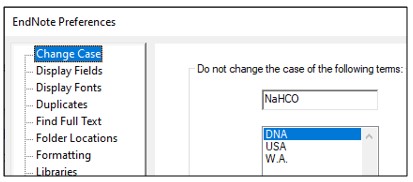
- Select the Edit menu (Windows) or EndNote (Mac) and click on Preferences
- Select Change Case
- Type the term with correct capitalisation (e.g. DNA) and click Add
- Click Apply and OK. Attach PDFs
Add attachments EndNote allows you to add files such as PDFs and Word documents to your references. This is a helpful way to keep your research organised in one place.
- Download and save the PDF to your computer
- Highlight the reference in your EndNote library
- In the Tabs panel, select the PDF tab
- Click Attach PDF
- Find the file on your computer, select the PDF, and click Open
- The PDF will appear in the PDF tab. If you click on another reference, EndNote will ask if you want to save the changes
- Click Yes. The PDF will now be attached to the reference
View, annotate and summarise PDFs
EndNote allows you to highlight text and add notes to your PDFs.
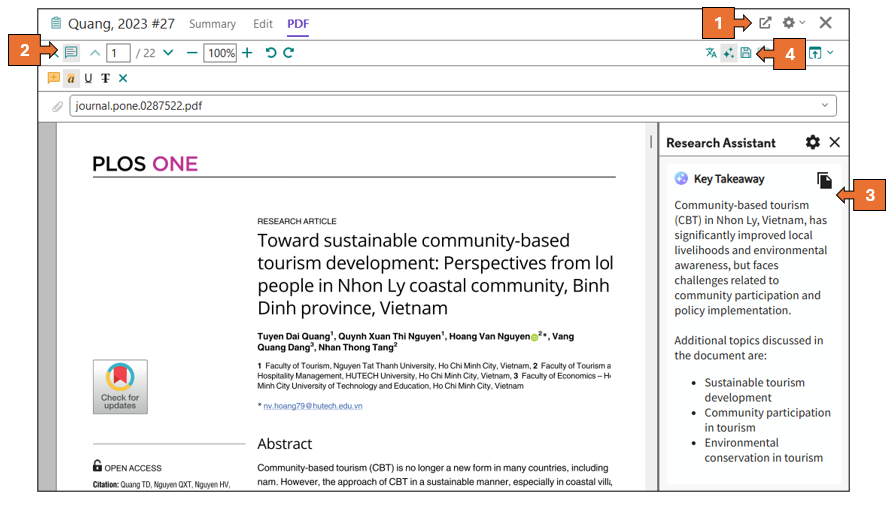
- You can view the PDF in the PDF tab, or open it in a separate window by clicking the Open PDF icon
- Click the Markup/Annotation icon to choose options such as: Highlight selected text and Add a sticky note
- Research Assistant uses generative AI to create a short summary of the key points in the PDF (EndNote 2025 only)
- Click the Save icon to save any changes you make to the PDF.
EndNote Click
EndNote Click is a browser plugin that helps you find full-text PDF journal articles from subscription and open access sources. You can also export these articles to your EndNote library. EndNote Click is available for Chrome, Firefox, and Edge.
To use EndNote Click, you need to register for an register for an EndNote Click account. Follow the prompts to create an account and when asked for your institution, enter Curtin University.
-
Introducing EndNote Click (EndNote Training YouTube video, 30mins)
-
EndNote Click: Capturing from PubMed [PDF, 757kB] Work with Microsoft Word
Cite While You Write (CWYW) toolbar
The Cite While You Write (CWYW) feature in EndNote allows you to insert references from your EndNote library directly into your Microsoft Word document. It also formats your in-text citations and reference list using the referencing style you have selected. Open your Word document and click on the EndNote tab in the Word ribbon to open the CWYW toolbar. Click the drop-down arrow in the Style: box to choose your referencing style. The style you select should match the one you are using in EndNote.

Insert citations
You can insert references from your EndNote library into your Word document using the Cite While You Write (CWYW) toolbar. This will automatically create an in-text citation and a matching entry in your reference list.
To insert from EndNote:
- Place the cursor where you want to insert the citation in your Word document
- Click Go to EndNote in the CWYW toolbar
- In EndNote, highlight the reference or references you want to insert
- Click the Insert Citation icon
 (quotation mark button) in the toolbar
 - Your Word document will now show the in-text citation and a reference list entry.
To insert from Word:
- Place the cursor where you want to insert the citation in your text
- Click the Insert Citation icon in the CWYW toolbar. An EndNote 2025 Find & Insert My References box will appear
- Type keywords, author name, or other details into the search box, then click Find
- Select the reference you want to use and click Insert.
Edit in-text citations
If you need to make changes to in-text citations, you should use the Edit & Manage Citation(s) function in the Cite While You Write (CWYW) toolbar in Word. If you need to change details in a reference list entry, you must do this in your EndNote library.
- Select the citation in your Word document. It will be highlighted in grey
- Click Edit & Manage Citation(s) in the CWYW toolbar
- Under the Formatting drop-down menu, you can exclude the author or year from the citation or display the citation as Author (Year)
- To add page numbers (if required by your referencing style), type the page number in the Pages field. If this does not work for your style, enter the page number in the Suffix box instead, for example: p. 25
- To add a prefix, type the word or phrase in the Prefix box followed by a space. Example: (see further details in Smith, 2017)
- Once you have made all necessary changes, click OK.
Want to abbreviate organisation names in-text? Watch Abbreviating organisation names in-text for APA to find out how.
</div>
Remove citations from your document
While EndNote formatting is active, you should not manually delete citations from your Word document. This can leave behind invisible field codes that may affect formatting or cause the citation to reappear when you reopen the document.
To safely remove a citation:
- Click Edit & Manage Citation(s) in the CWYW toolbar
- Select Edit Reference, then choose Remove Citation
- Click OK.
Convert document to plain text
It is recommended that you convert your final document to plain text before submitting it for assessment or publication. This creates a second copy of your document that is not linked to your EndNote library. Converting to plain text also allows you to make manual changes to your references if needed.
Important note
If your Word document is saved in a cloud syncing folder (such as OneDrive, GoogleDrive etc.), EndNote will not automatically create a second copy of the document. You need to save a copy yourself before converting to plain text.
</div>
- In the CWYW toolbar click Convert Citations and Bibliography (Windows) or Tools (Mac) and select Convert to Plain Text
- A new unsaved document will open. This version will have no field codes and will not be linked to EndNote
- Save this new document with a different file name. Your original document will remain unchanged and will still be linked to EndNote.
It is important to keep the original EndNote-linked document in case you need to make changes later. EndNote citations cannot be reactivated from a plain text copy.
Configure bibliography
The Configure Bibliography function in EndNote allows you to change how your reference list looks in your Word document. You can adjust the font, font size, line spacing, and add a title to your reference list.
- In the CWYW toolbar, click on the small arrow in the bottom right corner of the Bibliography section (Windows) or click on Configure Bibliography (Mac)
- Select the Layout tab
- Use the options to change the font, font size, line spacing, and add a title for your reference list (for example, References)
- Click OK to apply the changes to your Word document.
Save your library
Saving and backing up your EndNote library
EndNote automatically saves references as you add them to your library, so you do not need to save the library each time you close the program. However, it is a good idea to create a backup copy of your library in a separate location, such as a USB drive. This helps protect your work in case something goes wrong with the program or your computer.
Important: Do not use the “Save a Copy” option in EndNote. This can cause problems by creating multiple libraries and data folders.
</div>
Save a compressed backup library
- Go to the File menu and select Compressed Library (.enlx)
- In the box that appears, choose either: Create or Create & Email
- Choose whether to include: With File Attachments or Without File Attachments
- Click Next (Windows) or OK (Mac), then save the file to your chosen location
- If you selected Create & Email, your default email program will open with the compressed library file attached
- When you open the saved .enlx file, it will automatically split into a .enl library file and a .Data folder.
Sync your library across devices
If you use multiple computers (for example, at home, work, or university), you can use Library Syncing to keep your EndNote library up to date across all devices and your EndNote Online account. To learn how to set up syncing, see the Library syncing section in the EndNote Extras Guide. Troubleshoot issues
Error messages
If you see an error message while using EndNote, a Google search can help you find instructions to fix the problem. When searching, make sure you include: computer type (Windows or Mac), operating system (for example, Windows 11 or Mac Catalina), version of Microsoft Word and the exact error message you are receiving.
Software updates
If EndNote or the Cite While You Write (CWYW) toolbar in Word is not working properly, check for any software updates. Go to the Help menu (Windows) or EndNote menu (Mac) and click Check for Updates. Install any updates that are available. Then close and reopen both EndNote and Word. Restarting your computer may also help fix problems by applying system-wide updates.
EndNote support website
The EndNote Knowledge Base is a helpful website with answers to frequently asked questions. It includes instructions for solving common problems with EndNote.
Common issues with EndNote
Downloading and installing EndNote
-
Browser issues - If you are using Google Chrome and have trouble accessing the EndNote download in Student OASIS or the Staff Portal, try using a different browser such as Microsoft Edge, Firefox, or Safari.
-
Product key problems - If you see a message asking for a product key or saying you have started a 30-day trial, something went wrong during the download. You will need to uninstall EndNote from your computer (if you are using a Mac, make sure you empty the trash to delete it completely) and download EndNote again, preferably using a different browser. This helps avoid downloading a cached version with the same problem.
-
Security settings - Your computer’s security settings might block the installation of EndNote. If this happens, search online using the exact error message and include details about your computer, such as the operating system (e.g. Windows 11, Mac Catalina). Follow the instructions you find to fix the issue. You can also check related FAQs: EndNote cannot be opened on a Mac or Security settings in Windows preventing download.
-
Access outside of Australia - The EndNote download is only available to Curtin students and staff based in Australia. If you are studying at an international Curtin campus, contact your campus library for options. If you are in Australia but cannot download EndNote, make sure you turn off any VPNs or location-masking programs during installation. If you are studying through Curtin Australia but are located overseas, you will not be able to download the software.
EndNote cannot be opened on a Mac
When you open EndNote for the first time, a toolbar will appear across the top of your screen. The full program will not open until you have created an EndNote library.
MacOS Security settings
Most Mac computers have security settings that may stop you from opening or running EndNote. By default, macOS only allows apps downloaded from the Apple App Store.
Allowing Apps from outside Apple Store
- Click the Apple menu and choose System Preferences
- Select Security & Privacy
- Choose the option App Store and identified developers
- Your Mac should now show an Open button when you try to install software from the internet.
EndNote cannot be opened because Apple cannot check it for malicious software
- Click the Apple menu and choose System Preferences
- Select Security & Privacy
- Click Open Anyway.
EndNote cannot be downloaded because it is from an unidentified developer
- Open Finder
- Go to your Downloads folder and find the EndNote installer
- Right-click on the installer. If you cannot right-click, hold down the Control (CTRL) key and click
- Select Open
- If a new window appears, right-click again and select Open
- You will see a message: “EndNote.pkg is an app downloaded from the internet. Are you sure you want to open it?” Click Open
- Your Mac will now remember EndNote as a trusted app and allow you to open it normally after installation.
Security settings in Windows preventing download
The security settings on a Windows computer may stop you from downloading apps that are not recognised. To allow the EndNote download, you may need to temporarily change your settings.
- Search for Windows Security in the Start menu
- Click on App & Browser Control, then select the link for Reputation-based protection settings
- On Windows 11, turn off SmartScreen for Microsoft Edge
- Download EndNote
- Immediately restore your security settings after the download is complete.
RIS export files not opening in EndNote (Windows)
Sometimes when you export a .ris file from a database, it may open in another program like Notepad or Word instead of EndNote. If this happens, you need to link the .ris file type to EndNote so it opens correctly.
- Find the .ris file on your computer (usually in your Downloads folder)
- Right-click on the file and select Open with… then Choose another app
- Click on Choose an App on your PC, then select EndNote from the list
- Tick the box that says Always use this app to open .ris files, then click OK. From now on, .ris files should open directly in EndNote.
EndNote prompting you to select an import filter
When you export references from some sources, such as the Curtin Library catalogue, you may be asked to choose an import filter. Import filters help EndNote understand and correctly format the data from the source.
- EndNote includes many filters already. When asked to select one, look for the name of the database in the list
- If the filter you need is not listed, you can download more from the EndNote website
- If you are unsure which filter to use, a quick Google search using the name of the database and “EndNote import filter” will often help you find the correct one
- When exporting from the Curtin Library catalogue, select the RefMan RIS filter.
Corporate/organisation authors not displaying correctly
If a corporate or organisational author is not showing correctly in your reference (for example, appearing as Health, D. o. instead of Department of Health), you need to add a comma at the end of the name in the EndNote record.
Example: Department of Health,
If there is no comma, EndNote assumes the author is a person, and it will display the name in inverted format (Last name, First name).
Find full text not working
The library authentication system, OpenAthens, is not compatible with the Find Full Text feature in EndNote. You can try adding the suggested settings to your EndNote Preferences, but they are likely to provide only limited assistance in locating full-text articles.
- OpenURL path:
https://curtin.alma.exlibrisgroup.com/view/uresolver/61CUR_INST/openurl? - URL:
https://go.openathens.net/redirector/curtin.edu.au?url=
There are other options such as EndNote Click or automatic PDF importing that may be useful in accessing the full text.
EndNote error when inserting references into Word
If you see an error message in EndNote when trying to insert citations, it could be caused by a few different things. Try the steps below to fix it:
Check where your EndNote library is saved
If your EndNote library is saved in a cloud folder (like OneDrive, Google Drive, or iCloud), move both the .enl file and the .data folder to a location on your computer, such as your C: drive, desktop, or documents folder.
Update EndNote
Make sure you are using the latest version of EndNote. Install any updates, then close and re-open both EndNote and Word.
Specify which library to open
- In EndNote, go to the Edit menu and click Preferences
- Select the Libraries tab
- Change the setting for When EndNote starts to Open the specified libraries
- Add your library to the list under Libraries
- Click Apply, then OK.
Reset folder settings
- In EndNote, go to the Edit menu and click Preferences
- Select Folder Locations and click EndNote Defaults
- Click Yes
- Click Apply, then OK.
The EndNote support website also has further solutions that may help.
EndNote toolbar missing from Microsoft Word
Sometimes, the Cite While You Write (CWYW) toolbar might not appear in Microsoft Word. This can happen when you first install EndNote or after updating either EndNote or Word. In some cases, installing other referencing programs like Mendeley or Zotero can also cause the toolbar to disappear or stop working.
To fix this, visit the EndNote support website. It has detailed and searchable FAQs that explain how to install or restore the CWYW toolbar for both Windows and Mac computers.
In-text citations showing curly brackets and missing reference list
If your in-text citations are displaying in curly brackets: {Smith, 2017 #10}, and your reference list has disappeared from your Word document, it means instant formatting is turned off.
To turn it back on:
- Go to the Cite While You Write (CWYW) toolbar in Word
- Click Update Citations and Bibliography.
Tip for long documents:
If you are working on a long document with lots of references, it is a good idea to turn off instant formatting while writing. This helps Word run faster because EndNote will not update every citation each time you add a new one. It also makes it easier to cut and paste text without causing problems in your document.
Author initials showing in in-text citations
Sometimes EndNote will show the author’s initials or first names in your in-text citations, instead of just the family name. This can happen due to how the references are entered or formatted. To learn how to fix this, watch Author initials appearing in in-text citations:
Moving your library from cloud-syncing folders (iCloud, One Drive etc.)
It is important not to save your EndNote desktop library in cloud-syncing folders like iCloud, OneDrive, Dropbox, or Google Drive. Doing this can damage your library over time and cause errors. If your library is saved in a cloud folder, move both the .enl file and the .data folder to a location on your computer, such as your C: drive, desktop, or documents folder and open the library from that location.

For more details, check the EndNote support FAQ on their website.
Can I access EndNote when I leave Curtin?
To keep using your EndNote library after finishing your course, you have two options:
- Buy your own EndNote desktop licence, or
- Sign up for an EndNote Online account from the EndNote desktop software before you leave Curtin.
Before you leave Curtin:
- Log in to EndNote Online, click Options, then Email Address, and update it to your personal email
- Log in to EndNote Online from an authenticated IP address (on campus or using VPN). This will extend your premium access for one year from the date you log in. You can check your expiry date by going to Options > Subscription in EndNote Online.
After one year, your account will change to a Basic account, which has:
- Limited file storage (2GB)
- Fewer citation styles (21)
About UniSkills
UniSkills was created and is maintained by Curtin University Library. To report issues with UniSkills contact Library Help.
Twemoji icons by Twitter, Inc and other contributors, licensed under a CC-BY 4.0 licence.
Except where otherwise noted, UniSkills content in all it’s forms (website, PDFs etc) are licensed under a Creative Commons Attribution ShareAlike 4.0 International Licence. We ask that you attribute any use of the content as created by Curtin University Library with a link to the Library website.
This license does not extend to other Curtin University and Curtin University Library webpages, or to Curtin branding and trademarks. Curtin University’s copyright information is available on the Curtin website.